A large selection of master classes with a detailed description of knitting hats for boys of all ages.
The content of the article
- Simple light hat for a boy with knitting needles and a scarf: a scheme with a description
- Video: Calculation of loops when knitting hats. Knitting for beginners #Happy_Codelier
- Winter hat with knitting needles for a boy: Scheme
- Hat helmet for a boy with knitting needles with a detailed description
- Video: children's hat-shuttle knitting needles
- Baby hat with ears of knitting needles for a boy: Scheme
- Children's hat-mignon for a boy with knitting needles: a scheme with a description
- Video: hat for a boy Mignon Crochet
- Children's hat earflaps with knitting needles for a boy: a scheme with a description
- Video: knitting with knitting needles. We knit a hat-ear. Part 1. Knit Hat with Earflaps. Part 1.
- Video: knitting with knitting needles. We knit a hat-ear. Part 2. Knit Hat with Earflaps. Part 2.
- Video: knitting with knitting needles. We knit a hat-ear. Part 3. Knit Hat with Earflaps. Part 3.
- Hat helmet of a tanker for a boy with knitting needles: a scheme with a description
- Hat for a boy in spring and autumn knitting needles: diagram, description
- Hat for a boy of a teenager with knitting needles: a description scheme
- Video: Men's cap with a chess pattern. Men’s Hats Knitting
- Hat stocking for a boy with knitting needles: a scheme with a description. Bino hat for a boy with knitting needles: knitting pattern
- Video: knitting with knitting needles. Bini cap
Table of compliance of the age, volume of the child’s head, height and diameter of the bottom of the cap.
|
Age |
Facial of the head, cm | Hat height, cm |
Diameter bottom/tops, cm |
| 0-3 months | 35-40 | 13 | 9 |
| 3-6 months | 42-44 | 14 | 10 |
| 6-12 months | 44-46 | 15,5 | 12 |
| 1-2 years | 46-48 | 18 | 13,5 |
| 2-3 years | 48-50 | ||
| 3-4 years | 50-52 | 19 | 14,5 |
| 4-5 years | 52-54 | ||
| 5-8 years | 54-56 | 19,5 | 15,5 |
| 8-10 years | 56-58 | 21,5 | 16,5 |
| 10+ | 58-60 | ||
|
16+ (Little adult) |
22 | 17 | |
| average adult | 23 | 18 |
Important: the table contains averaged values. More accurately the diameter of the bottom /top of the cap can be determined by the formula: OG /3.14, where the OG is the head of the head to see the depth of the product depends on the model and individual preferences.
Simple light hat for a boy with knitting needles and a scarf: a scheme with a description
In this part of the article, two simple hats connected by two different techniques are offered to your attention: from above (from the crown) and below (from the gum). Having learned to knit these basic models, you can realize the most complex ideas.
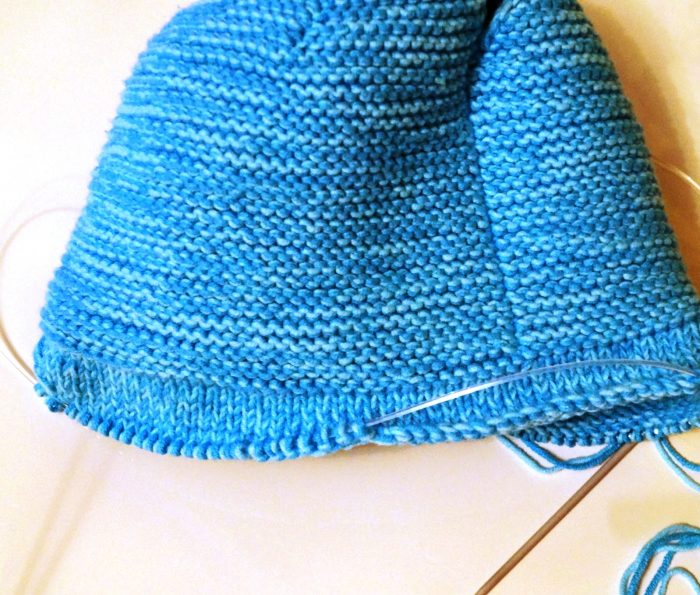
Simple light hat for a boy with knitting needles (knitting from the crown)
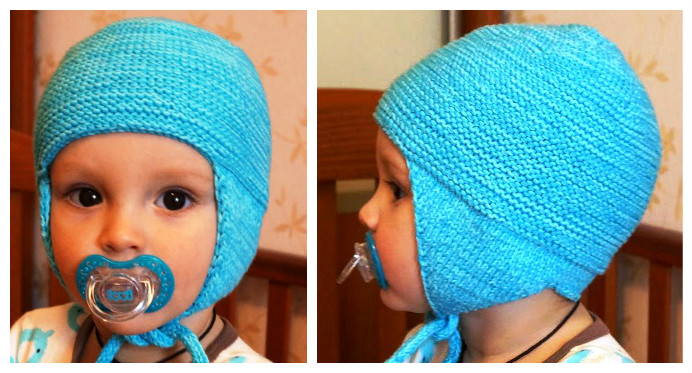
Simple light hat for a boy with knitting needles
Cap size / head of the head, cm: 48
Important: if you knit a larger product, increase the diameter of the bottom/crown to the necessary (see table at the beginning of the article).
You will need to work:
• yarn, blue color. Composition: 100% wool. Weight - 100 g, meter - 140 m. For work, you will need a thread in two additions
• Circular knitting needles #4.5
Abbreviations that are used in the description:
KP - brown loop
IP - wrong loop
ISP - wrongly crossed loop (see photo below)
LP - front loop
LSP - facial crossed loop (see photo below)
N - cloak
Kr - circular row
Pr - turning row
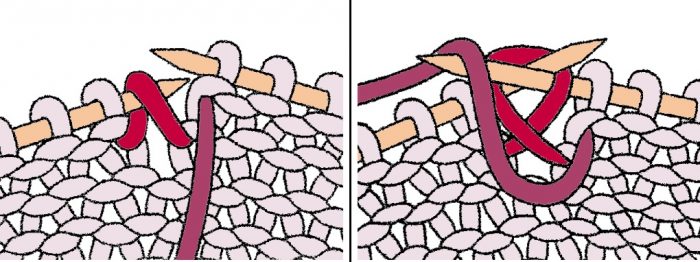
How to knit a fraternal cloth crossed loop
How to knit a crochet with a front loop
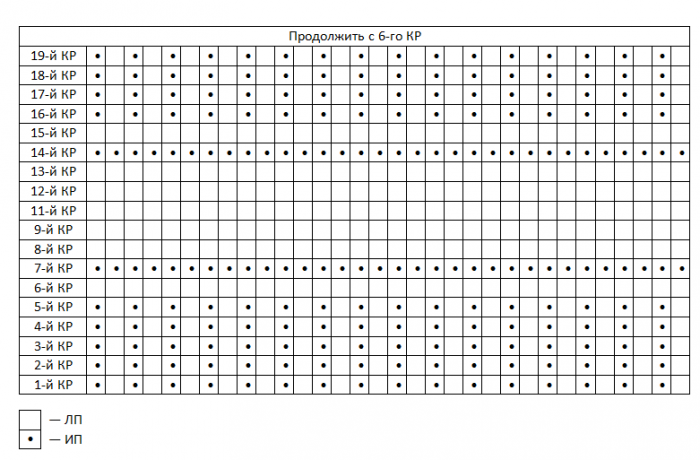
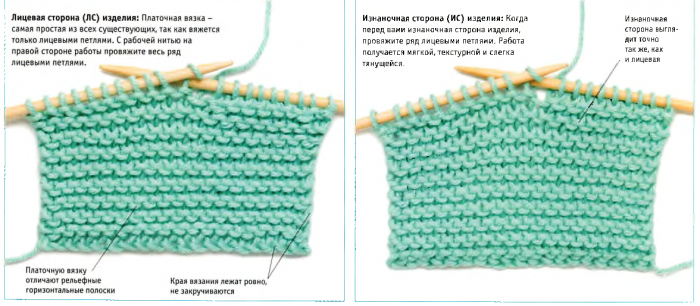
Basic pattern:
• Plateau knit. All rotary rows are knitted with lp. Circular rows are knitted according to the scheme (see figure below)
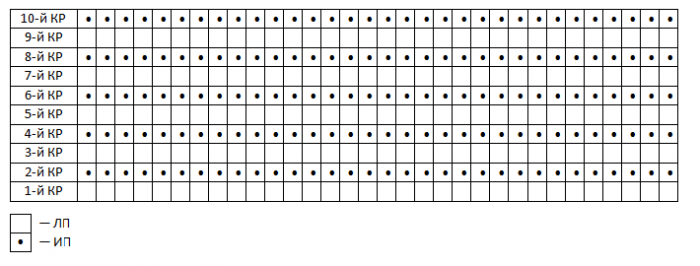
Scheme of patch knitting for knitting needles
Finishing: Facial surface or gum 2x2 (1x1)
Work description:
1. Enter the bottom/tops of the caps:
• Dial 7 loops.
• 1st PR: KP, N, LP, N, LP, N, LP, N, LP, H, LP, N, KP. At the end of the addition of 13 loops on the knitting needle.
• 2nd PR: KP, SPP, IP, SPP, IP, POP, IP, SPP, IP, ISP, IP, POP, KP.
• 3rd pr: kp, * 2 lp, n (knit alternately from * to the end of pr), kp. At the end of the addition of 19 loops on the knitting needle.
• 4th PR: KP, * LSP, 2 LP (knit alternately from * to the end of PR), KP.
• 5th PR: KP, * 3 LP, N (knit alternately from * to the end of PR), KP. At the end of the addition of 25 loops on the knitting needle.
• The 6th PR and all subsequent even pr, knit the LP, knit the crochet LSP.
• 7th PR: KP, * 4 LP, H * (knit alternately from * to the end of PR), KP. At the end of the addition on the knitting needle 31 loops.
• 9th PR: KP, * 5 LP, H * (knit alternately from * to the end of PR), KP. At the end of the addition of 37 loops on the knitting needle.
• 11th PR: KP, * 6 LP, H * (knit alternately from * to the end of PR), KP. At the end of the addition on the knitting needle, 43 loops.
• 13th PR: KP, * 7 LP, H * (knit alternately from * to the end of PR), KP. At the end of the addition of 49 loops on the knitting needle.
• 15th PR: KP, * 8 LP, H * (knit alternately from * to the end of PR), KP. At the end of the addition of 55 loops on the knitting needle.
• 17th PR: KP, * 9 LP, H * (knit alternately from * to the end of PR), KP. At the end of the addition on the knitting needle 61 loops.
• 19th PR: KP, * 10 LP, H * (knit alternately from * to the end of PR), KP. At the end of the addition of 67 loops on the knitting needle.
• 21st PR: KP, * 11 LP, H * (knit alternately from * to the end of PR), KP. At the end of the addition on the knitting needle 73 loops.
• 23rd PR: KP, * 12 LP, H * (knit alternately from * to the end of PR), KP. At the end of the addition on the knitting needle 79 loops.
• 25th PR: KP, * 13 LP, H * (knit alternately from * to the end of PR), KP. At the end of the addition of 85 loops on the knitting needle.
• 27th PR: KP, * 14 LP, H * (knit alternately from * to the end of PR), KP. At the end of addition to the knitting needle 92 loops.
• 29th PR: KP, * 15 LP, H * (knit alternately from * to the end of PR), KP. At the end of the addition on the knitting needle, 103 loops. The diameter of the resulting circle is 13.5 cm (see photo below).
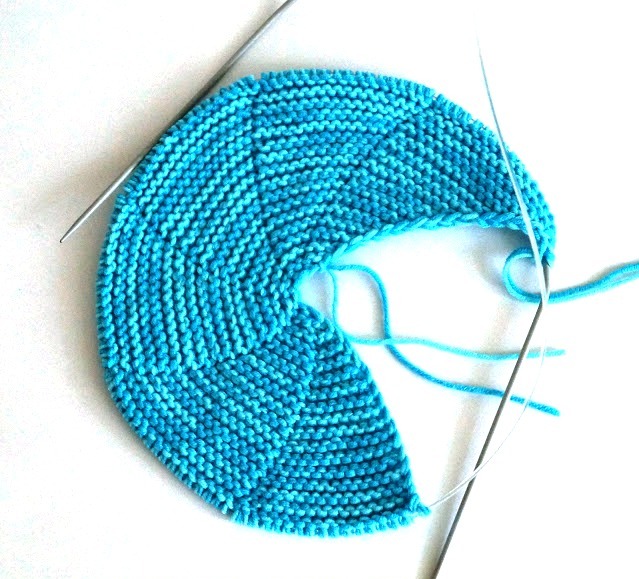
Donyshko/crown cap.
Advice. If you need a larger hat, continue knitting with crochet, gradually forming a circle of larger diameter.
2. Close knitting in the Kyrgyz Republic and proceed to the shape of the tula (main part) of the cap.
Closing a circular series.
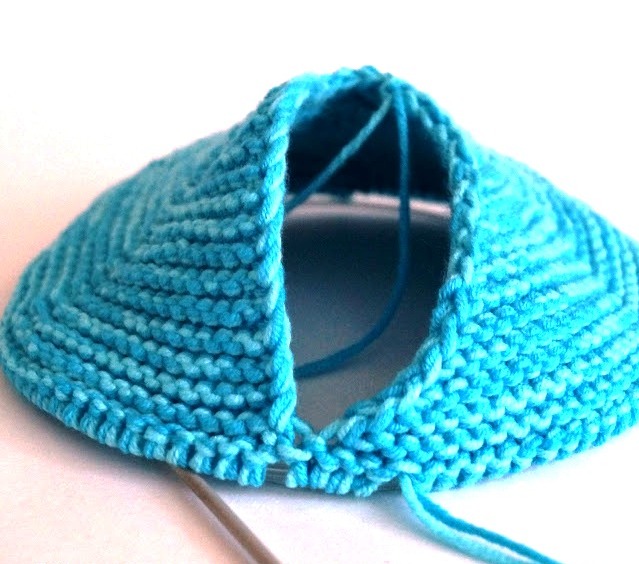
3. Continue knitting with a tulle of the crumbing of a gastard without increases.
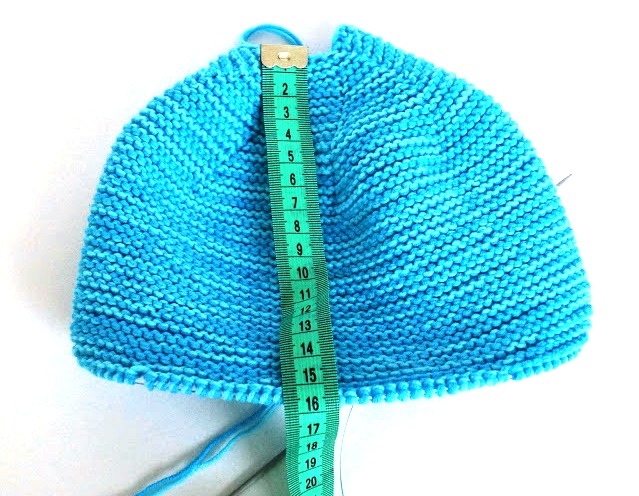
How to measure the depth/height of the cap.
4. As soon as the necessary height of the product is achieved, you can
• Knock the hat lapel. To do this, knit 2x2 or 1x1 with an elastic band 4 cm and close the loops;
• Tie ears with ties.
How to tie ears with ties:
1. Determine the width of the frontal part according to the formula ¼ of the total number of loops, i.e. 103/4 file (always take an even number of loops)
2. Continue the work of the front surface. Knit a row in the following sequence: 38 LP, close the average 28 loops, 37 lp.
3. Knit the front stitch 6 pr. In each rotary row, knit 2 loops together at the end of the row. Be careful: you should remove 3 loops on each side!
Work on the occipital part of the cap
3. Determine the width of the occipital part according to the formula ¼ of the total number of loops, i.e. 75/4≈19
4. knit a row in the following sequence: 28 LP, close the average 19 loops, 28 lp.
5. Continue to knit “ears” working in parallel with two separate skeins of yarn. In each row, knit 2 loops together at the end of the row. When the number of loops reaches 4, continue to knit without decrease, knitting the cords of the required length.

How to tie a hollow cord
6. Sew the head of the cap. Decorate the product at your own discretion.
Ready hat.
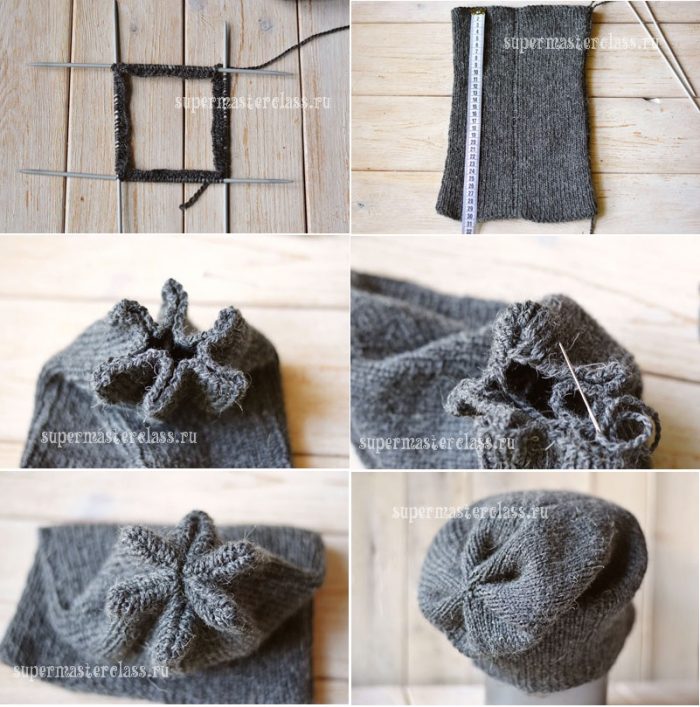
Simple light hat for a boy with knitting needles (knitting from below)

Simple light hat for a boy with knitting needles (knitting from below)
The size of the cap / head of the head, see: 46-48.
To work, you will need:
• yarn, blue color. Composition: 100% wool. Weight - 50 g, meter - 80 m.
• Circular knitting needles #4
Abbreviations that are used in the description:
IP - wrong loop
LP - front loop
Kr - circular row
Work description:
1. Take 74 loops on the knitting needles. Distribute the loops, forming a circle. The setting edge should be located in the center of the resulting circle, and the loops should not be twisted.
2. Stitch the set -top range of LP. At the end of the row, fix the working thread and the end of the thread from the set of the loops with a knot. So you will get a closed Kyrgyz Republic.
3. Knit according to the #1 scheme to the required height. To determine the height of the tula, use the formula: the height of the cap (cm) - ½ diameter of the bottom/crown, i.e.
• hat height - 18 cm (see the table at the beginning of the article)
• diameter of the bottom/top of the head - 13.5; Hence ½ diameter bottom - 6.5 cm
• Tula height, cm: 18-6.5 \u003d 11.5
Scheme #1
4. To knit the bottom/tops of the cap, continue to work with the front surface:
Divide the total number of loops by 6: 74/6 \u003d 12 (+2 p. In the stop). For ease of work, knit with rotary rows.
1st PR: 10 LP, 2 together LP, 11 lp, 2 together with, 10 lp, 2 together with, 10 lp, 2 together lp, 11 lp, 2 lp, 10 lp, 2 together lp. After decreasing 68 loops on the spoke.
2nd and all subsequent even pr: IP.
3rd pr: 21 lp, 2 together lp, 32 lp, 2 together lp, 11 lp. After reducing 66 loops on the spoke.
5th pr: Alternately 9 LP, 2 together LP until the end of the pr. After reducing 60 loops on the spoke.
7th pr: Alternately 8 LP, 2 together with the LP until the end of the pr. After reducing 54 loops on the spoke.
9th PR: Alternately 7 LP, 2 together with the LP until the end of the pr. After decreasing 48 loops on the spoke.
Knit, gradually removing the loops at the end of each wedge, until 18 loops remain on the knitting needle. Cut off the remaining loops with cut working thread and fix it. Sew the product.
Simple scarf for a boy
From the remnants of the yarn you can tie a simple and very practical scarf.
Basic pattern: patch knitting
The width and length of the product is calculated individually.
Baby scarf of the gallop
Video: Calculation of loops when knitting hats. Knitting for beginners #Happy_Codelier
Winter hat with knitting needles for a boy: Scheme
Winter hat for a boy
The size of the cap / head of the head, see: 48-50 (50-52) 52-56.
Please note: for each of the sizes in the description, different calculations are given!
To work, you will need:
• yarn, color green and brown. Composition: 60% wool, 40% polyacryl. Weight - 100 g, meter - 170 m.
• Circular knitting needles #4 and #4.5
Description and scheme

Winter hat with knitting needles for a boy: Scheme
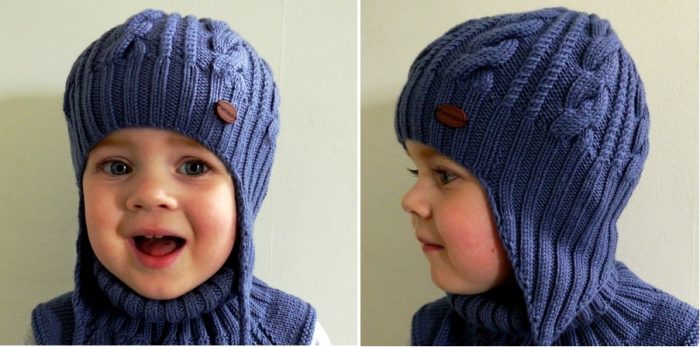
Hat helmet for a boy with knitting needles with a detailed description

The simplest hat for a boy
To tie such a model, even very inexperienced craftsmen.
The size of the cap / head of the head, see: 52-54
To work, you will need:
• yarn, gray color. Composition: 100% wool. Weight - 100 g, Meter - 300 m
• Circular knitting needles #3
Abbreviations that are used in the description:
IP - wrong loop
LP - front loop
Kr - circular row
Pr - turning row
Basic pattern: gum 2x2 (see diagram below)
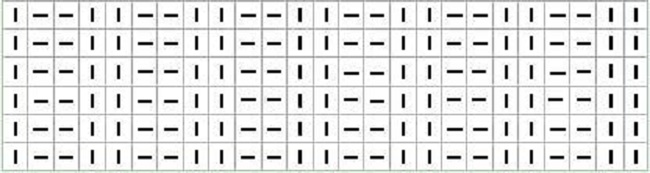
2x2 gum circuit for circular loops
Work description:
1. Take 152 loops on the knitting needles. Distribute the loops, forming a circle. The setting edge should be located in the center of the resulting circle, and the loops should not be twisted.
2. Stitch the set -top range of LP. At the end of the row, fix the working thread and the end of the thread from the set of the loops with a knot. So you will get a closed Kyrgyz Republic.
3. When working in the “Glastic 2x2” technique, tie a “pipe” with a height of 14 cm.
4. Upon reaching the indicated height, close 54 loops and continue knitting PR, focusing on the pattern of the pattern.
5. Having knitted 12 cm in height from the closed edge, dial 54 loops (see Fig. Below) and continue to work kr.
Set of loops for expanding the canvas
6. Having knitted 8 cm in height from the setting edge, proceed to the attachment of the head of the helmet:
• Each pair of loops knit the LP. After reducing 78 loops on the spoke.
• Continue to knit LP: 6 lp, 2 loops together with lp, 6 lp, 2 loops together with lp, 7 lp, 6 lp, 2 loops together lp, 6 lp, 2 loops together with lp, 6 lp, 2 loops together with lp, 7 lp , 6 lp, 2 loops together with lp, 6 lp, 2 loops together with LP, 6 lp, 2 loops together with lp. The decrease field on the knitting needle is 70 loops.
• KR without reduction: LP to the end of the row.
• KR with decreases: alternately 5 LP, 2 loops together with the LP to the end of the cr. After reducing 60 loops on the spoke.
• KR without reduction: LP to the end of the row.
• KR with decreases: alternately 4 LP, 2 loops together with the LP to the end of the cr. After decreasing 50 loops on the spoke.
• KR without reduction: LP to the end of the row.
• KR with decreases: alternately 3 LP, 2 loops together with the LP to the end of the cr. After declining 40 loops on the spoke.
• KR without reduction: LP to the end of the row.
• KR with decreases: alternately 2 lp, 2 loops together with the LP to the end of the cr. After decreasing 30 loops on the spoke.
• KR without reduction: LP to the end of the row.
• KR with decreases: alternately 1 LP, 2 loops together with the LP to the end of the cr. After reducing 20 loops on the spoke.
• KR without reduction: LP to the end of the row.
• KR with decreases: 2 loops together with the LP until the end of the cr. After reducing 10 loops on the spoke.
Tighten the remaining loops with cut working thread, fix it.
7. Make a strapping hole.
Binding with a "rabal step" technique
Video: children's hat-shuttle knitting needles
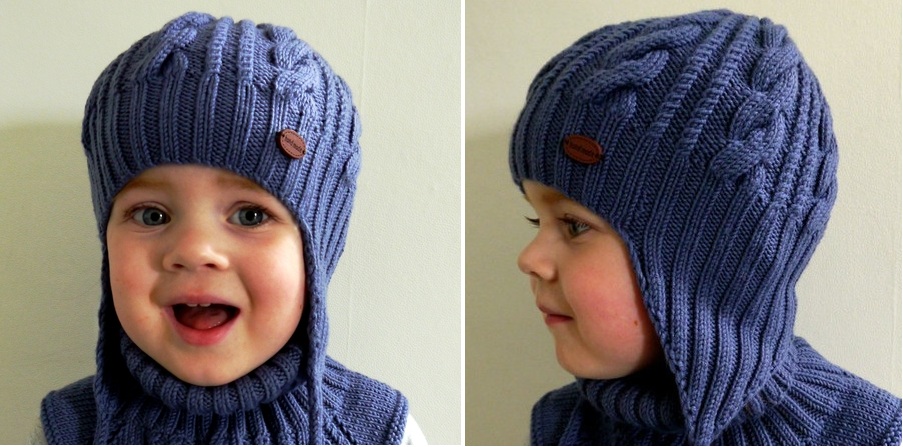
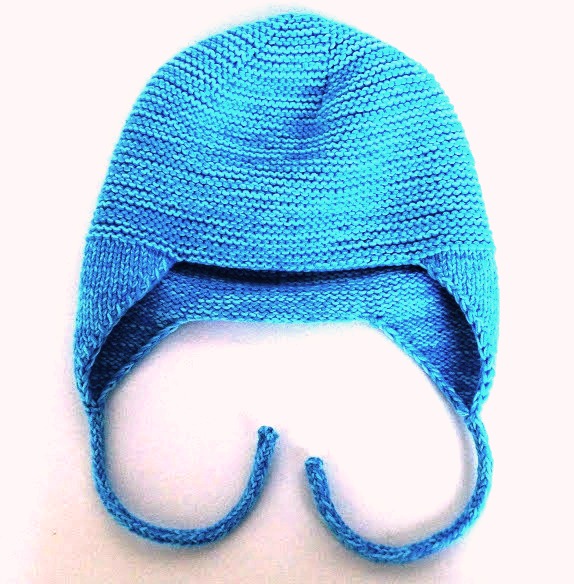
Baby hat with ears of knitting needles for a boy: Scheme
At the beginning of the article, we examined in detail how to tie a hat with the ear ears. In this part of the review, MK is presented for knitting a model with braids (direction of knitting from the bottom up).
Baby hat with ears for a boy
The size of the cap / head of the head, see: 51-55
To work, you will need:
• yarn, blue color. Composition: 100% wool. Weight - 100 g, Meter - 210 m
• Circular knitting needles #3, #3.5
Abbreviations that are used in the description:
IP - wrong loop
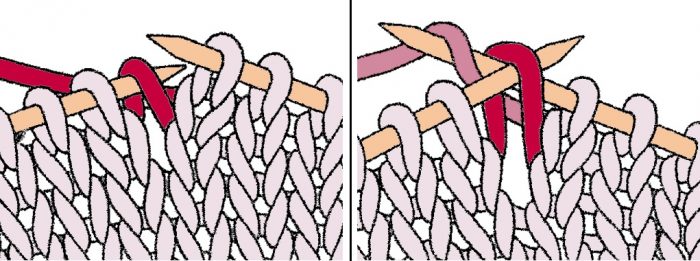
ISP - the wrong side crossed from the broach (see diagram below)
LP - front loop
LSP - Brushed front from the broach (see diagram below)
KP - brown loop
NP - Napish line
But - cloak reverse
Kr - circular row
Pr - turning row
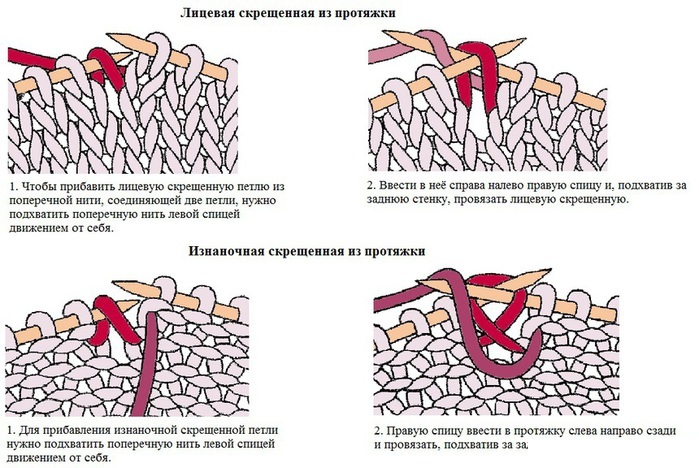
Knitting pattern of crossed loops from a broach
Basic pattern:
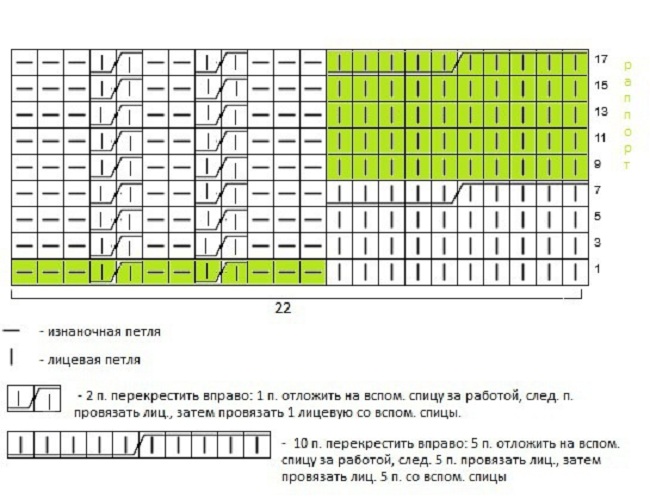
The scheme of the main pattern for a cap with braids
Additional pattern: Gum 2x2
Work description:
1. Knitting begins with the manufacture of cords (see infographic below). Test Territory: 4 loops. The cords are knitted on the front of the front.
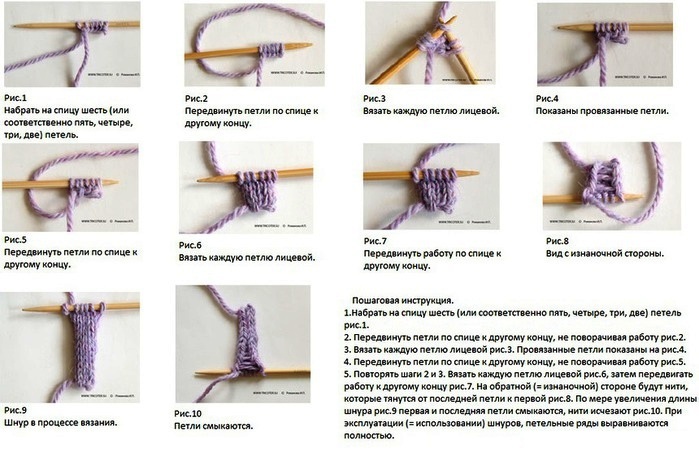
How to tie a hollow cord with knitting needles
Advice. Working in parallel with two separate skeins of yarn, you will connect absolutely identical details.
2. As soon as the cord has reached the required length, go to the knitting of two parts. For one "ears":
• 1st PR: KP, NP, 2 LP, but, kp.
• 2nd and all subsequent even pr: by the pattern, knit the crochet with crossed loops (LP or IP-without the formation of holes).
• 3rd pr: KP, NP, 1 IP, 2 LP, 1 IP, but, kp.
• 5th PR: KP, NP, 2 IP, 2 LP, 2 IP, but, kp.
• 7th PR: KP, NP, 1 LP, 2 IP, 2 LP, 2 IP, 1 LP, but, kp.
• 9th PR: KP, NP, 2 LP, 2 IP, 2 lp, 2 IP, 2 lp, but, kp.
• 11th PR: KP, NP, 1 IP, 2 LP, 2 IP, 2 lp, 2 IP, 2 lp, 1 IP, but, kp.
• 13th PR: KP, NP, 2 IP, 2 LP, 2 IP, 2 lp, 2 IP, 2 lp, 2 IP, but, kp.
• 15th PR: KP, NP, 1 LP, 2 IP, 2 lp, 2 IP, 2 lp, 2 IP, 2 lp, 2 IP, 1 lp, but, kp.
• 17th PR: KP, NP, 2 LP, 2 IP, 2 lp, 2 IP, 2 lp, 2 IP, 2 lp, 2 IP, 2 lp, but, kp.
• 19th PR: KP, NP, 1 IP, 2 LP, 2 IP, 2 lp, 2 IP, 2 lp, 2 IP, 2 lp, 2 IP, 2 lp, 1 IP, but, kp.
• 19th PR: KP, NP, 2 IP, 2 LP, 2 IP, 2 lp, 2 IP, 2 lp, 2 IP, 2 lp, 2 IP, 2 lp, 2 IP, but, kp.
• 21st PR: KP, NP, 1 LP, 2 IP, 2 lp, 2 IP, 2 lp, 2 IP, 2 lp, 2 IP, 2 lp, 2 IP, 2 lp, 2 IP, 1 lp, but , Kp.
• 23rd pr: kp, NP, 2 lp, 2 IP, 2 lp, 2 IP, 2 lp, 2 IP, 2 lp, 2 IP, 2 lp, 2 IP, 2 lp, 2 IP, 2 lp, but , Kp.
• 25th PR: KP, NP, 1 IP, 2 LP, 2 IP, 2 lp, 2 IP, 2 lp, 2 IP, 2 lp, 2 IP, 2 lp, 2 IP, 2 lp, 2 IP, 2 LP, 1 IP, but, kp.
• 27th PR: KP, NP, 2 IP, 2 LP, 2 IP, 2 lp, 2 IP, 2 lp, 2 IP, 2 lp, 2 IP, 2 lp, 2 IP, 2 lp, 2 IP, 2 LP, 2 IP, but, kp. The number of loops on the spoke: 34.
3. Form the occipital part. To do this, type 20 loops between the ears. After combining the parts on the spoke - 88 loops (34 loops "ear" - 20 set loops - 34 loops "ear"). Continue knitting przinka 2x2. Recommended height of the occipital part of 2 cm (9 rows).
4. To form the frontal part of the hat, type 40 loops between the ears and close the kr. On the spoke - 128 loops. Continue knit KR with an elastic band 2x2. As soon as the height of the part reaches 5 cm (19 rows) from the setting edge, proceed to the knitting of the cap of the cap.
5. For ease of work with the scheme of the main pattern, shift the beginning of the Kyrgyz Republic to the left, knitting five loops with an elastic band 2x2 (according to the pattern). The start of the rapport corresponds to the 6th set of the back of the head. It is this loop in the future that will become 1 loop of the cr.
6. To avoid reducing the volume of the cap, make the addition according to the following scheme: *1 lp, 1 lp, 1 lp, 1 lp, 2 lp, 1 lp, 1 lp, 1 lp, 1 lp, 1 IP, 1 is IP, 1 IP, 1 IP, 1 2 lp, 2 IP, 2 lp, 1 IP, 1 isp, 1 IP; Continue from * (repeat 8 times). At the end of the Kr on the spoke - 176 loops.
7. Knit the caps of the cap according to the “main pattern” scheme, the rapport of the pattern will be repeated 8 times. Knit even kr, focusing on the drawing of the canvas. The height of the canvas with braids is 26 rows.
8. Having knitted the indicated number of rows, proceed to knit the crown of the hat.
Tip: if you get the top of the head with the preservation of the pattern is too difficult for you, go to the front surface and put the top of the head described above.
• 1st KR: 5 LP Remove to the auxiliary knitting needle at work, 2 together with lp, 3 lp, 2 lp (from auxiliary knitting needle), 3 lp, 3 IPs, braid 1x2, 2 IPs, braid 1x2, 3 IP. Repeat to the end of the cr. After decreasing 160 loops on the spoke.
• 3rd Kyrgyz Republic: 8 LP, 3 IP, scythe 1x2, 2 IP, scythe 1x2, No. IP.
• 5th KR: 8 LP, 2 Together IP, 1 IP, Spit 1x2, 2 IPs, Spit 1x2, 1 IP, 2 Together IP. Repeat to the end of the cr. After decreasing the spoke 144 loops.
• 7th KR: 8 LP, 2 Together IP, Spit 1x2, 2 IP, Slet 1x2, 2 Together IP. Repeat to the end of the cr. After decreasing 128 loops on the spoke.
• 9IC: 8 LP, 1 IP, scythe 1x2, 2 together, IP, braid 1x2, 1 IP. Repeat to the end of the cr. After decreasing 120 loops on the spoke.
• 11th K: 4 LP Remove to the auxiliary knitting needle at work, 2 together with LP, 2 lp, 2 lp (from an auxiliary knitting needle), 2 lp, 1 IP, braid 1x2, 1 IP. Repeat to the end of the cr. After decreasing the spoke 104 loops.
• 13th KR: 6 lp, 1 IP, scythe 1x2, 1 IP, braid 1x2, 1 IP. Repeat
• 15th KR: 6 LP, 1 IP, 2 Together of LP, 1 IP, 2 together lp, 1 ip. Repeat to the end of the cr. After decreasing 88 loops on the spoke.
• 17th KR: 6 LP, 1 IP, 3 together with LP, 1 IP. Repeat to the end of the cr. After decreasing the spoke 72 loops.
• 19th Kyrgyz Republic: 3 lp Remove to an auxiliary knitting needle at work, 2 together with LP, 1 LP, 2 together LP (from an auxiliary knitting needle), 1 LP, 1 IP, 1 LP, 1 IP. Repeat to the end of the cr. After reducing 56 loops on the spoke.
• 21st KR: 2 Together of LP, 2 Together of LP, 1 IP, 1 LP, 1 IP. Repeat to the end of the cr. After declining 40 loops on the spoke.
• 23-1 KR: 2 Together LP, 1 IP, 1 LP, 1 IP. Repeat to the end of the cr. After decreasing the spoke 32 loops.
• 25th Kyrgyz Republic: 2 Together of LP, 2 together lp. Repeat to the end of the cr. After decreasing 16 loops on the spoke.
9. Tighten the remaining loops with a cut with a working thread, fix it, cut the ends.
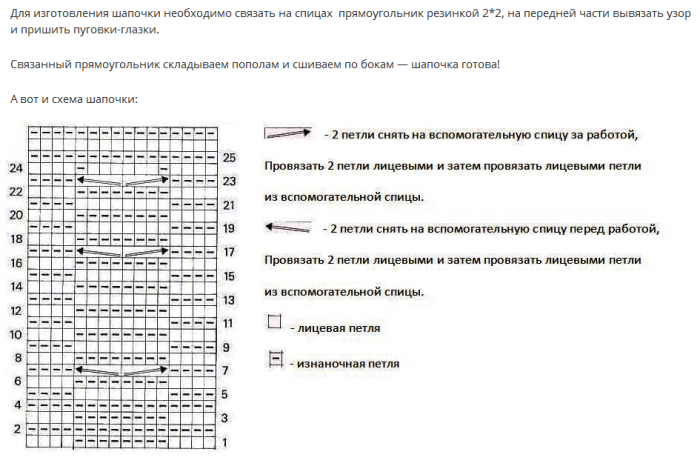
Children's hat-mignon for a boy with knitting needles: a scheme with a description
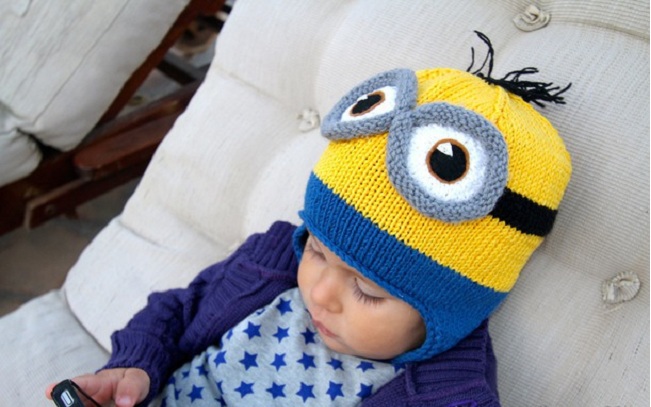
Children's hat-mignon.
A mignon hat is one of the most beloved models of boys from 2 to 102 years old.
The reduction used:
LP - front loop
LPS - front loop crossed
Work description:
1. Tie a hat, based on MK presented above. Basic knit: front or patch.
2. By and large, the main complexity occurs in the process of decorating the cap. That's where we will stop. The eye of the minion consists of several, separately related details: a white circle, gray frame, pupil.
3. The White Circle is knitted from the center with the help of hitchfuls:
• Temple row: dial 9 loops, during the knitting process, distribute to 3 knitting needles (3 loops each).
• Alternately: 1 LP, 1 LPS from the broach. After adding 18 loops on the knitting needles.
• Alternately: 2 lp, 1 LPS from the broach. After adding 27 loops on the knitting needles.
• Alternately: 3 lp, 1 LPS from the broach. After adding 36 loops on the knitting needles.
• Alternately: 4 LP, 1 LPS from the broach. After adding 45 loops on the knitting needles.
Depending on the size of the cap, you can stop at this stage or continue further by increasing the diameter of the circle. Close the loops. Sew the part to the hat. If your minion has two eyes, you need to tie 2 white details.
4. The gray frame of glasses is also knitted with the hollow knitting needles with the front surface.
• Temple row: the number of loops \u003d the number of closed loops of the white part + 5 loops. If you ended with 45 loops, then type 50 loops (45+5) on the knitting needles
• knit 6 rows. Close the loops. Twist the finished part with a roller and sew around the circumference of the white circle.
• For pupil, use a button or felt circle.
5. Attach several black threads on the crown that imitate the hair of the minion.
Video: hat for a boy Mignon Crochet
Children's hat earflaps with knitting needles for a boy: a scheme with a description
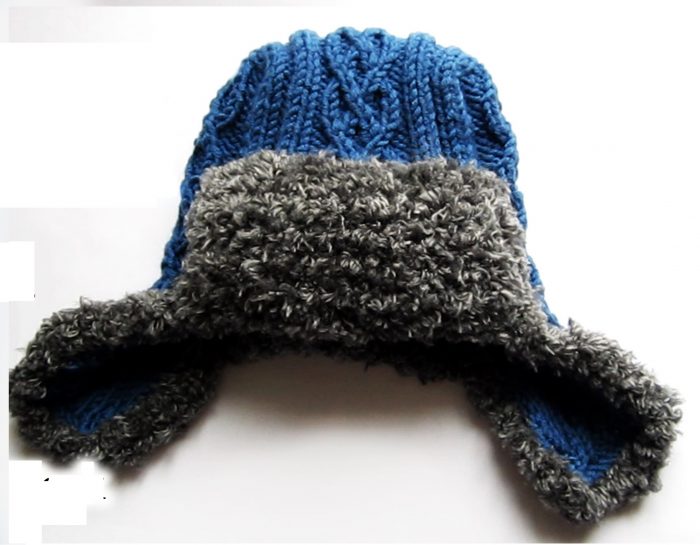
A head-hat for a boy
The hats of the ears are unchanged, warm and comfortable, classic. Video master class tells in detail about all stages of knitting hats-earflaps for a boy (size: 54-55), starting with a set of loops and ending with the assembly of the product.
If you need a smaller cap for a baby 1.5-2 years, study the scheme below.

Children's hat earflaps with knitting needles for a boy: a scheme with a description
Explanations to the scheme

Stages of knitting a children's cap with knitting needles
Video: knitting with knitting needles. We knit a hat-ear. Part 1. Knit Hat with Earflaps. Part 1.
Video: knitting with knitting needles. We knit a hat-ear. Part 2. Knit Hat with Earflaps. Part 2.
Video: knitting with knitting needles. We knit a hat-ear. Part 3. Knit Hat with Earflaps. Part 3.
Hat helmet of a tanker for a boy with knitting needles: a scheme with a description
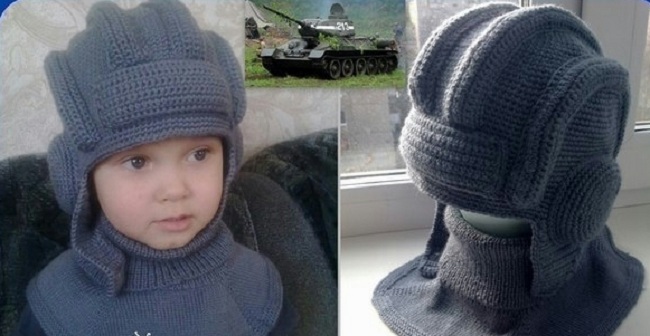
Hat helmet with a crochet.
If you carefully studied the MK presented above, it will not be difficult to tie the hat “helmet of the tanker”.
1. Tie a standard hat with ears using MK knitting hats from the crown. Basic knit: front.
Please note: in the helmet of the tanker there is a valve-traffic valve in the occipital part of the headgear! You can tie it separately, and then sew it to the hat, fixing it with buttons. In a casual state, the valve will protect the child’s neck.
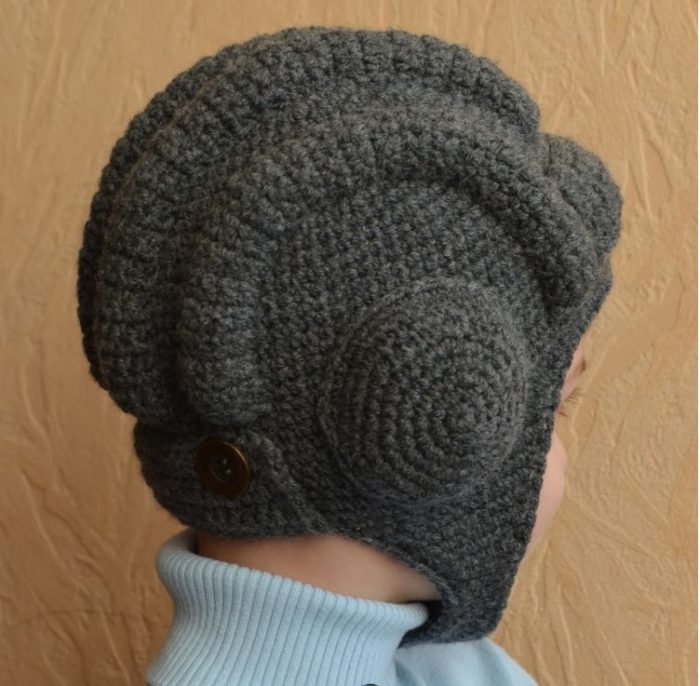
Type of the cap "helmet of the tanker" behind
2. Separately, tie the overhead elements: 2 round linings on the ears, 1 overlay on the forehead, 4 longitudinal pads. To give an additional volume of the lining should be filled with synthetic winterizer or holofiber.
3. Round lining
• Temple row: dial 9 loops, during the knitting process, distribute to 3 knitting needles (3 loops each).
• Alternately: 1 LP, 1 LPS from the broach. After adding 18 loops on the knitting needles.
• Alternately: 2 lp, 1 LPS from the broach. After adding 27 loops on the knitting needles.
• Alternately: 3 lp, 1 LPS from the broach. After adding 36 loops on the knitting needles.
• Alternately: 4 LP, 1 LPS from the broach. After adding 45 loops on the knitting needles.
Depending on the size of the cap, you can stop at this stage or continue further by increasing the diameter of the circle. If the diameter of the circle suits you, knit 1 kr without increasing. Close the loops. Sew the part to the hat, not forgetting to fill with the filler.
4. The lining on the forehead is a rectangle. You should tie the part based on the size of your product. The overlay should also be filled with a filler (during sewing).
5. Tie the longitudinal pads: 2 - a little longer (for the middle part of the head) and 2 - a little shorter (located in the temporal part of the headgear). The longitudinal pads are long strips, from 3 to 5 cm wide (depending on the size of the cap). Sew the overlays.
6. As a “ears” fixer, you can use a special vaccination clamp.
Hat for a boy in spring and autumn knitting needles: diagram, description
A fashionable and convenient model “Owl” is suitable for boys under 10 years old. The video will help to calculate the number of loops at the beginning of the article.
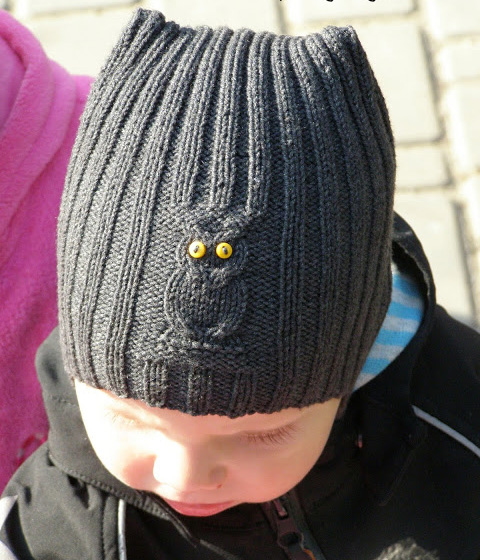
Hat "owl" for a boy
Description and diagram of the “owl” cap.
Hat for a boy of a teenager with knitting needles: a description scheme
The video “Men's cap with a chess pattern” will introduce the stages of manufacturing fashionable hats for a boyfriend's boy.
Video: Men's cap with a chess pattern. Men’s Hats Knitting
Hat stocking for a boy with knitting needles: a scheme with a description. Bino hat for a boy with knitting needles: knitting pattern
The simplest description of all possible.
The hat is knitted on stocking or circular knitting needles. The yarn is selected based on personal preferences. The number of the spokes (circular or hitchful) must correspond to the number indicated in the manufacturer's recommendations. The video at the beginning of the article will tell you how to correctly calculate the required number of loops.
The main stages of work:
1. Take the required number of loops, knit the first row of the setting edge, close the circular row.
2. Continue to knit a hat using the "Gum 1x1" or "Gum 2x2" pattern
3. An adult size involves the length of the product at least 30 cm. For a children's hat, the length has to be determined independently based on personal preferences.
4. As soon as the length of the product has reached the necessary, close the loops.
5. Form the crown by collecting the edge of the cap with folds (number of folds: 4 or 6)
6. Fight each fold with a seam. Take the seams inside.
7. Fasten all the threads, cut the knots.
How to knit a hat-chubs (beeth cap) with knitting needles.