How to assemble a cube-cutting cube?
The content of the article
Do not rush to put the puzzle on the far shelf. After reading the article, you can understand how to independently go through all the stages of a “cubic” assembly.
A step -by -step diagram and methodology of assembling a 3x3 chubby cube for beginners and children
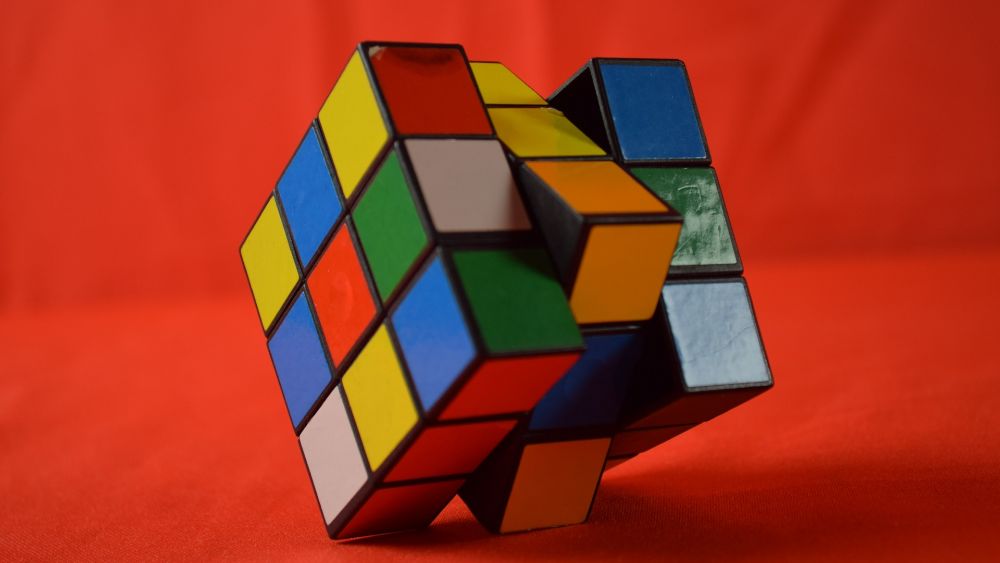
If you decide to reveal the secret to the assembly of the popular toy-heading toys, then you should start by studying its internal device and how the puzzle functions. The cube is sold in stationery stores, in supermarkets and shopping centers, on shelves in the toy department.
- But out of billions of combinations, it is unlikely that an adult is able to find the only solution for this 3D puzzle, not devoting a lot of time to study and assembly, what can we say about children.
- Having seen enough videos about the high-speed assembly of a cutting cube, you might think that this is easy. But everything is not so simple. So, the first and important step before starting the solution of the puzzle is analyzing it for separate elements.
- The 3x3 cube is made in the form of a mechanical cube with the sides of a strictly defined color.
How is a cube-cutting cube
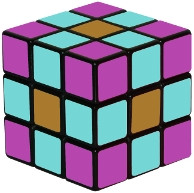
Each line is arranged the same and consists of:
- central segments (one side includes one such segment) capable of rotating around the axis, remaining in the "its" cell (on our example these are brown central squares on each side)
- 8 corner segments, the square parts of which are painted with three different colors (for example, such violet segments)
- 12 ribslocated between the corner segments and having two different colors (for example, these are pale blue squares)
- Rubik's Cube make up 20 mobile parts - These are ribs and corners. Knowing how 12 ribs and 8 angular segments are able to move, you will understand what the principle of assembling the puzzle consists in.
Rubik cube consists of 20 mobile elements
What will happen if you turn one line? The centers are static (not shifted), the ribs change positions, taking the places of other ribs, and the corners move into the corner.
With each displacement and rotation of the sides of the cube, the edge remains the edge, and the segment located in the center is the center.
How easy, quickly and correctly collect a cube of a Rubik cube: formula, assembly procedure, combinations
The collected cube-cutter means that all elements are located in "their" places. The guidelines of the faithful square of the squares are centers recorded in one place.
- The sides of the ribs between the red and green centers are painted red-green. This means that the green edge will stand near the collected cube-cutting cube next to the green central segment, and a red one next to the red central segment.
- The correct location of the tricolor angle is between centers painted with appropriate colors.
To collect a cube-cutter, you need to pay attention to the central elements
Stage 1: Assembly of the edge
- Let's start the assembly of the cube with one color. In our circuit, it will be yellow. If you prefer to start with a different color, then just repeat all the actions with elements painted in this color.
- We have a cube with a yellow central segment up. Then the white center is located on the opposite bottom of the lower side (standard cubes-cutters have the same arrangement of colored segments, because the yellow center is always over white).
- We set all the edges of the color we need around the central square. On the upper side of the cube should form a cross of yellow.
- But this is done as follows:
The rib, as we have already said, is painted in three different colors, because its second color should correspond to the center that is closer.
The second color of the rib must coincide with the central element
Without an idea of \u200b\u200bthe device of the cube, this stage will be difficult to understand. But if you do not regret the time for training (without the prompts of those who have mastered the high -speed assembly), then everything will work out.
Anyone who first set to solve a cunning puzzle usually throws his venture after a folded cross and one of the sides. They do not have enough patience to advance further. But we will continue, because the puzzle has not yet been decided!
- So, for us now the main thing is not to give up and try to put the cross on your own. It is better to close the article for this time, but if the decision does not come to you, then look at the examples below.
- The scheme presented below will help you understand how to arrange the squares of the same color with a cross. Repeat this stage 4 times, because for each color you need to put it crosswise.
The start of the assembly of the cross
How to lay out the cross:
- We turn the puzzle with a yellow center up (if you have chosen a different color, then set the side with the central segment of the color you have chosen at the top). The White Center will be below.
- We are looking for the edge on the lower side, stained in yellow. Do not forget that two colors of each ribs are important to us now.
- We find from below the edge, painted with yellow, and scroll it so that the yellow square of the rib will take a “place” on the upper side.
Let's do the following:
- The yellow center is directed down.
Yellow "looks" down
- The yellow center is directed forward.
Yellow "looks" forward
- We have a rib between two intermediate layers.
Rib in the intermediate layer
Important: the yellow segment of the upper edge can be oriented incorrectly relative to other segments, or take the wrong position relative to the nearest central segment.
- To return such an element to the right place, another element should be moved to its position.
- Then the region will be in one of the three positions described above. We install it in the "right" place.
- We collect each yellow edge similarly to the above scheme, until you get a cross on the upper side of the cube.
Stage 2: Continuation of the assembly of the upper face:
- After assembling the cross, we continue to collect the upper side: we move the corners to their places one after another.
- But here it should be collected, adhering to certain rules, and not as if you want. The color of each corner depends on which place is allotted to him.
Assembly of the upper face
To go through this stage, there are several ways. The assembly of each angle is carried out in 4 actions:
Repeat all actions 4 times
- We turn the cube with the yellow side up. The white side should be from below. We are looking for a corner on the white side, one square of which is yellow.
Yellow "looks" to the left
- We scroll through this “white” layer so that the yellow corner will take a “” place.
Yellow "looks" right
Yellow from below
Next, we act according to the scheme:
- install the cube with an angular element painted yellow to the left
- we turn over by directing the yellow element to the right
- turn again, directing yellow to the bottom
Important: if there is no yellow corner below, then he moved to the upper side, which means he took a “alien” position. To return the yellow angle to the place, turn any angle of the lower side up. After that, the yellow angle will be below. Tune until the top layer is completely assembled.
Stage 3: Assembly of the second layer
We collect the edges of the second layer. We remember that the centers do not move at the cube and they do not need to be shifted, to find the right place for them. We repeat the actions 4 times. After all, we have 4 edges:
- Put the cube with a white layer up. Yellow, which is located below, is already assembled.
- We find the edge on the upper edge, both sides of which are not white.
- We turn the top so that the color of the edge found in the previous step is the same color as the center. We should get an inverted T.
- To do this, repeat one of the actions described below. You need to find a solution in which the edge took a position on the left or right: follow the example that suits you.
Here are the ways to assemble this part of the cube-cutter:
- We move the edge from the position on which he stopped to the right side.
We move the edge to the right
- We move the edge to the left side.
We move the edge again, but to the left side
Important: the absence of a edge, any side of which is not white, means that he did not take “his” position in the middle layer.
- We move the other edge so that it takes in the upper layer the position of the extreme element that takes a “alien” position.
- Now there is no white square on the upper face, which can be scrolled according to the scheme described above.
- Again, we repeat all the actions 4 times, thus collecting 4 edges.
Stage 4: Assembly of the Second Cross
- We have collected 2 faces. Next, it is necessary to carry out such manipulations, after which 4 white edges of the upper edge form a cross. We focus exclusively on extreme elements. The corners should not be interested in us now.
- Four white edges can be accumulated on the upper layer, two or not to be white extreme elements at all. There may be such a position: on the upper face - all 4 white ribs. In this case, you can immediately proceed to the next stage.
- The option with two white ribs is collected according to the scheme below. We pay attention to how these ribs are located - nearby or opposite each other.
If the white edges are adjacent:
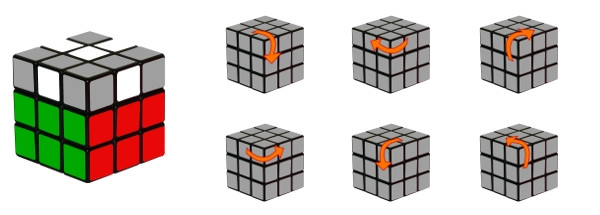
If the white edges are adjacent
If the white edges are opposite:
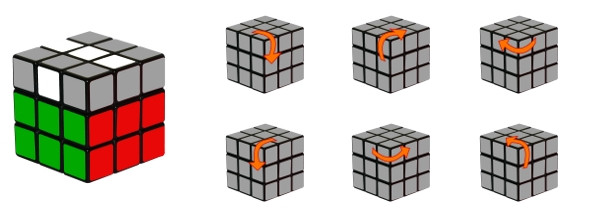
If the white edges on the opposite sides
There are no white squares in their places:
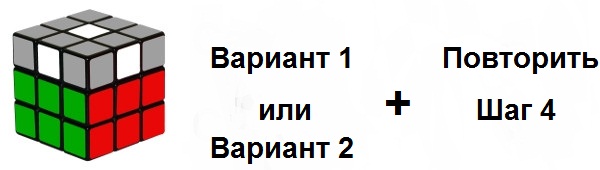
If there is not a single white square on the top
- It is necessary to do the above manipulations to obtain 2 squares on the upper face.
- Next, fold the cross depending on how the white squares are located.
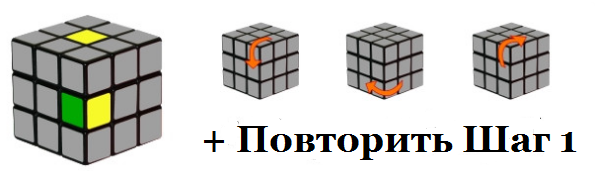
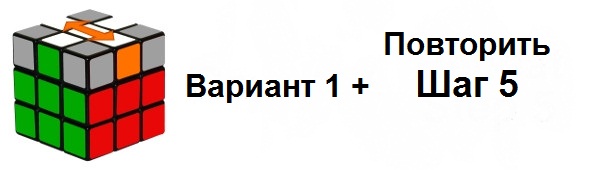
Stage 5: The location of the second cross
- When the second cross is complicated, we need to place the sidewalls of the cross in such a way that they become a continuation of the central elements of the faces corresponding to color.
- Again we focus exclusively on the white edges, without taking into account the color of the corner elements.
- We need to crank the upper line so that the color of the two ribs coincides with the color of the central squares of the corresponding faces.
- When only one edge coincides, rotation must be continued.
- Act on the above examples. It all depends on the lateral extreme elements: they are located sequentially or are on the opposite sides.
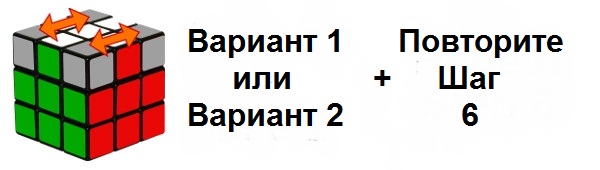
If on adjacent edges:
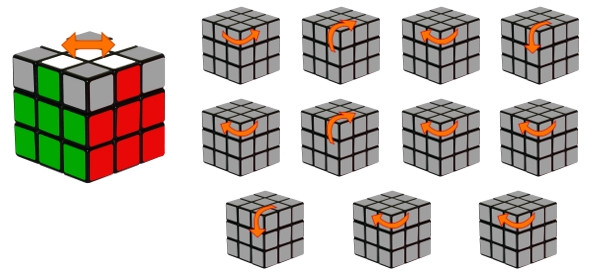
Option with adjacent edges
If on opposite edges:
Option with opposite edges
We should get a properly located second cross.
Stage 6: Corners
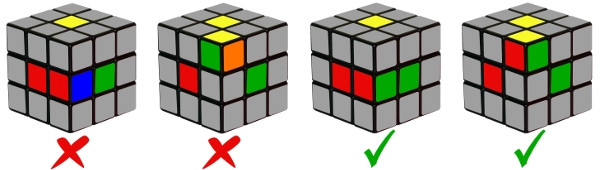
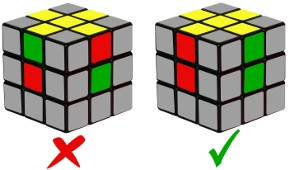
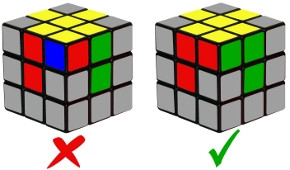
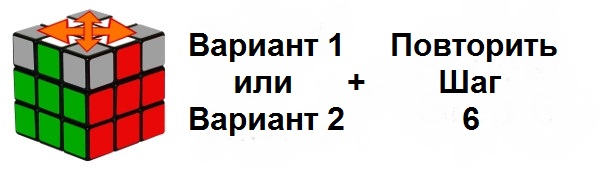
- Now we proceed to the arrangement of the corner elements of the last layer. The orientation of the corner parts is not important now. The main thing is to determine whether the corner element took the correct position.
- It is not difficult to determine this: with a properly located corner element, the color of nearby centers coincides with the color of 3 squares of the angle.
Understand when the corner element is located correctly, the following examples will help:
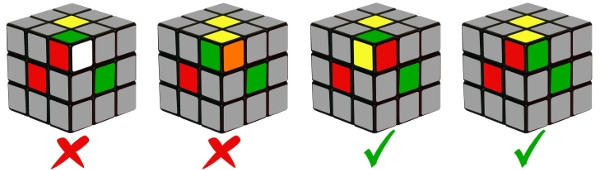
Correct and incorrect angles
- If the 4th corner took the right position, then you can go to stage 7.
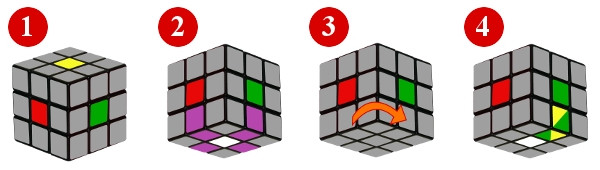
- If only one corner part is placed correctly, or there is no correctly placed corner at all, then choose one of the corresponding examples for placing all corner parts in “your” places.
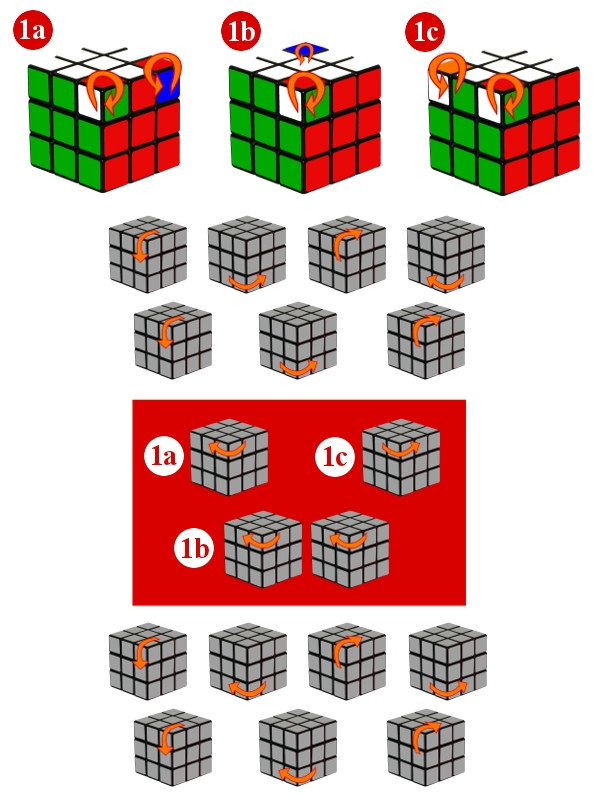
If all three corner parts are not in “their” places - solution options:
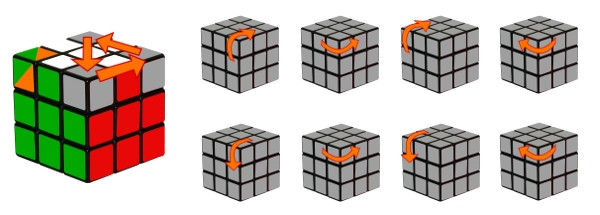
Three corners in their places (option a)
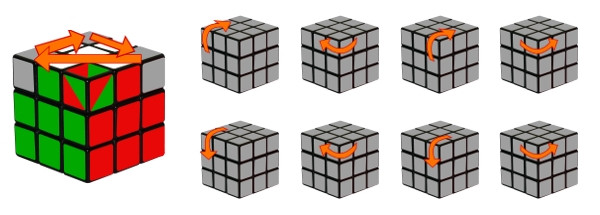
Three corners are not in place (option b)
If there are no correctly located corner elements:
- In the latter case, it is necessary to follow one of the above examples so that at least one corner element takes the desired position.
- After that, continue depending on how the elements are located.
Further actions that will bring angles to their places
Another option for setting angles in its place
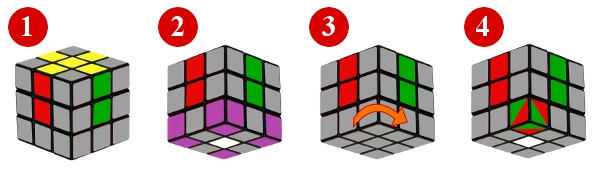
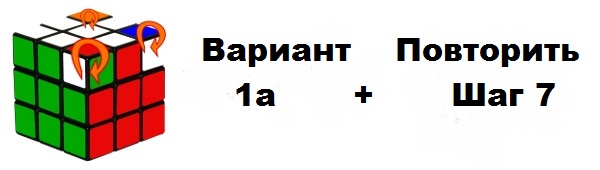
Stage 7: Assembly
- The corners took their positions, and we have to fulfill the last actions: to solve the puzzle, turning the corner elements of the last layer.
- Now on the dice of a rubika can be 2, 3 or 4 of the corner elements of the last layer, which are oriented incorrectly.
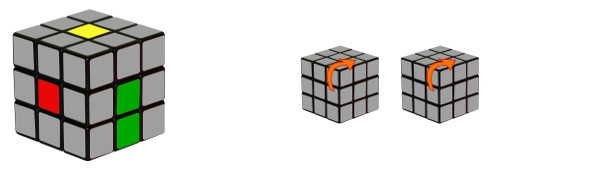
In a situation where 2 corner elements are oriented incorrectly, follow the following:
Before rotating the faces of the cube, pay attention to several important points:
- The first option for solving the puzzle may have fence. It all depends on which one suits you. It is necessary to do the first sequence of actions, and then act in accordance with the result.
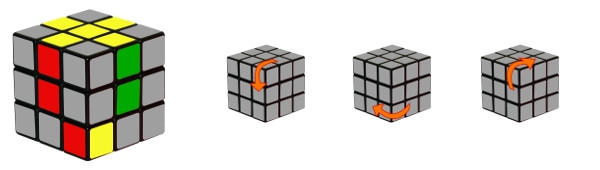
Option 1:
- with two incorrectly oriented elements: it is necessary to turn the “neighboring” angle clockwise.
Assembly for two incorrectly oriented angles
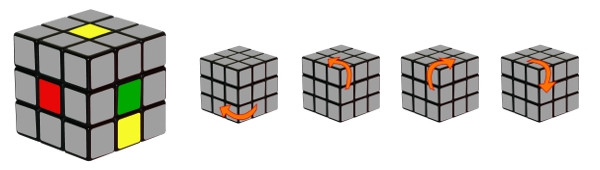
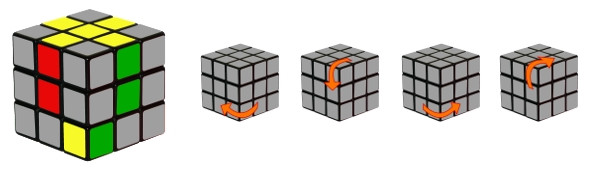
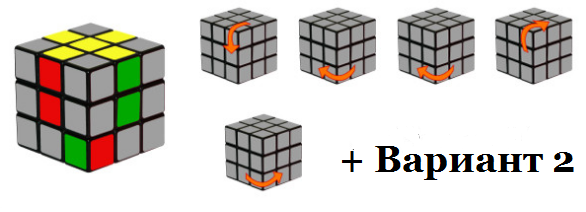
Option 2-3:
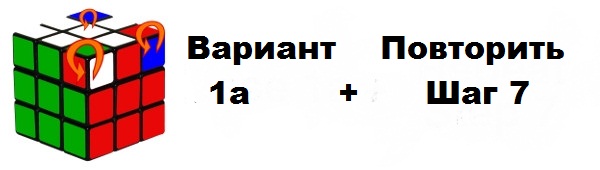
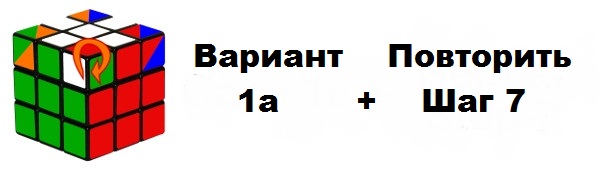
- with three incorrectly oriented corner elements, the chube is collected by the first example to reach 2 improperly oriented corner elements. Next, manipulations are carried out based on the result.
Building option for three incorrectly oriented angles No. 1
Assembly option for three incorrectly oriented angles No. 2
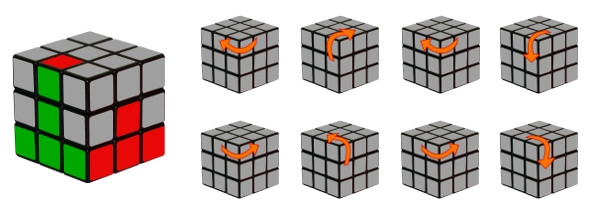
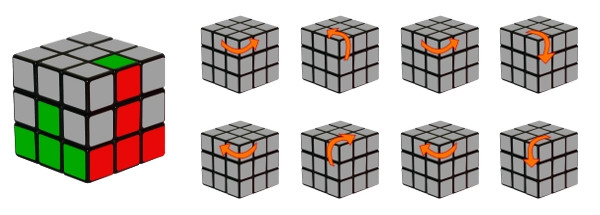
Option 4:
- in the absence of correctly oriented angular elements, it is necessary to act according to the first above example, and then select the decision that corresponds to the result.
Assembly option for all incorrectly oriented angles
Do you still follow our instructions and everything is done correctly? Our congratulations! Your dice Rubik is assembled! And you yourself decided this puzzle!