
The content of the article
- Knitting a simple female beret crochet for beginners: a detailed description
- How to tie a children's beret for beginners?
- How to tie a summer beret: a scheme and a description for beginners
- How to crochet an elastic band for a beret: Description
- The size of the bottom of the beret Crochet: How not to be mistaken in size?
- Crochet pattern for beret: scheme and description
- How to tie it crochet for beginners: video
- Video: How to tie it crochet for beginners?
- Knitting a beret with knitting needles for beginners: a detailed description
- How to connect children's beret with knitting needles for beginners with a description and a scheme?
- How to tie a female simple beret with a description for beginners?
- How to knit the bottom and elastic band of the beret with knitting needles?
- How to knit patterns for berets with knitting needles: schemes and description
- Video: Knitting a beret with knitting needles with a pattern of "corn" for beginners
In your eyes, fear and doubts about your abilities?
Nevertheless, the first step is important for understanding the features of a particular type of needlework. We will analyze the nuances of crochet and knitting needles for beginners. Continuation see the following articles.
Knitting a simple female beret crochet for beginners: a detailed description

photo of a girl in a simple red beret with a gray visor
So that he keeps his shape and does not look excessively loose, knit with a thread in 2 additions.
Before proceeding, prepare:
- yarn, for example, 100% cotton-1-2 skein
- hook in size equal to the thickness of the working thread
- scissors
- flexible meter
- form the crown ring from a thread twisted 3-4 times around the index finger or tie a pigtail of 6-8 air loops,
- tie the ring with 11 columns without crochet, the pigtail is 15th. Closure the first row with a connecting column,
- at the beginning of each new row, perform 3 air loops for lifting,
- in the 2nd row, increase the number of loops with 1 crochet with 1 crochet,
- in the 3rd row, perform 1 crochet columns, increasing the number of loops. Through one loop of the previous row, knit two from one. You will get from 2 from below 3 from above,
- 4 row - the same columns with 1 crochet, but 2 from one lower perform through two loops. Total-from the 3rd lower loops you get 4 new ones.
Then continue according to the scheme:
- 5 row-from 4 loops 5,
- 6 row-out of 5 6,
- 7 row-out of 6 7
- save the trend until the 13th row
- Divide the canvas into 14 parts. You will have 11 loops in each.
- Tie a row, repeating the rapport 9 crochet, 2 columns together.
- Continue declining for another 3 rows.
- From the remaining loops, form an elastic band. Its elements are relief columns with 1 crochet then before, then at work.
- Adjust the height of the elastic band at your discretion, but not less than 7 rows.
- For decor, knit a flower and/or leaves.
- Connect them in the composition on the bereta.
How to tie a children's beret for beginners?

photos of girls in crocheted berets
- Follow the baby’s head before starting work.
- Tie a prototype with the figure that will be at the beret.
- Fix knitting density by 10 cm.
- Taking into account the presence of decreases in front of the elastic band, add these loops to the initial calculated value. For example, you plan to connect 4 rows of decreases after the bottom. On average, each row will become shorter for 12-14 loops. Total to the number of loops of the rim, add 4 x 12 or 4 x 14.
- This value is your landmark that you should go to when knitting the bottom.
The order of work is similar to the considered in the previous section.
How to tie a summer beret: a scheme and a description for beginners

openwork summer berets, connected by a novice needlewoman
Openwork patterns and ornate spiral stripes are the best suited for summer models.
The direction of work is permissible any that is convenient for you. If from the crown, knit the pattern first. From the moment of decreasing the loops, go to a simple lace of air loops.

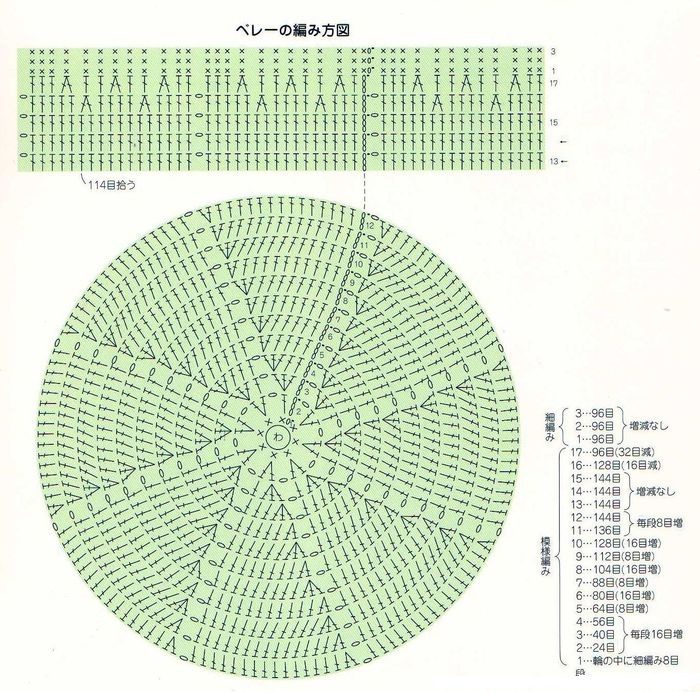
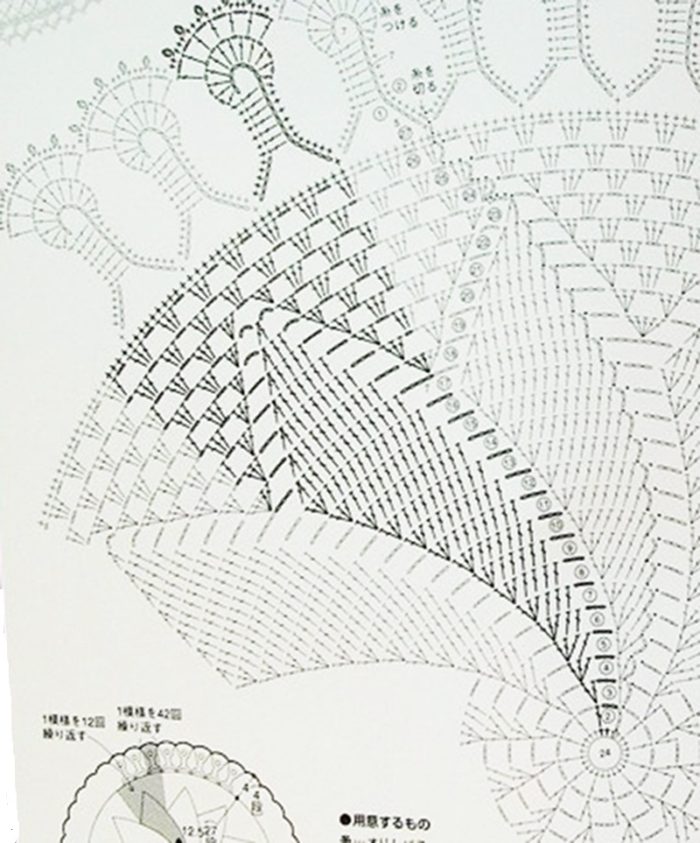
scheme and description of a knitted set of crochet in which the beret is present

women's openwork crochet: Scheme

detailed description of knitting a children's beret crochet

pattern scheme and ready -made crochet

crochet scheme and ready -made berets
How to crochet an elastic band for a beret: Description

crochet elastic band is made of blue and pink threads
The main types of crocheted elastic bands:
- in the direction of work - longitudinal and transverse
- nakid embossed columns similar to the usual 1x1 knitting needles
- the same pattern, but resembling 2x2
- relief columns without crochet
- with openwork between relief columns
- it is convenient to perform it on even number of loops,
- in the circular motion of the work, knit the same elements of the elastic band over the other. In another case - alternate the columns according to the drawing,
- the composition of the elastic band is 2 types of columns that differ in the location of the crochet and the method of entering the hook before their implementation,
- place each gum column not in the loop of the previous row, but around the column trunk. It is like a crochet from different sides - on the front or the wrong part,
- scratust for embossed columns, perform alternately before and at work.

pattern and arrangement of a hook for knitting elastic bands with rulous columns with 1 crochet

elastic bands from embossed columns in different combinations
The size of the bottom of the beret Crochet: How not to be mistaken in size?

the girl measures the radius of the finished bottom of the beret before knitting a new headdress
To select the diameter, the bottom of the beret crocheted with the minimum volume use the following tips:
- measure the head circumference or focus on standard indicators if you want to bind to the child,
- divide the value by the number of pi 3.14,
- add 2 cm and round the numbers to the whole,
- another method is the indicator of the head of the head in the cm to increase by a quarter, then divide into pi.
Crochet pattern for beret: scheme and description

crochet and pattern of the pattern for it
Consider the characteristics of yarn before choosing a pattern. The coat will absorb patterned elements, and the cotton in one addition will still remain in the hole.
- flowers or one large
- leaves
- tied buttons
- with the addition of beads, sequins
For inspiration, add several patterns of patterns with a description.

crochet beret pattern, Option 1
crochet beret pattern, option 2

crochet beret pattern, Option 3

crochet beret pattern, option 4

crochet beret pattern, Option 5
crochet beret pattern, option 6

crochet beret pattern, option 7

crochet beret pattern, Option 8

crochet beret pattern, option 9

crochet beret pattern, Option 10
How to tie it crochet for beginners: video
Video: How to tie it crochet for beginners?
Knitting a beret with knitting needles for beginners: a detailed description

warm knitted knitting needles on a girl
Prepare:
- yarn 1-2 skein depending on the meter
- 2 set of knitting needles, one of which is less than the diameter of the yarn, and the second is equal to it
- flexible meter
- scissors
- hook
- remove the measurements of the head - the diameter of the zone in which you intend to stir the elastic of the product, and the height from it to the crown,
- perform a control sample with knitting gum and pattern,
- determine the density of knitting per square 10x10 cm,
- the first beret is kniting from the bottom up - from the gum to the crown,
- dial the loops of the desired amount and knit an elastic band with a 5 cm high,
- change the knitting needles and perform 1 row with facial,
- the next row - from each second loop, tie two,
- continue the work of a gandrain, alternating row with facial and a series of wrong ones,
- if you want to get beret more voluminous, in every 5th row, add 5% of the loops evenly throughout the canvas,
- perform the previous action up to 3 times,
- tie 2 rows facing. So you have indicated the line of transition to the bottom of the beret,
- now there are decreases in every 2nd row. Divide all the loops into wedges 7-10 depending on the splendor of the headgear,
- knit 2 loops together at the beginning or end of each wedge,
- the final number of loops equal to the number of wedges, tighten the thread. It is convenient to stretch it with a hook,
- cut the thread, and hide its tail on the wrong side of the beret,
- in warm water, perform a light wash of the finished thing,
- lay it out on a horizontal surface for complete drying,
- wear your knitting needles with pleasure.
How to connect children's beret with knitting needles for beginners with a description and a scheme?

warm knitted knitting gray takes on a girl
Decide on the yarn and make measurements of the child’s head.
- The movement of your work is from the gum to the crown.
- To make knitting easier, perform it on two knitting needles. Upon completion of the beret, sew on the cromic loops.
- Be careful about the additions and decreases of the loops. In the second case, you will see even wedges similar to twisting a spiral.

knitted by knitting needles for a girl, a description for beginners
How to tie a female simple beret with a description for beginners?

simple female takes with needles with an English elastic band and the wrong surface
Make measurements of loops/rows on a control bound sample.
- circular or handbags of two sizes - equal and less than the thickness of the thread
- hook
- scissors
- flexible meter
- take the loops on the knitting needles of the smaller diameter and tie the row in the circle of the faces. To avoid stretching of the thread in the connection area, stretch the penultimate loop through the extreme,
- perform an elastic band with a height of 4 cm. The higher it, the denser it takes on the head,
- again a number of facials, in which add 10 loops evenly throughout the canvas,
- Knit 20 cm with a pattern "Rice",
- add 30 loops in the front row again and continue to work another 2 cm,
- divide the canvas into 10 sectors,
- reduce 1 loop at the beginning of each in each 2 row,
- using the hook, pull the thread through the final 10 loops and pull them off,
- cut the thread and hide from the inside,
- water and dry on a horizontal plane on a towel.
How to knit the bottom and elastic band of the beret with knitting needles?

type of elastic band 1x1 on knitted knitting needles
- along the canvas
- across him
The second is longitudinal knitting on a small number of loops with alternating rows. For example, one row is facial, the second is the wrong ones. Or 2 rows of facial and 2 wrong. Such an elastic band is sewn to the finished beret dome.
- to the crown
- from her
The second method is working with an expanding canvas. Similarly, the reduction scheme that is present in the previous method, make the number of loops. That is, work in a mirror order.
How to knit patterns for berets with knitting needles: schemes and description

options for drawings for beret with knitting needles for beginners
Knitted berets are appropriate at any time of the year. Therefore, there are many patterns for them for them.
In confirmation of the above, we give a number of models with schemes and description of the work.

scheme and appearance of patterns for knitted berets, example 1

scheme and appearance of patterns for knitted berets, example 2
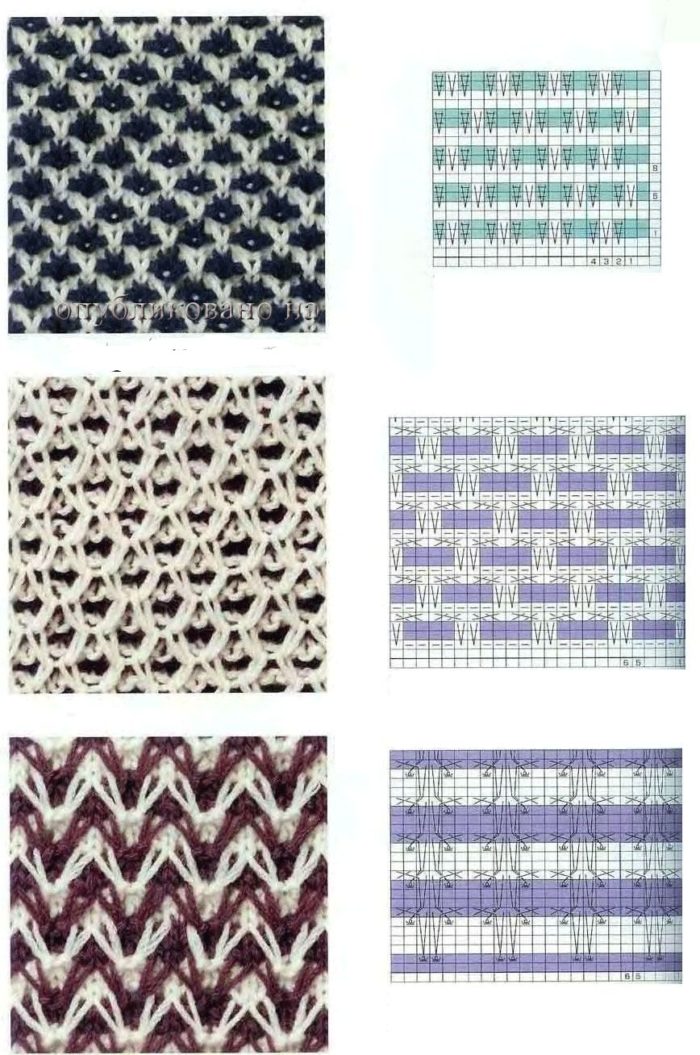
scheme and appearance of patterns for knitted berets, example 3

scheme and appearance of patterns for knitted berets, example 4

scheme and appearance of patterns for knitted berets, example 5

scheme and appearance of patterns for knitted berets, example 6

scheme and appearance of patterns for knitted berets, example 7
So, we paid enough attention to the features of knitting female and children's berets with knitting needles and crocheting beginner needlewomen. Briefly met the secrets for knitting the bottom and elastic bands of hats.
Since you felt inspiration to create a beret with your own hands, buy yarn and knitting needles or hook and go! Light loops to you!