
Phased lessons of drawing Verva.
The content of the article
- How to draw a tree of a tree with a pencil in stages?
- Video: How to draw an willow with a pencil?
- Video: How to draw an willow with a pencil?
- How to draw a branch of the top with a pencil in stages?
- How to draw a recoil in a vase with a pencil?
- How to draw a spere in a vase gouache?
- Vetka Verba drawing children
- Video: Speed \u200b\u200bPainting - Weeping Willows
- Drawing willow with pastel
From the article you will learn how to draw a spere and several recruiting twigs. Thanks to the step -by -step description, even a child will be overcome by a pattern.
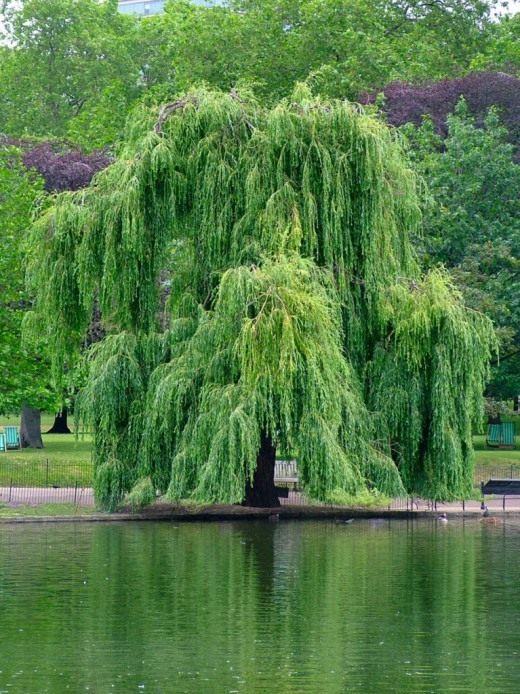
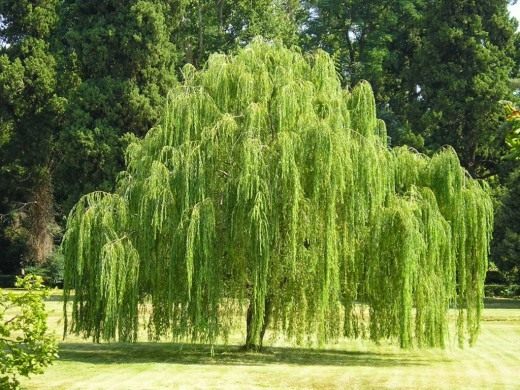
How to draw a tree of a tree with a pencil in stages?
To learn how to draw a tree, in addition to imagination and time, you need to take into account some nuances:
- display the time of the year in the figure (there are a lot of foliage, for example, it can be in the summer in the summer, and in the fall under the tree the crumbling foliage is visible)
- it is important to find out the growth scheme of the tree, the main shape (a wide crown, thin or thin barrel)
IVASHICE IVE
A twig of the back
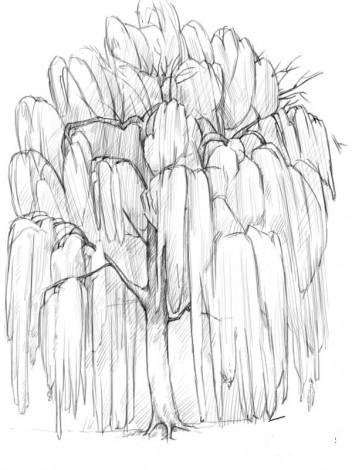
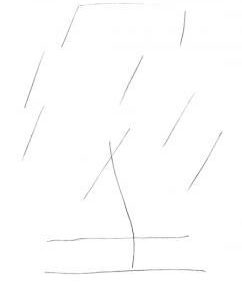
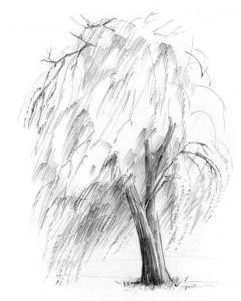
Let's start creating a masterpiece!
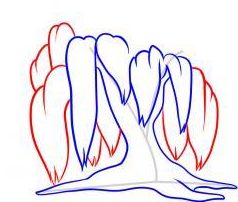
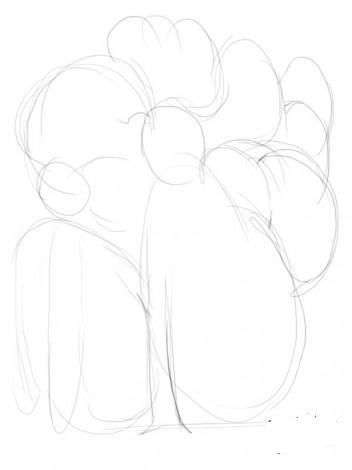
- We sketch the original barrel lines. In our figure, it will have an irregular shape of 3 lines, but you can draw to your liking.

We draw the initial barrel lines
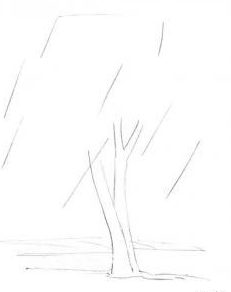
- We turn these lines into a powerful trunk of a tree, drawing additionally a little wave -like contours on the outside. So we will show an uneven and massive trunk, because in willow it cannot be smooth.

We outline the barrel
- We depict the knots on the tree and add the curved lines of the resulting bark. Thanks to these details, the drawing will look more interesting.
- Let's start drawing the willow crown hanging down. We outline the four main branches. It is easier to draw them if you imagine elongated leaves located apex down, differing in shape and thickness.
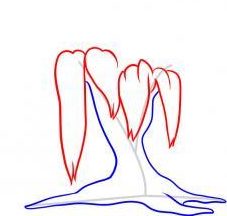
We draw the first drooping branches
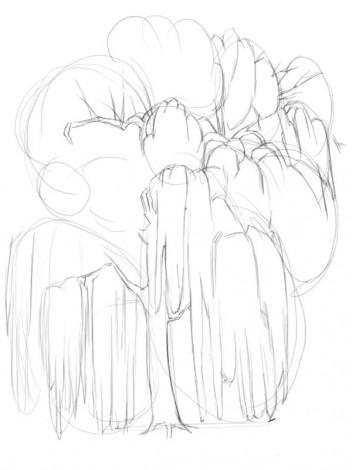
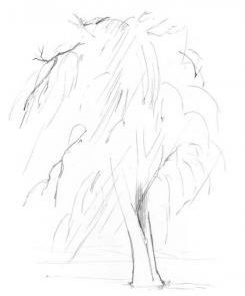
- To show that the crown consists of small long leaves, draw a dissection along the lower contour.
We finish the branches from the sides
- We continue to draw a drooping crown, adding branches covered with leaves from the sides.
- The next step will be the completion of the second “floor” of the crown of the tree. We draw torn lines directed downward, giving the branches the shape of a falling water mass.
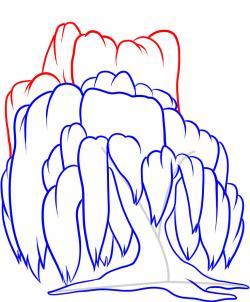
We continue to “finish” the tiers of the branches on Verb
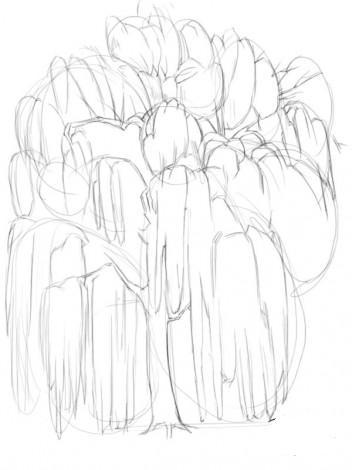
- But this is not the top of a tree. We draw the last "tier" of foliage.
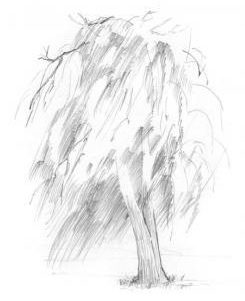
- We finish the details, clarify the lower part of the branches hanging to the ground and add the volume to them, drawing a short line on each branch in the center.
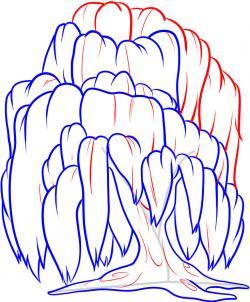
We finish the top of the tree
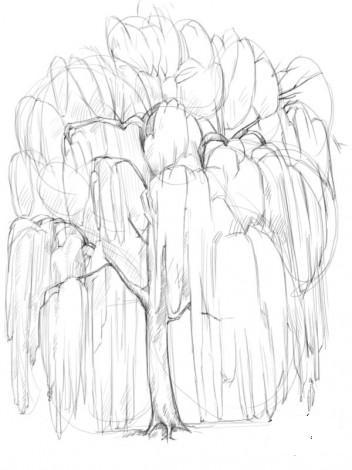
- The finished drawing can be improved by adding shadows or decorating.
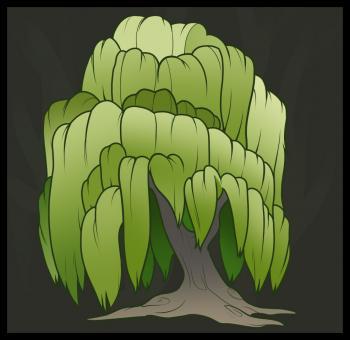
We decorate
Video: How to draw an willow with a pencil?
Video: How to draw an willow with a pencil?
The second version of the willow drawing with a pencil
For work, you will need the following:
- simple pencil
- color pencils or felt -tip pens
- eraser
- album sheet
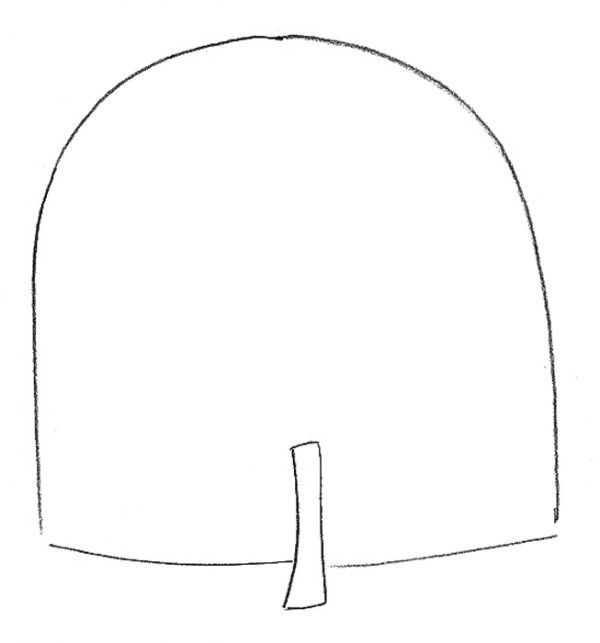
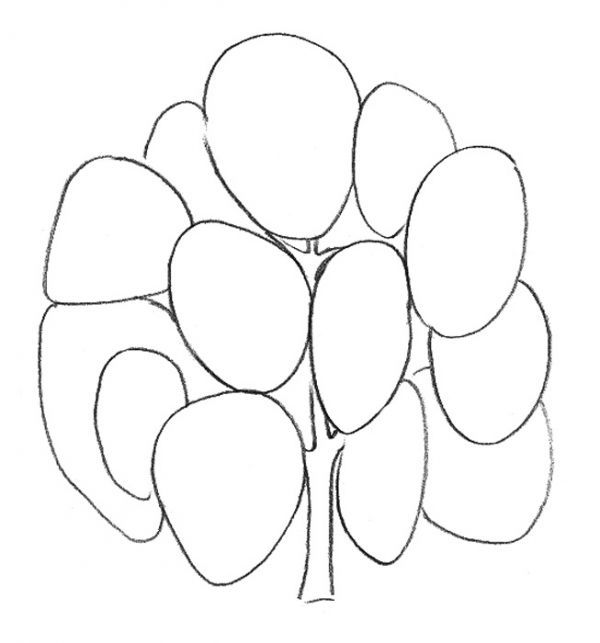
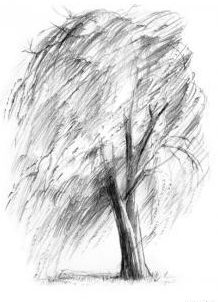
Let's start the drawing with the application of the original contours of the tree.
- We recall the geometric shapes and depict a massif of circles, resembling balloons rushing to the sky in shape. Add the barrel line.
We draw the original contours of the vertebrae branches
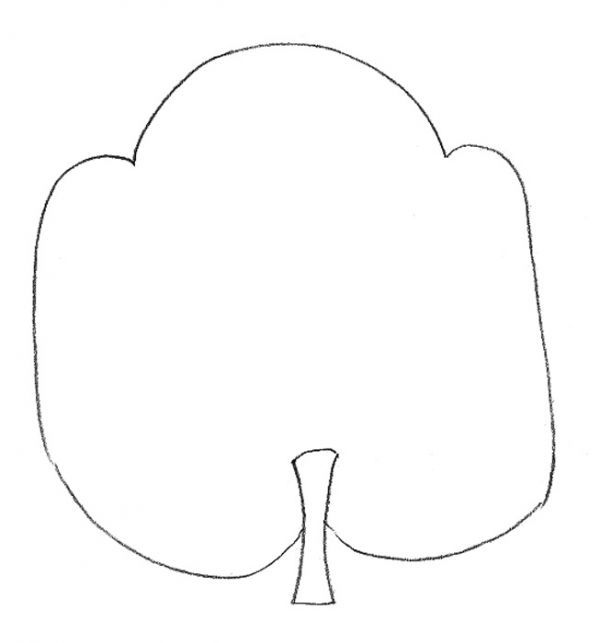
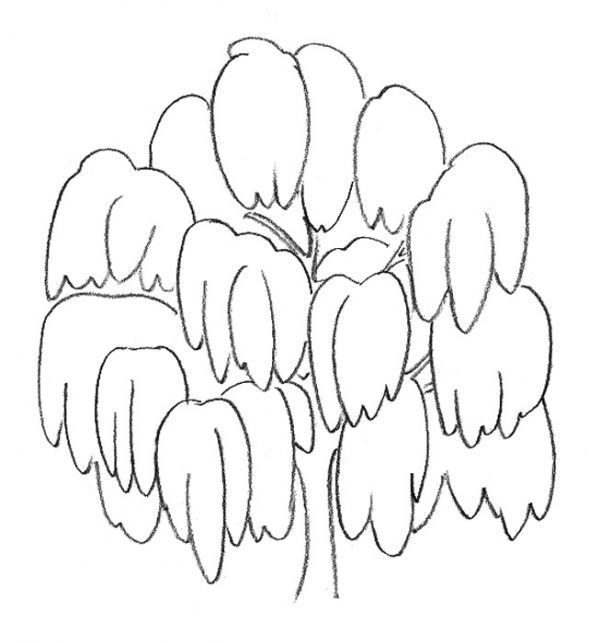
- We finish the second line of the contour of the barrel, while showing the largest branches. We show with curved lines and crown drooping to the ground.
Draw the barrel and drooping branches
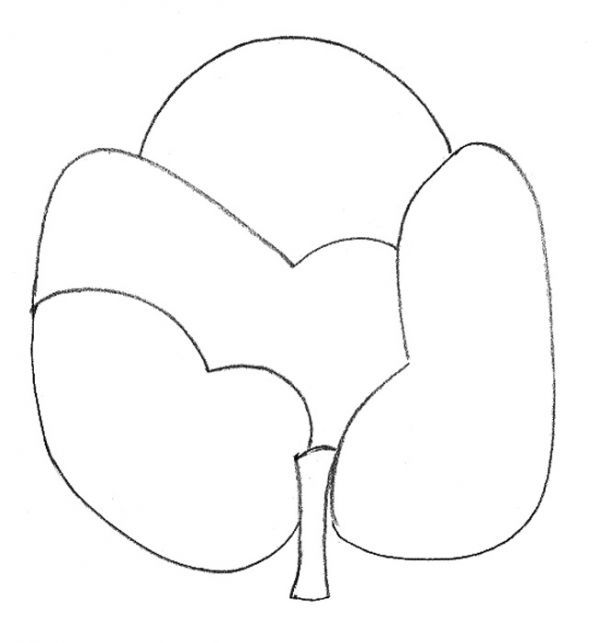
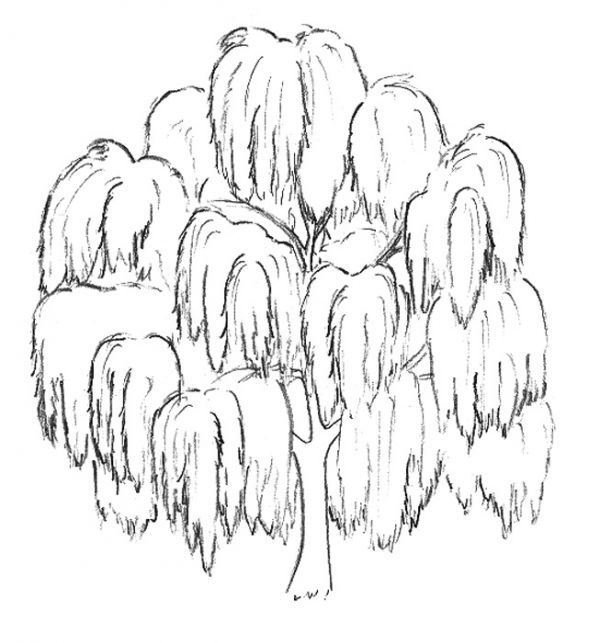
- We draw willow branches, adding additionally lines to give volume and clarifying the facial part. In order not to have difficulties with drawing branches, carefully look at the photo and repeat all the lines.
- The turn came to draw small willow twigs. Continue the sparkle with the photos presented.
Show small twigs on a tree
- We erase all the unnecessary lines in the figure with an eraser. We draw small branches and foliage where the site on the tree looks “empty”.

Add parts
- We apply light hatching to the lit areas, shade the trunk and willow branches.
We shallow some areas
Option Third
- We also draw blooming willow. We draw the initial outline of the tree: a large half -ovar, from which we will draw a crown, and the barrel.
We outline the contour of the crown
- Do not forget that all lines in the first stages are applied without pressure on a pencil, so that later they can be easily removed.
- We draw the top of the tree, depicting a wave -like foliage. We wash the auxiliary line. We clarify the shape of the barrel.
We clarify the shape of the top of the tree
- We draw additional lines on the crown, dividing it into several tiers.
Divide the crown into sectors
- We clarify the crown of the tree: we draw circles and ovals lying one on the other.
We begin to draw branches
- The next step will be the drawing of willow branches: add the volume with short lines and decorate the lower part of the branches hanging to the ground. We draw the main lines of the barrel.
Draw twigs in more detail
- All branches need to be “fluffed”. To do this, along each branch hanging down we will go through short stroke lines.
"Fluff" wood "
- We decorate with yellow, because we have a blooming tree. But you can decorate with green.
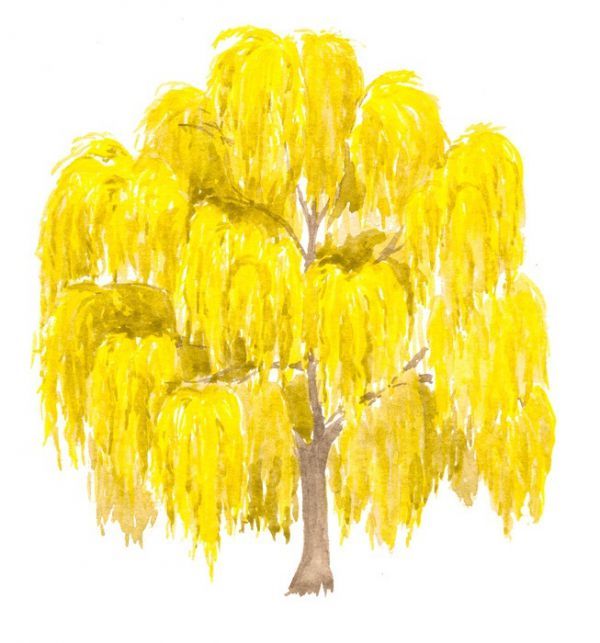
We apply bright colors to the pattern
Let's try to portray Yves a little differently. For the picture you will again need a simple pencil and a clean album sheet.
- We mark the sheet for 3 parts. In the lower part we draw two horizontal lines. It will be the soil in which the tree grows.
We make initial markings
- Let's make the crown’s markup: draw short lines under the slope, marking the top of the tree on top with a horizontal segment. Approximately in the center we will draw a curved line of the tree trunk.
- We will draw another line in parallel with the initial outline of the barrel. We will draw an additional main branches.
Draw the barrel and the main branches
- Let's start adding the tree of foliage, remembering that the Krona willow drooping: all twigs are lowered to the ground.
We continue to draw branches, hide the barrel under the crown
- We begin to stroke directly under the crown of the trunk, drawing the details in accordance with the pattern below. After that, let's move on to the hatching of the whole crown.
- Add the shadows to the bottom of the crown.
We apply a pencil barn on the branches and the remaining part of the barrel
- We draw some details and the drawing is ready. It remains only to decorate if there is a desire.
We apply more intense hatching in the bottom of the tree
Ready drawing
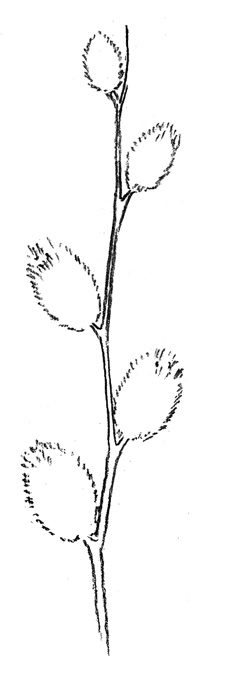
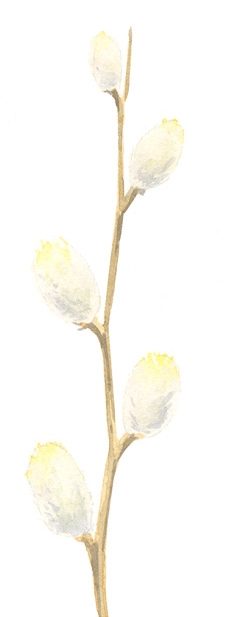
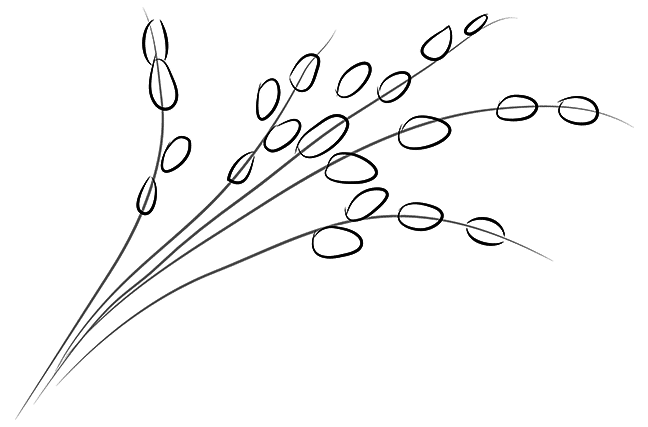
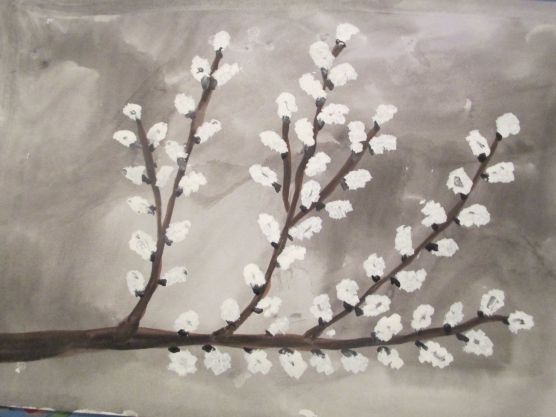
How to draw a branch of the top with a pencil in stages?
In early spring, the verba blooms. Let's try to portray fluffy inflorescences of a reconnaissance twig.

If you take a closer look at the twig of the vertebra with fluffy earrings, you can see that they are not located opposite each other, but alternately.
The largest fluffy inflorescences grow in the lower part of the branch. Gradually, they become smaller and already at the very top of the kidney branch is tiny.
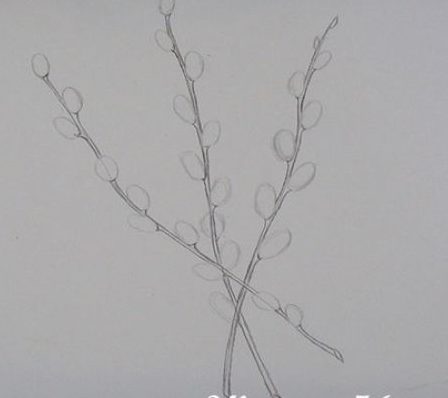
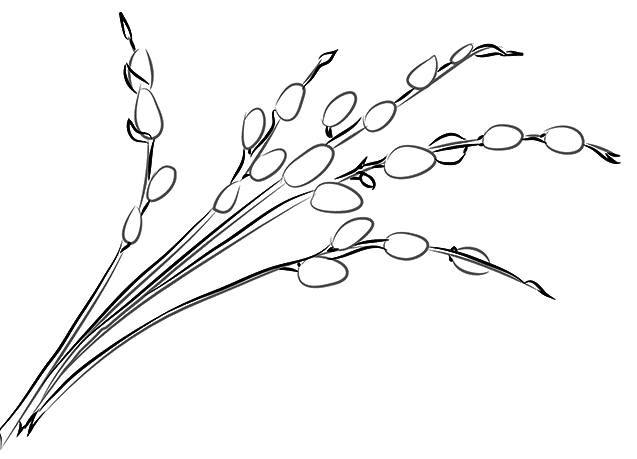
- We draw the initial contours of the branch. We denote the kidneys by ovals. From each oval we will draw a short line to the kidney.
- We draw a parallel line on the branch and on the short lines that connect the bud to the branch.
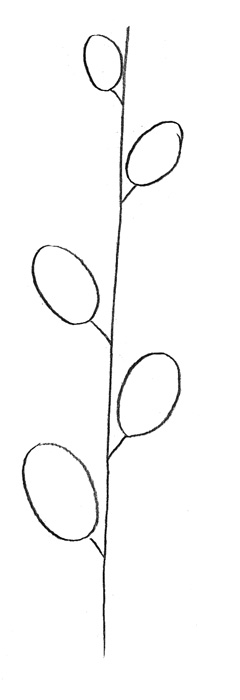
We draw straight and circles on it

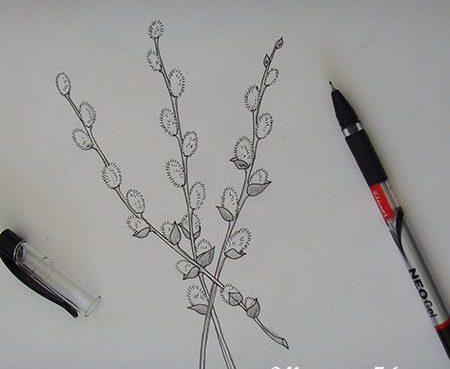
- We wash the contours of buds with an eraser and draw in short lines, placing them close to each other, the pubescence of buds.
- We draw the details: on the tops of each bud we show the villi, drawing several rows of short lines.
We draw villi on buds
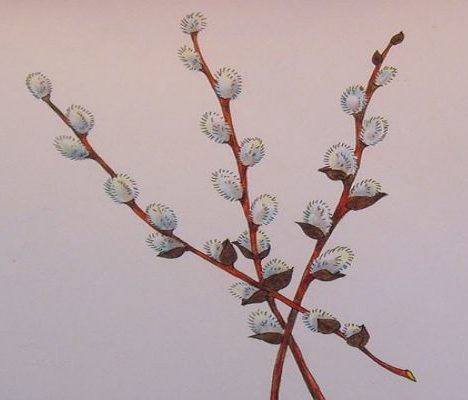
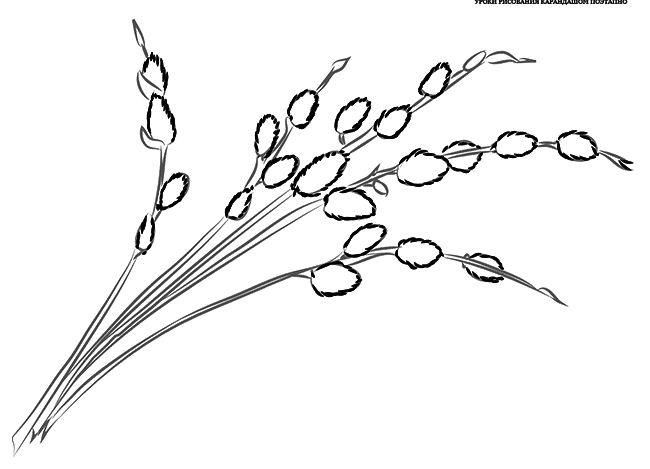
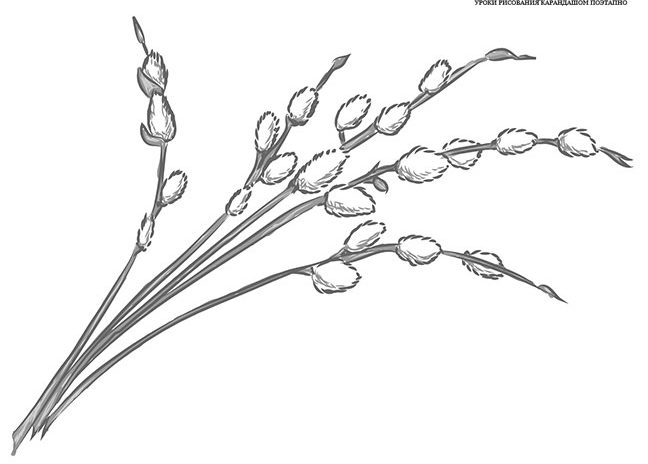
- We decorate the pattern using light shades for buds (yellow, blue, gray) and brown color for the branch. You show glare on a branch with yellow.
Add the colors "cats"
You can draw recruitment twigs with colored pencils on a congratulatory card.
For the picture you will need:
- clean sheet of paper
- simple pencil
- colour pencils
- eraser

What you need for work
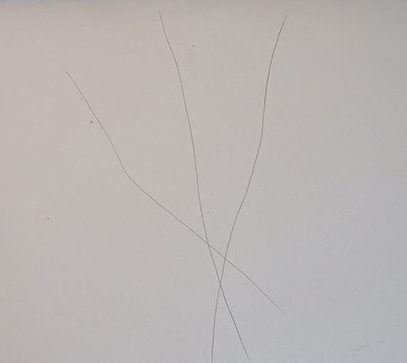
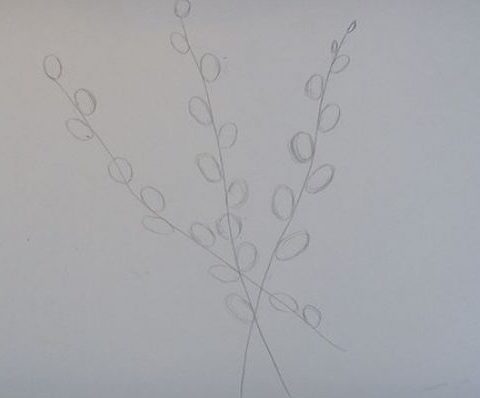
- We begin to draw a symbol of the bright holiday of Easter with the outline of the original contours. These will be 3 lines that will become twigs. The main thing is that they are directed up and closer to the lower edge of the sheet touched each other.
We draw three twigs
- We denote the kidney ovals on the branches. We try to draw them approximately the same.
Draw the kidneys on the branches
- We draw a second line of the branch, forming and drawing the main circuit.
Clearly draw the twigs
- We draw the scales from which the kidneys blossom. To make it easier to draw them, we recall the shape of the leaf.

We finish the scales
- We leave some kidneys without scales - they are so tiny that they simply are not visible. We draw villi on the kidneys.
Circle the contour with a pen or felt -tip pen
- We clarify the contour with a handle or draw a darker with a simple pencil.

We wipe all auxiliary lines with an eraser
- We remove all unnecessary lines. We start decorating. The stem is painted with red-brown color.
- For scales, we use a dark brown pencil. We draw a light brown tint on the sections.

Start to decorate the stem and scales
- We decorate the reeds of the willow with light stroke lines with blue, yellow and gray.

Preteen the blossomed buds in blue
Ready drawing
We draw a few recruiting branches with blossomed buds.
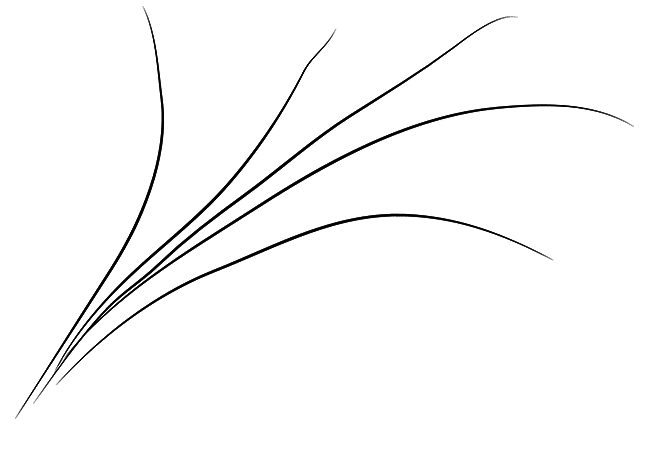
- We draw 5 inclined lines, giving them the shape of a bouquet.
- We draw buds: we denote the initial contours by ovals, without pressing on a pencil.
We draw twigs
- We draw one more line on the branches, giving them the volume. We finish the scales under some buds.
Draw buds on branches
- Ending gradually auxiliary lines on buds, draw villi. To do this, we draw short stroke lines, placing them close to each other.
We will draw one more line on the branches
We draw villi
- Add shadows on the kidneys, on scales. Take a closer look: the shadows on the buds are drawn on the same principle as the villi. We paint over the twigs, not forgetting to leave light areas - glare.

The lower part of the branches and buds are slightly painted over
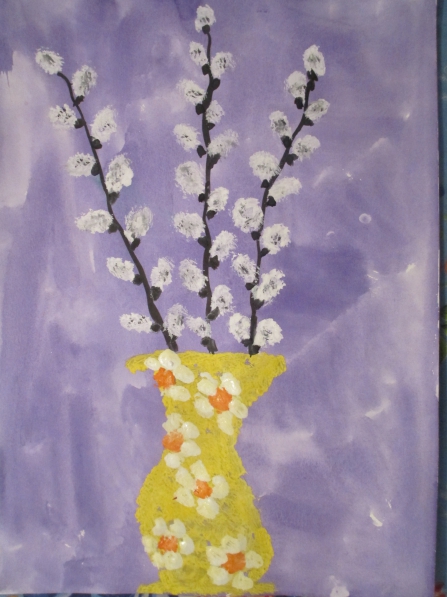
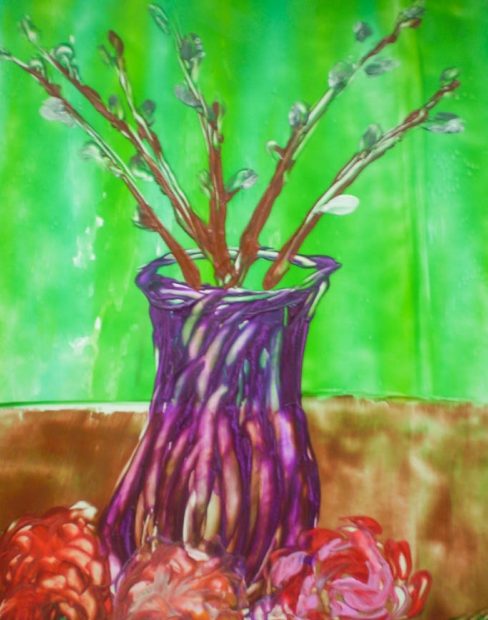
How to draw a recoil in a vase with a pencil?
It is not difficult to draw recruitment twigs in a vase if before this is portrayed one twig and understand the kidney location scheme.
- We outline the main contour of the vase and with a large circle we denote the future vertebral branches. The main thing is that both parts of the vase are symmetrical.
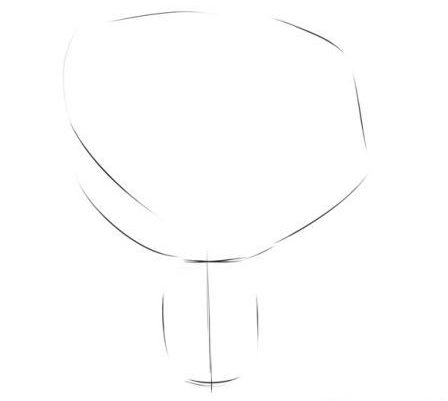
We plan the main contour of the vase
- We draw a vase: draw the neck with two parallel lines, we draw the bottom in the same way. We denote the vase shoulders with a semicircle.
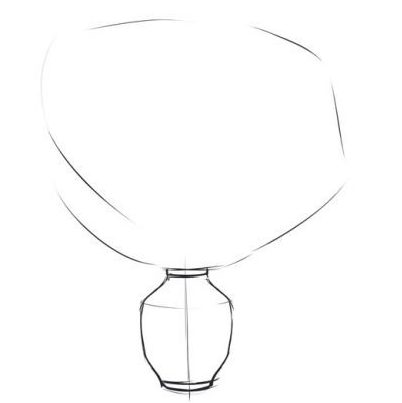
We draw a vase
- Let's start drawing the twigs of the vertebral. We draw the bases thicker, thin short twigs depart from them.
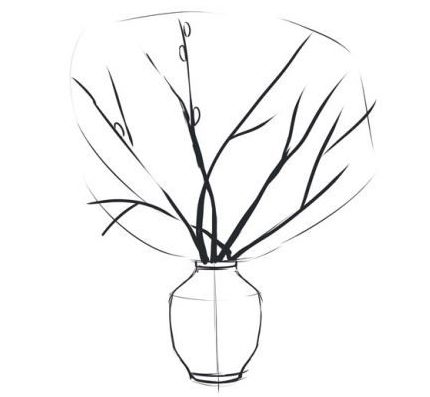
We draw twigs
- We draw fluffy buds on the branches.
Draw the kidneys on the branches
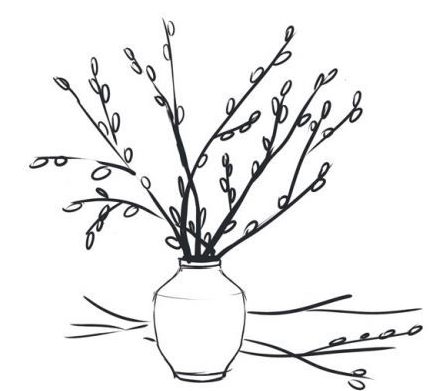
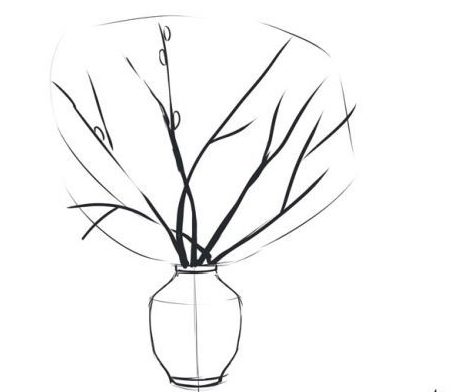
- We will finish the branches lying on the table.
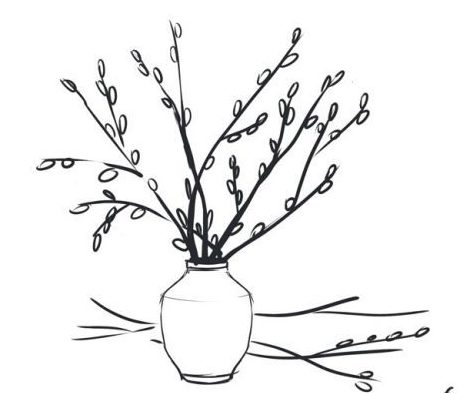
We will finish the branches lying on the table
- Add fluffy buds along the entire length.
- Near the vase you can draw Easter eggs.
- Let's start giving the volume of a vase and kidneys. We use soft hatching for this.
- In the same way, we will give the volume to Easter eggs.
- We outline the contours of the vase, branches and eggs with a black pencil or felt -tip pen.
- Since the vase stands on the table, you need to outline the shadows under the lying branches, under a vase and eggs.
- Add a vase pattern.
- Lastik draw glare on a vase, on eggs.
Add shadows on a vase on the table
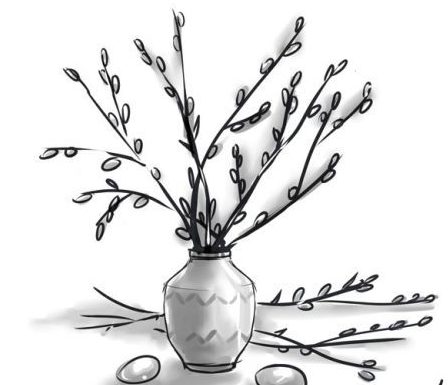
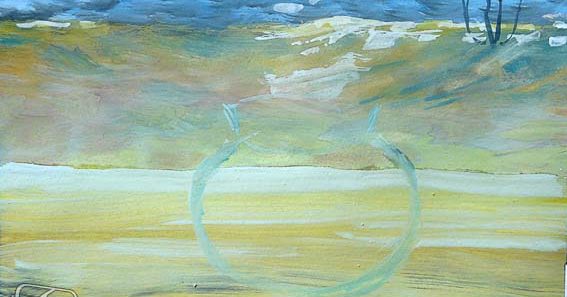
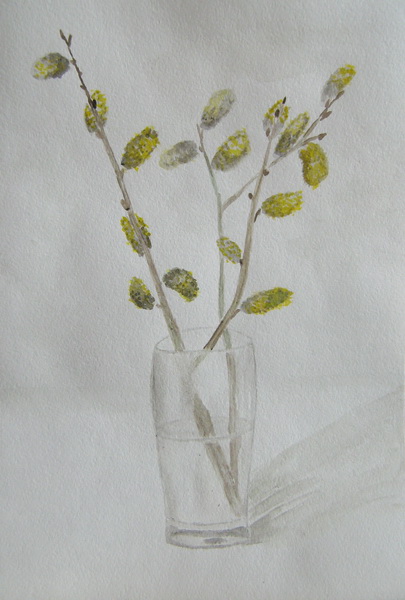
How to draw a spere in a vase gouache?
For the picture you will need:
- gouache
- album sheet
- simple pencil
We begin to draw a spring still life with recruitment branches from the creation of the background: mix on the palette with water in such colors (each separately): blue, yellow, red-brown, white.
- We take a wide flat brush and draw a pale strip with each color, stretching it in width. We start with blue, and closer to the lower edge of the sheet, the color becomes red.
Cooking the background
- We draw in short strokes water in the red-brown strip. We put the smear behind the smear quickly, without waiting for the paint to dry.
We draw water with wide strokes
- To get a rich blue color that we will use for this, take blue and white gouache, and a little black. On the palette, gradually add blue or white paint or black.
- We draw the forest behind the river with wide strokes. Trees growing closer to the foreground are drawn with a mixture of black, white, blue, dark green and yellow colors (mix the paint on the palette until the desired shade is not possible). We dilute the mixture with white paint so that the trees that are in the distance do not seem too bright.
We draw the forest behind the river
- Too pale trees in the figure should not be done, otherwise the recruitment twigs on a light background will not look spectacular.
We draw the shore with wide strokes
- Behind the trees we will draw another pale blue strokes, similar in shade to the color of the sky.
- We draw the visible part of the coast with wide strokes. We use a mixture of yellow, brown paint, ocher and a little green for this. We portray the shadows in the foreground in blue. We plan the bushes and trunks of trees.
- In some places we will go through the water and the shore with wide white strokes.
Let's go through a brush with white paint along the shore and water
- We draw horizontal strips of the table using a wide brush. The lower edge of the sheet is shared, because this part of the table is closer to the viewer.
We draw the wide strips of the edges of the table and outline the vase contour in light blue
- We throw the contours of the glass vase with a brush. We use a mixture of blue, white and gray paint for this.
- To show that the vase is glass, we will make the shadow intermittent, leaving uninvited places and a translucent table.
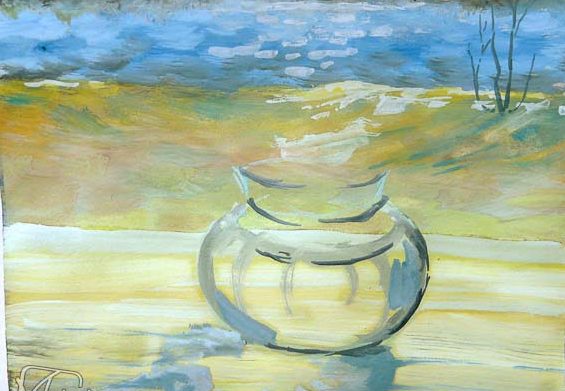
Clarify the shadows on the table and on a vase
- With a few smears of yellow and white paint, we draw glare on a vase and on the surface of the table.
- We draw a dark color (mix brown and gray colors) of the twigs and draw in some places shaded areas in black.
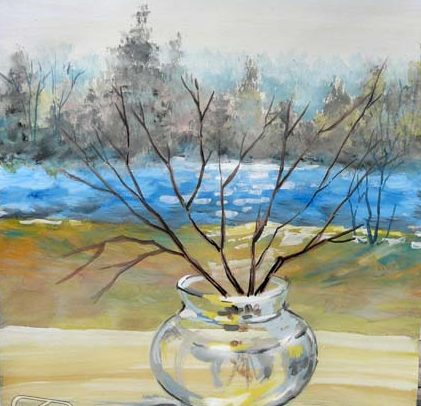
We draw in dark color the twigs
- We prepare a mixture of yellow and white gouache. We draw the kidneys on the branches. We will draw several “fluffists” that fell on the table.
We draw fluffy "cats" of the back
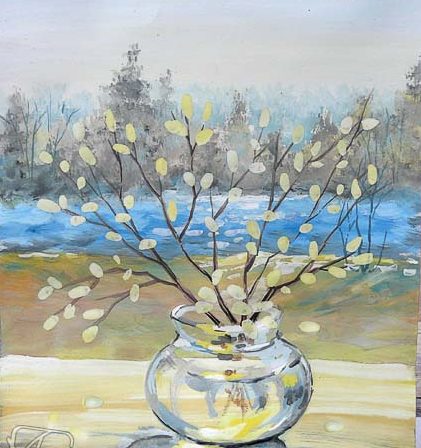
- We draw a mixture of brown and white paint of the kidney core with a mixture. In order for the recruitment buds to seem fluffy, we draw white or yellow villi along the edges. We use the thinnest brush for this.
- We clarify the shadows on the surface of the table and enjoy the picture filled with the sun!
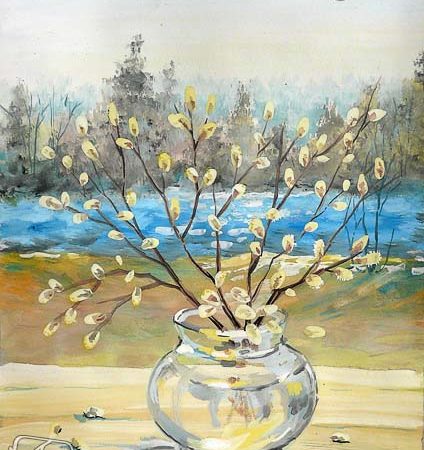
We will finish the shaded areas on the recruitment buds
Vetka Verba drawing children
Children will quickly learn how to draw recruitment twigs if they offer them easy to draw a picture. This section presents children's work on the topic "Verbal branches".
Example 1: Vetochka Verba, children's drawing
Example 2: Vetochka Verba, children's drawing
Example 3: Vetochka Verba, children's drawing
Example 4: Vetka Verba, children's drawing
Example 5: Vetochka Verba, children's drawing