
You can invite guests very brightly with the help of our advice.
The content of the article
- Invitation in the form of a butterfly
- Bee-inflammations
- Invitations for the smallest birthday
- Invitation in the form of mini-mas
- Invitations in the form of candies
- Invitation in the form of sealing
- Invitation-organs
- Invitation-Parakchik
- Small invitations
- Invitations with balls
- Video: Creation of invitations for children's birthday
The child’s birthday is the most responsible event in the life of the family. Of course, everyone wants to contribute to this holiday, but the whole organization falls on the shoulders of the mother. And mom wants to give all the best to her child. The most delicious menu, the most interesting games for the holiday, the brightest decor and, of course, are the most beloved friends invited to the holiday!
How to invite guests? How to make such invitations so that everyone understands that your baby is special and very, very beloved? How to set the mood for the holiday before it starts? Of course, having made funny and memorable invitations to your holiday!
Today we will talk about the most striking ideas for invitations for the baby’s birthday, among which you can choose the very one that is ideal for your holiday. In addition, our ideas are so simple that they can be done with the child. The joy of your baby from such joint crafts with your mother will not be limited! Let's start?
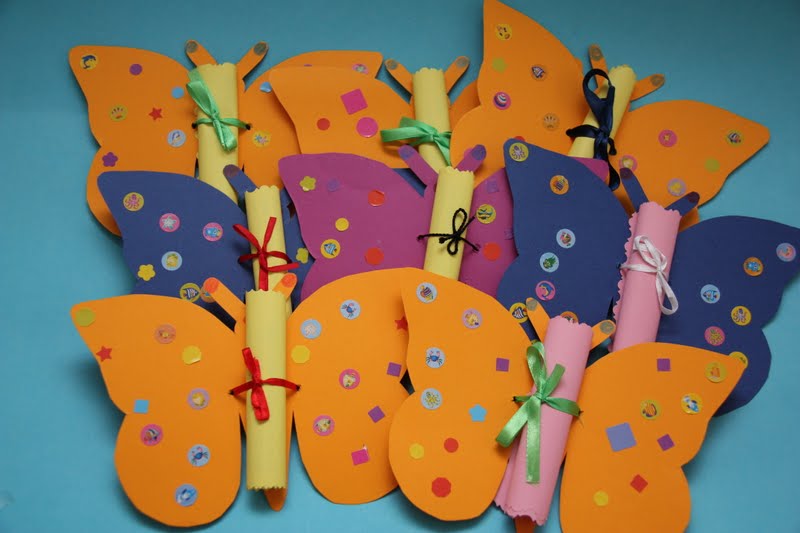
Invitation in the form of a butterfly
Such invitations are ideal for the birthday of a little princess. In addition, small gifts can be invested in these invitations, which will become a pleasant surprise to future guests, thereby setting the mood for the holiday.
What do you need?
The number of materials is designed for one invitation:
- 1 sheet of bilateral color cardboard.
- 1 tube of PVA glue.
- 1 brush for glue.
- scissors.
- 1 sheet of white paper A4 to write the text of the invitation (if desired, you can take colored paper).
- long thin candies or pencils for gifts.
- 10 cm of satin tape.
- lighter.
- sparkles (1 package).
We invite
What do we have to do?
- Fold a sheet of cardboard in half and make a sketch of the wings of the butterfly on it. It should also be noted on the fold of places where cuts will be made for a gift, and on one of the wings inside the future butterfly - the place where we glue the text.
- On sheet A4, make the butterfly contour twice smaller than the first butterfly. On this small butterfly we will write an invitation.
- The second way is to cut a piece from white paper according to the size of the gift, write an invitation on it and wrap a gift into it.
- Now you can cut the butterflies on the sketches made earlier. In the marked places, cut small cuts for gifts.
- If you glue the text of the invitation to cardboard, then glue it. Work very carefully so that excess glue does not spoil the invitation.
- Insert the gift into the holes. If you do not glue the text of the invitation, first wrap a gift into it.
- Avenue wings with glue in those places where you want to make a decor. You can draw a beautiful decor with glue, or you can just a contour. Dip your butterfly in sparkles and let it dry.
Bee-inflammations
These cute invitations with insects that all kids like is easy to do. Bright and sincere, they will approach a thematic holiday or for a summer holiday in nature.
What do you need?
The number of materials is designed for one invitation:
- 1 sheet of bilateral decorative white cardboard.
- scissors.
- 1 tube of light yellow paint for honeycombs (if you do not have light paint, you can mix white with yellow).
- 1 tube of dark yellow paint for bees.
- a piece of bubble film 10 by 10 cm.
- 1 black felt -tip pen.
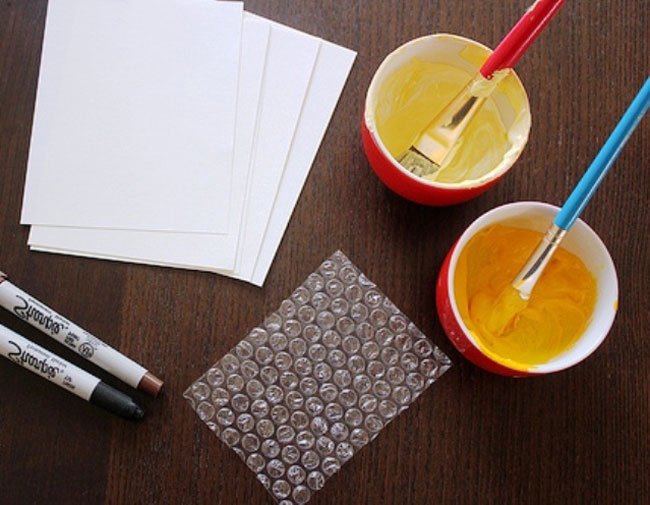
Materials
What do we have to do?
- Apply light yellow paint to the bubble film and make prints on decorative cardboard, on one side. Wait when the paint dries. It will turn out beautiful and delicate honeycombs.
- Dip the baby's thumb in a dark paint and make an imprint on the honeycombs. If you make invitations yourself, dip any of your finger and do the same. These prints will later become bees. Wait until they dry out
- Take a black marker and draw bees, paws and strips.
Invitations for the smallest birthday
With this wonderful birthday invitation, you will greatly delight all grandparents. The idea is especially suitable for mothers whose children are completely babies, and cannot fully help them make invitations to the holiday.
What do you need?
The number of materials is designed for one invitation:
- 1 sheet of bilateral decorative white cardboard
- scissors
- 1 tube of raspberry finger paint (or on a tube of colors of different colors)
- 1 saucer (or by the number of colors)
- 1 golden or silver gel pen
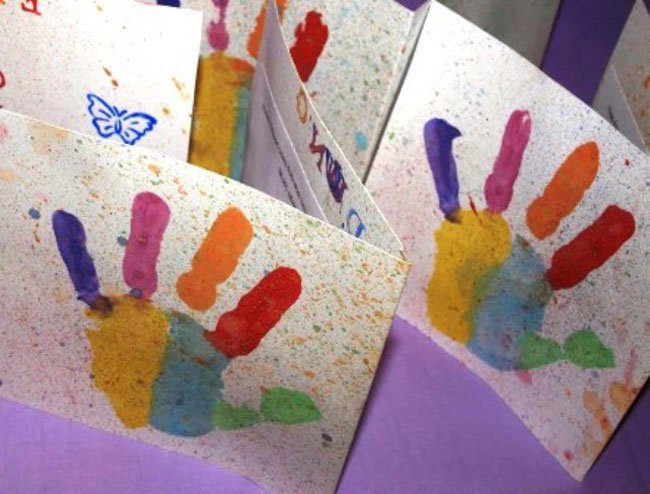
Bright invitation
What do we have to do?
- On the back of the invitation, write the text of the invitation with a gold pen. Do not forget to indicate the exact time and place of celebration.
- Pour the paint from the tube into a plate or a saucer. If you have a lot of colors, pour each paint into a separate saucer. You can also mix paints.
- Dip the small handle in the paint (or each finger and palm separately in different colors). You can apply paint to your palm with a brush, if you are more convenient for you. And leave the palm on decorative paper.
- That's all. It remains to wait for your invitation to dry.
Invitation in the form of mini-mas
Mini-Mas is one of the most beloved heroines of little girls. The mischief and lover of peas and bows, a girl from the legs to the ears is a great idea for invitation, especially if you have a thematic party.
What do you need?
The number of materials is designed for one invitation:
- 1 sheet of bilateral color cardboard black
- scissors
- 1 sheet of white paper A4 to write the text of the invitation (if desired, you can take colored paper)
- 10 cm of satin tape in polka dots
- lighter
- compass
- black gel pen
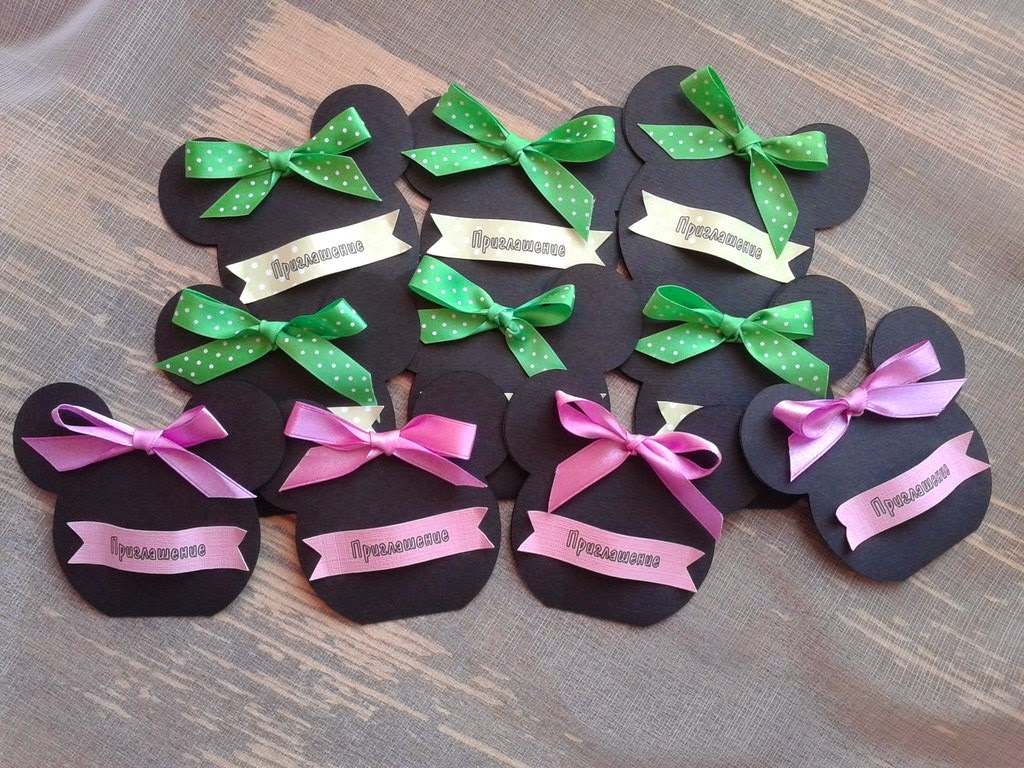
Mickey
What do we have to do?
- Make a mini-mouse head on cardboard-with the help of a circul, make one large circle and two small ones. On white paper, make a circle of a circuit two centimeters less in diameter than a large circle (the head of a mini) - this will be a place for the text of the invitation.
- Cut the head of our heroine and the white circle for the text of the invitation. Make two holes between the ears of the mouse and the same at the top of the white circle. In these holes we will stretch the ribbon.
- Process the edges of the ribbon with a lighter. Pull it into the holes and tie the bow.
- Sign your cute invitations.
Invitations in the form of candies
Ledes are one of the most beloved treats of kids. These bright invitations are suitable for any holiday - it doesn’t matter, this is the holiday of a boy or girl, or a thematic party.
What do you need?
The number of materials is designed for one invitation:
- 1 sheet of bilateral color cardboard of any color that is suitable for your holiday.
- 1 tube of PVA glue.
- 1 brush for glue.
- scissors.
- 1 sheet of white paper A4 to write the text of the invitation (if desired, you can take colored paper).
- 10 cm of satin tape.
- lighter.
- compass.
- 1 wooden stick.
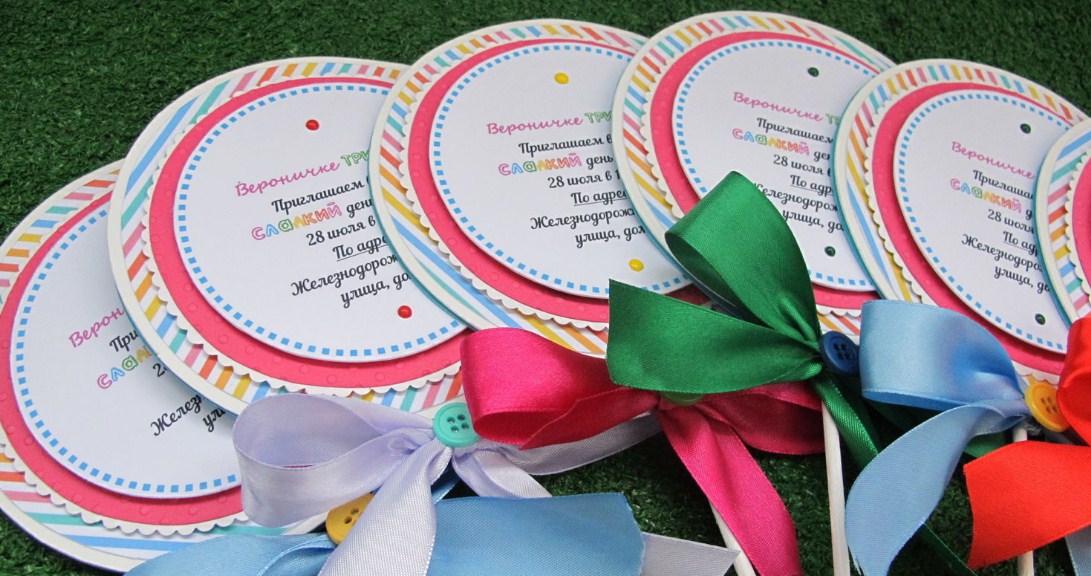
Ledes
What do we have to do?
- Make a circle on cardboard with a circul. On white paper, make a circle of 2 cm with a circuit in diameter than a circle on cardboard - this will be a place for the text of the invitation.
- Cut circles from cardboard and white paper.
- Glue the wand to the cardboard, and gently glue the circle of white paper on top of the wand.
- When our candy has dried up, sign your invitations. You can also pre -write and print the text of the invitation on the printer.
- Tie a bow at the base of the stick.
Invitation in the form of sealing
Invitations in the form of another beloved children's treats are a hint of a delicious treat and the upcoming cheerful holiday.
What do you need?
The number of materials is designed for one invitation:
- 1 sheet of brown bilateral colored cardboard.
- scissors.
- 1 sheet of white paper A4 to write the text of the invitation (if desired, you can take colored paper).
- 10 cm of satin tape.
- lighter.
- compass.
- 1 wooden stick.
- silver paint.
- brush.
- figure scissors.
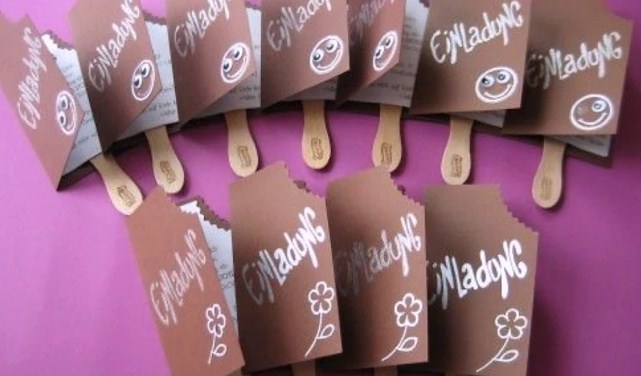
Morozhenko
What do we have to do?
- Draw a square on cardboard. Cut the square of cardboard.
- Fold the square in half. Cut out of white paper a rectangle equal to half the square.
- Glue a wand from the inside to half of the square. Stick a rectangle of white paper on top.
- Crall the three edges of the ice cream, and cut the fourth edge on top with curly scissors.
- Sign the invitation with silver paint with a brush on top.
- Inside on white paper, write the text of the invitation, time and place of the holiday.
Invitation-organs
An original invitation can be written on a figure - Origami. This is probably the most difficult idea of \u200b\u200ball that we have selected for you. There are many ideas on the Internet, you can choose any figure - from an elephant to a voluminous cube or swan. In addition to materials, you will need patience and accuracy.
What do you need?
The number of materials is designed for one invitation:
- 1 sheet of colored bilateral paper
- scissors
- 1 black felt -tip pen
Origami
What do we have to do?
- Cut the square out of paper.
- Fold the bed in half.
- Fold the resulting rectangle again in half.
- Disassemble the resulting small square, and fold the resulting large square in half to make a triangle.
- In the center of the triangle, the folds formed a square. Make another fold on this square. On the other side of the triangle, make the same bend on the square.
- Lay the triangle. Bend the edges of the square inside. It turns out a square slightly less. Bend the edge of the resulting square inside.
- As a result of the above manipulations, a small square turned out. If it is straightened, a figure with four legs.
- Write the text of the invitation by a felt -tip pen on the legs of the figure and fold it back in a square.
Invitation-Parakchik
This is a great idea for the birthday of a boy or a thematic party. A cute dragon will tell your guests about the holiday of your beloved baby.
What do you need?
The number of materials is designed for one invitation:
- 1 sheet of bilateral color cardboard green color
- 1 tube of PVA glue
- 1 brush for glue
- scissors
- 1 sheet of white paper to cut and draw eyes to a dragon and teeth
- flomaster
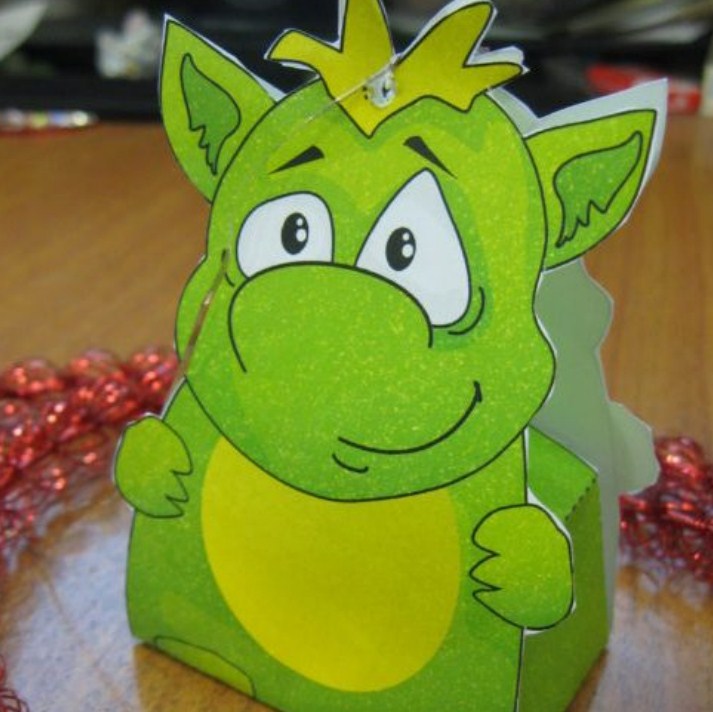
Drakosha
What do we have to do?
- Cut from green cardboard dentures for the dragon back and square.
- Fold the square in half.
- Green cloves to the back of the square.
- Cut two circles from white paper, draw pupils on them and glue the postcards inside them.
- Cut the dragon from white paper. Stick them inside the postcard.
- Sign the postcard.
Small invitations
This is not just an invitation - this is a way to make your guests a pleasant little gift.
What do you need?
The number of materials is designed for one invitation:
- 1 sheet of bilateral color cardboard blue
- 1 tube of PVA glue
- 1 brush for glue
- scissors
- 10 cm of satin tape
- lighter
- sheet A4
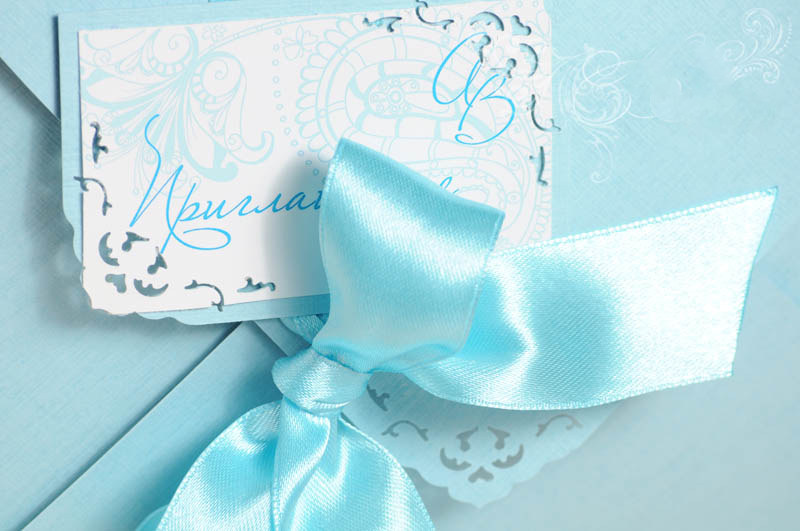
Blue
What do we have to do?
- Cut a rectangle-opener out of cardboard
- Make two holes in the middle of the cardboard
- Pull the ribbons into the holes
- Cut from white paper or rectangle and write the text of the invitation on it.
- Make a bow from the tape.
Invitations with balls
What do you need?
The number of materials is designed for one invitation:
- 1 sheet of bilateral color cardboard
- 1 tube of PVA glue
- 1 brush for glue
- scissors
- 1 sheet of white paper A4 to write the text of the invitation (if desired, you can take colored paper)
- 10 cm of a beautiful lace
- 30 cm of decorative tape
- 1 ball
- 1 marker

With balls
What do we have to do?
- Cut a rectangle from cardboard.
- Stick decorative tape along the edges of the rectangle.
- Make a hole in the center of the rectangle.
- Take the ball, inflate it and write on it the textor of the invitation.
- Flow the ball. Pull the cord into the holes on the rectangle and tie the ball.