
What crafts can be done for Easter with children?
The content of the article
- DIY crafts for Easter from napkins
- Video: chicken, cockerel from napkins with your own hands. Master Class
- Video: Easter bunnies from napkins
- DIY crafts for Easter from pasta
- Video: crafts for Easter from pasta
- Video: Macaron basket. Pasta products. Creative work
- DIY crafts for Easter from cotton pads
- What kind of Easter crafts do you do with your own hands quickly?
- Salt dough crafts on Easter
- DIY Fetra Crafts
- Video: Fetra chicken. A detailed master class
- Video: Easter egg from felt
- Video: DIY Easter baskets from felt
- DIY crafts for Easter from corrugated paper and cardboard: schemes
- Video: Easter crafts with your own hands from corrugated paper
- Crafts from Foamiran on Easter: Templates
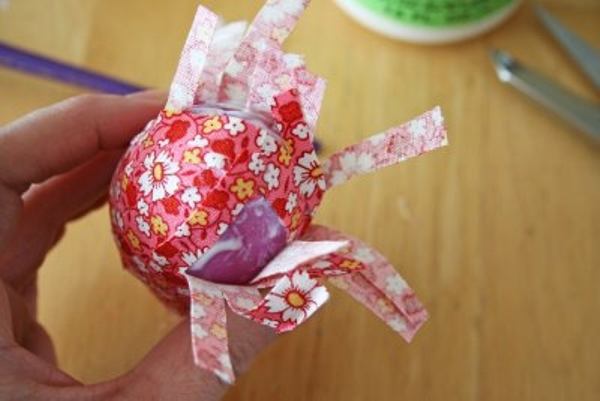
- Crafts from fabric to Easter: Schemes
- Crafts on Easter from Kinder Jita
- Video: We make a chicken from a container from Kinder Surprise
- Video: how to make Easter chicken: crafts for Easter with your own hands
- DIY ribbons for Easter
- Video: Easter eggs from satin ribbons
- Video: Easter souvenir in the technique of artichoke
- Crafts from plasticine to Easter
- Video: Easter crafts with your own hands
- Video: Three Super Cool Crafts for Easter with kids
- DIY crafts for Easter for competition
- Video: Easter composition - a nest with a bird. Master Class
- Video: Easter decor with your own hands
- The bright holiday of Easter is looking forward to not only adults, but also children.
- For kids on Easter days, there is a special time for fun and joy. But most of all, the children are looking forward to the moment of receiving a symbolic gift and presenting pre -prepared crafts.
- This article contains step -by -step descriptions of children's Easter crafts of different levels of complexity.
- Prepare yourself an Easter souvenir from improvised materials a few days before the holiday or in a couple of hours - choose you. Take an inspire and start creativity with the children.
DIY crafts for Easter from napkins
You can quickly make an Easter craft from napkins. You just need to wrap a boiled egg with a napkin and tie a beautiful ribbon. You can replace the napkins with corrugated paper.
Another way to make crafts from napkins:
- Prepare a drawing on which a layer of napkins will be applied.
- Determine the colors and choose the napkins of the desired shades.
- Cut a lot of squares from napkins 2x2 cm in size.
Comers every square in a small ball. - Stick balls of napkins inside the drawn contours.
- You can make a card with a turn or cut a figure along the contour.
Application from napkins
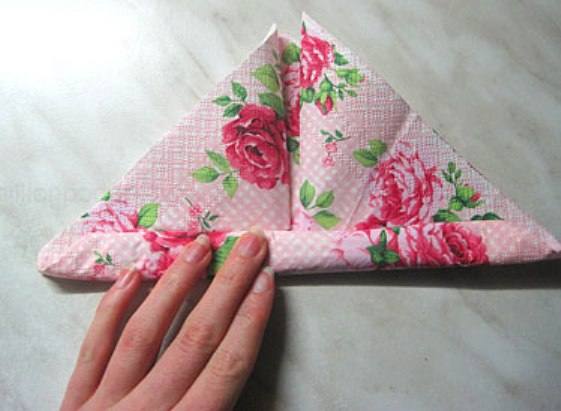
Easter composition will be incomplete without a stand for eggs. You can make it from napkins:
- folding a paper cloth diagonally
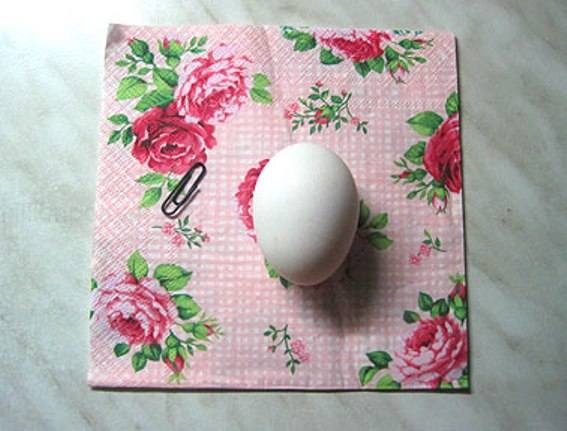
In addition to a napkin for a stand, you will need that egg and a paper clip
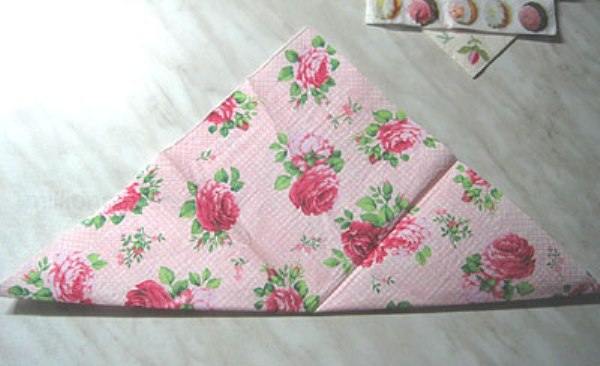
Folding the cloth diagonally
- bend the corners of the resulting triangle up, connecting them to the upper angle
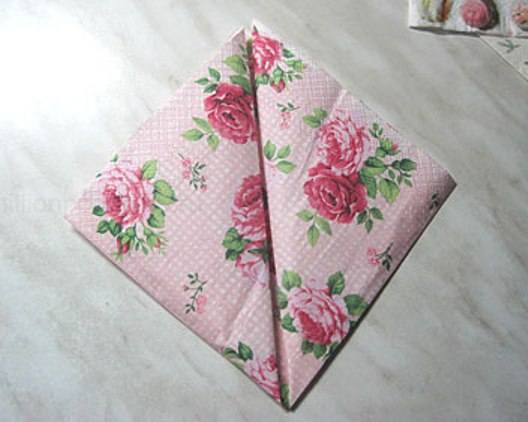
Bend the corners up
- we twist the lower edge of the resulting square with a roller approximately to the middle line
Twist the roller half of the resulting square
- turn the structure and connect the lower corners at the roller
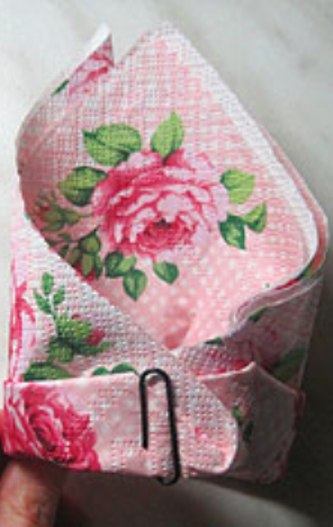
We fix the corners under the roller paper clip
- we fix them with a clip
- we turn the future basket over again (the paper clip should be behind) and straighten the ends of the workpiece
We straighten the ends of the workpieces
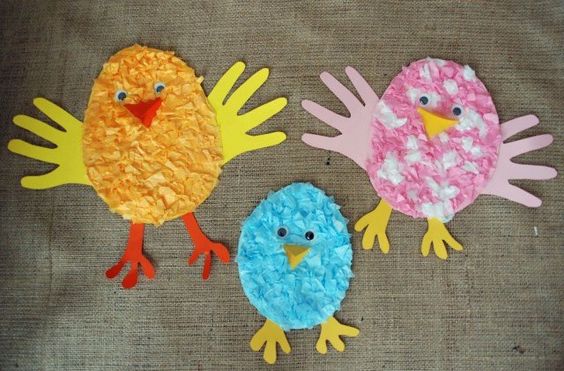
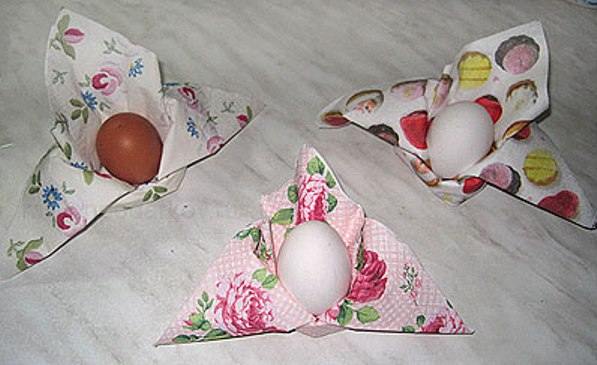
Options for crafts from napkins:
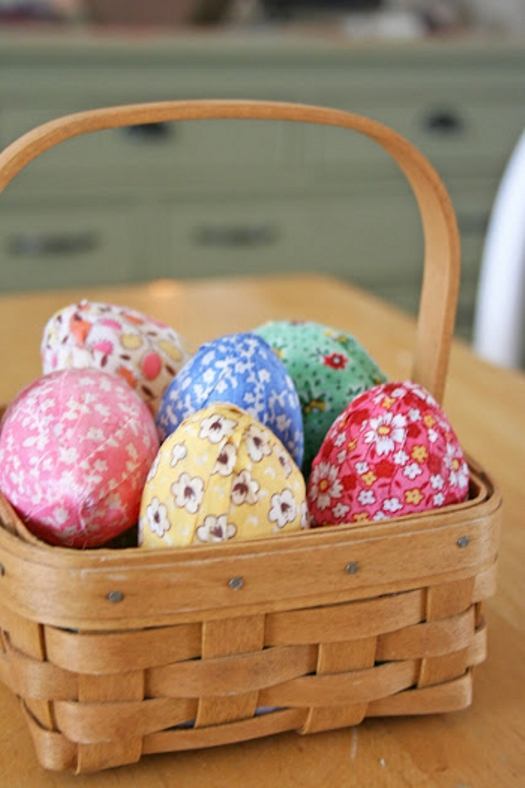
Easter basket with eggs
How to wrap an egg with a napkin

Easter wreath
Video: chicken, cockerel from napkins with your own hands. Master Class
Video: Easter bunnies from napkins
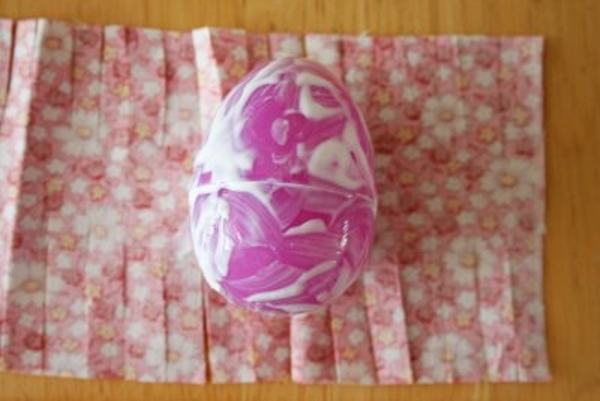
DIY crafts for Easter from pasta
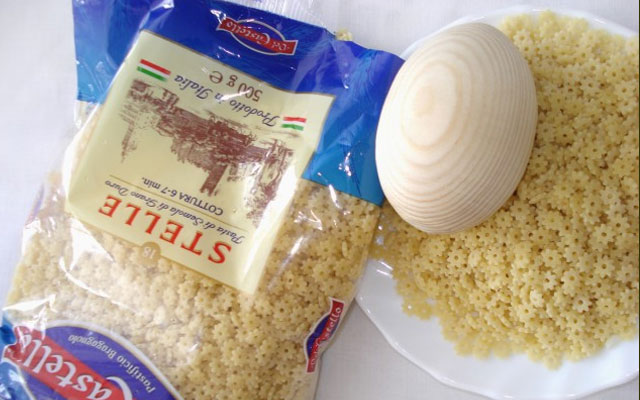
Macarone products are also used in the manufacture of various crafts. We offer you several lightweight options for creating an Easter souvenir from pasta.
The first method: original Easter egg
Prepare the necessary materials and tools:
- wooden or foam eggs
- glue (it is better to take PVA, then there will be no traces of glue on the finished craft
- brush
- bright colors
- a stand on which the finished product will dry
- macarone products in the form of small stars
- dry sparkles
We begin to create!
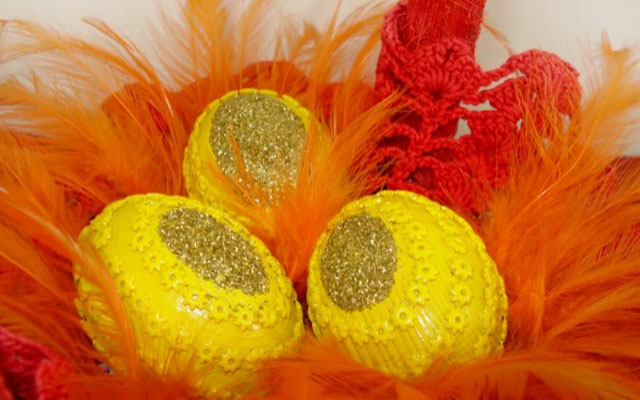
Easter eggs from pasta
- We will apply evenly on the workpiece of the future Easter egg layer of glue and begin to glue in even rows of pasta stars (but only raw!).
What will be needed for the manufacture of crafts
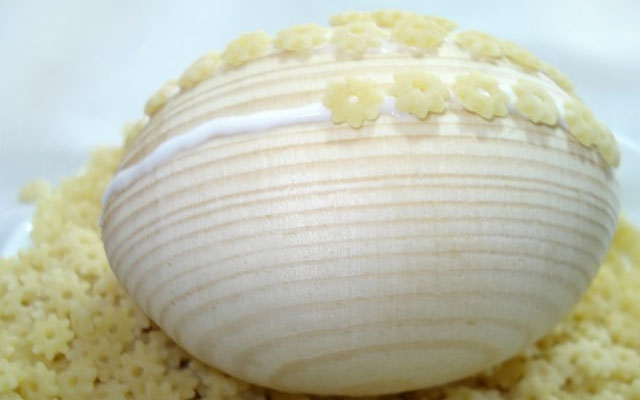
Apply glue with thin even strips and glue the pasta-stars
- If desired, you can use small pasta of various shapes, as well as glue them on the workpiece in any order.
- We leave the egg for a while so that the glue dries well.
- We check whether the glue has dried up and if all the stars are well held on the workpiece of the Easter egg, we cover the product with paint. We use a brush for this.
We paint the eggs and apply glue glue
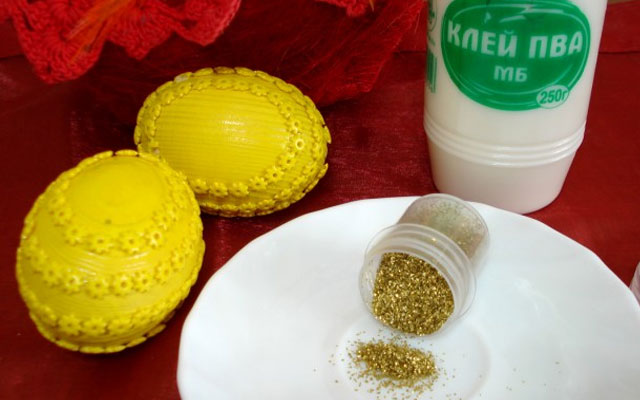
- To decorate the egg with sparkles, we spread the right place with glue, and sprinkle with dry sparkles. After the glue dries, we shake off extra sparkles.
After the glue dries, we shake off extra sparkles
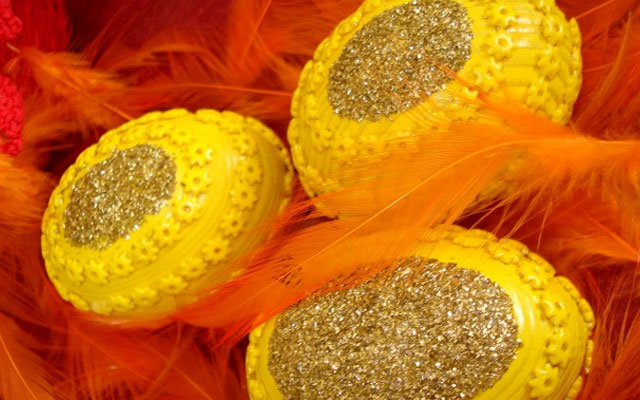
- These are bright souvenir eggs you can make with your child and decorate the room for Easter, putting crafts in the basket.

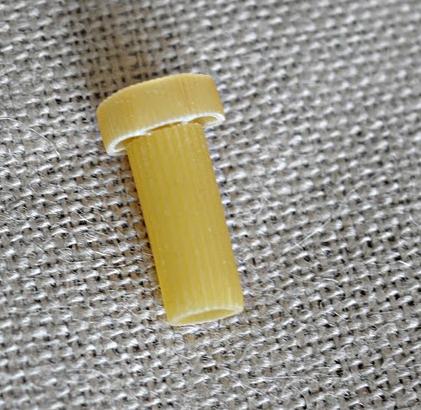
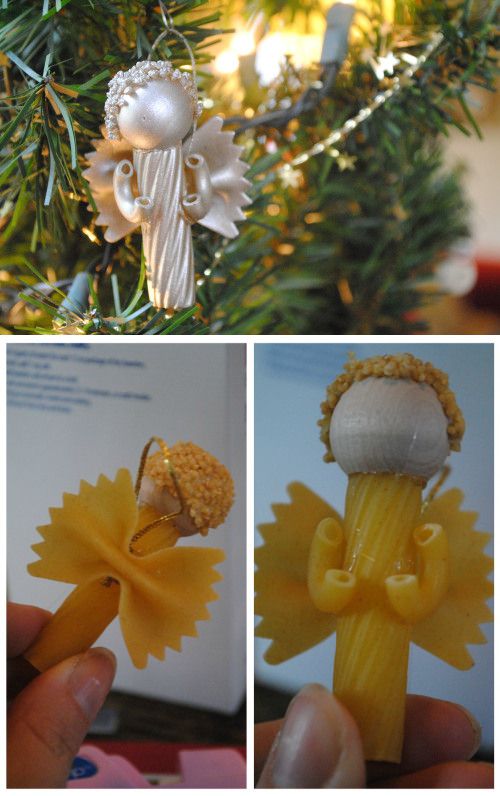
From pasta of various shapes you can make angels.
For crafts you will need such pasta:
- stars
- horns
- spirals
- vermicelli
You can put the angel with your own hands next to Easter eggs, put in a basket or put next to recruitment branches.
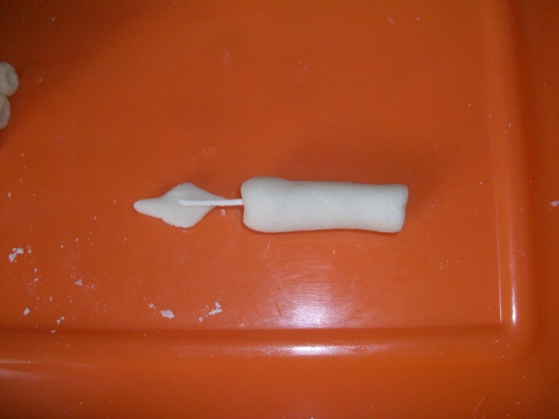
We will need:
- pasta
- sticks
- glue (the moment or thermal pistol is suitable)
- pVA glue
- parked balls made in advance in advance or foam or wooden round blanks purchased in Hend Mide store
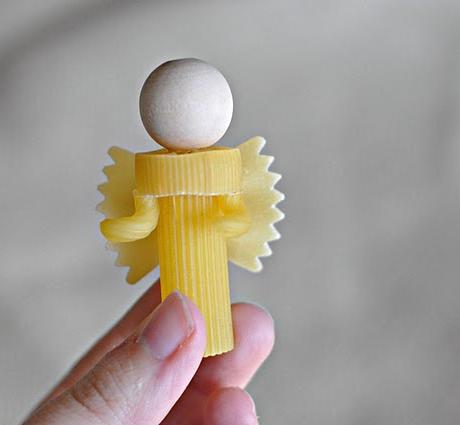
How to make an angel from pasta:
- We glue the pasta in the form of a wheel to a thick tube.
- Apply glue to a ball of salt dough or foam blank and connect to the body.
We glue a small ribbon on the back.
We make the body of the angel
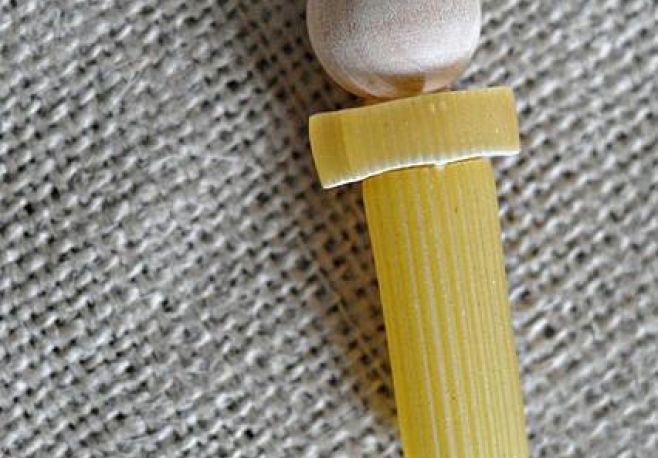
We glue the head
- We select pastes suitable in shape and size for wings (we have macarone banks) and stick it on top of the ribbon.
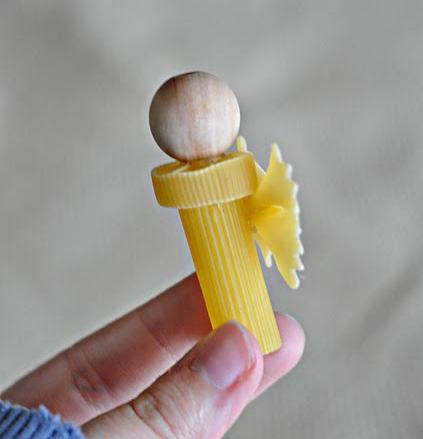
We glue the wings
- We use a small vermicelli for the angel’s hair: we spread his head with PVA glue and immerse it in a bowl with a vermicelli or spread in even rows.
- We use pasta-cutters for pens. We glue them near the wings.
We glue hands

How to glue hair
How to glue hair
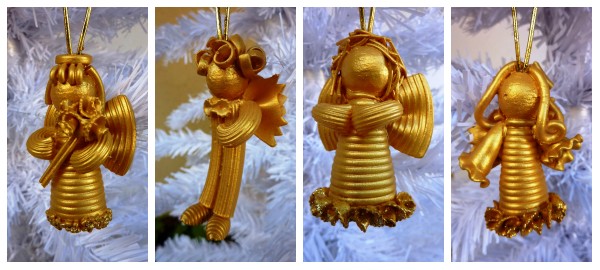
- We only have to cover the angel with paint. You can use golden paint, white or silver.
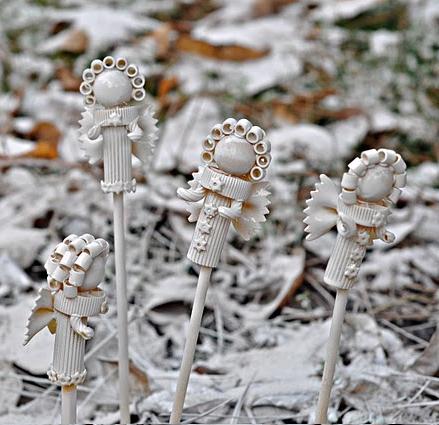
We cover the angel with paint
- Why do you need a wand? To glue it inside the body of the angel and place it in the Easter basket.
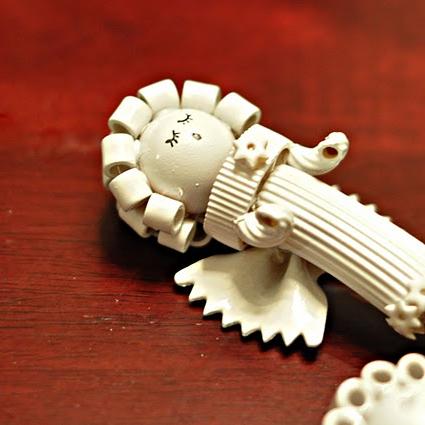
We draw eyes and mouth
Video: crafts for Easter from pasta
Video: Macaron basket. Pasta products. Creative work
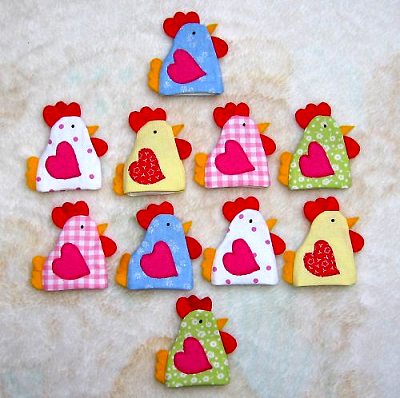
DIY crafts for Easter from cotton pads
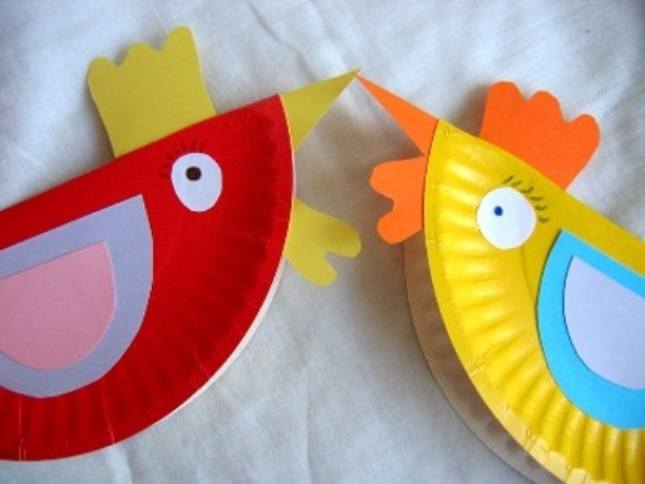
Without an image of a chicken, an angel is difficult to imagine a holiday of Easter. Let's try to make an interesting simple craft - a bright and sweet chicken that can become an element of the decor of the Easter basket or decorate the room during the holiday.
For work you will need:
- cotton wheels
- yellow dye for yellow eggs
- colored paper or cardboard sheets of the desired color
- scissors
- sinel wire
- glue
We start work:
- We dilute the paint with water and lower the cotton pads into the solution. For one chicken, you will need two disk painted with yellow. Leave them to dry.
- From the blue wire of a suitable color we make the paws.
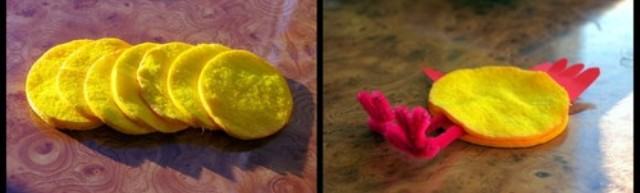
We paint cotton wheels and divide them into two halves. We cook paws
- We cut out a crest made of red or orange paper, wings and beak.
- We place the parts carved from colored paper between two cotton pads and glue them.
- For the eye, the chicken can be used or cut out of paper and draw a black pupil. Glue the eyes on both sides.
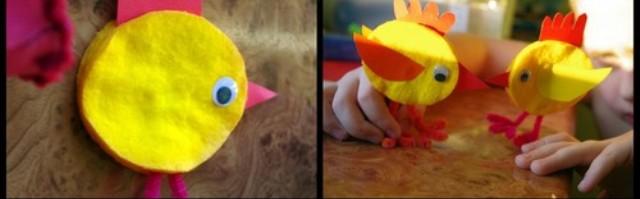
We glue toy eyes, wings cut out of colored paper, beak and crest
From cotton pads you can make angels that complement any interior.
How to make an angel from cotton pads?
- We divide the cotton pad into two parts.
- We put a bead in the center of one of the parts of the cotton pad.
We process the edges of the cotton pad with a zigzag scissors for a more aesthetic type of product.
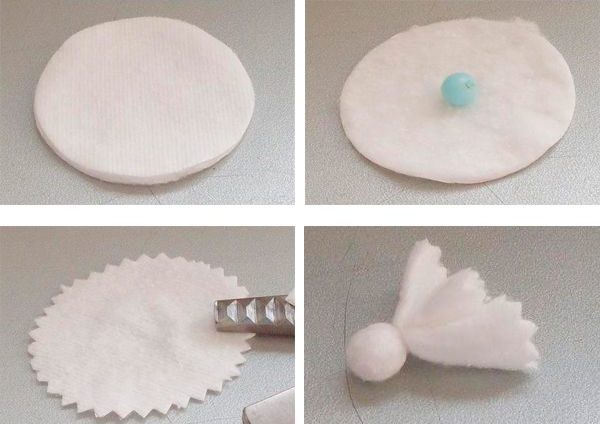
We tie the button with a thread
- We bend in a circle a disc with a bead inside and wrap a thread under a bead. We straighten the resulting "skirt" from a cotton pad.
- Fold the second part in half. Wrap the edges of the workpiece at the same distance from the center. After that, we wrap the edges to the center.
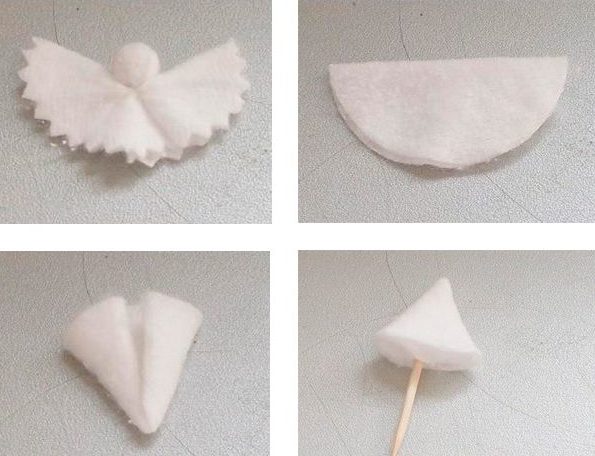
We make wings and trunk
- Diping the toothpick into the glue, we will turn a slightly twisted cotton pound and stick it inside.
Glue the wings to the body.
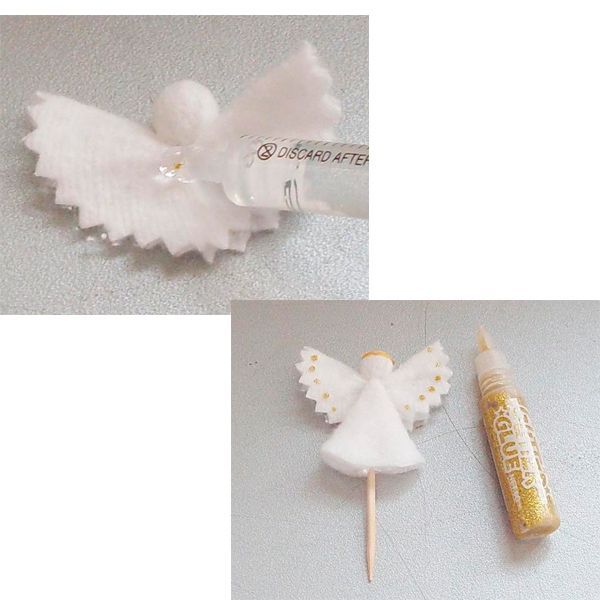
Combine the parts with glue and apply the sparkling point on the wings
- It remains only to apply a strip-down on the head and points on wings of paint with sparkles and a delicate angel is ready!
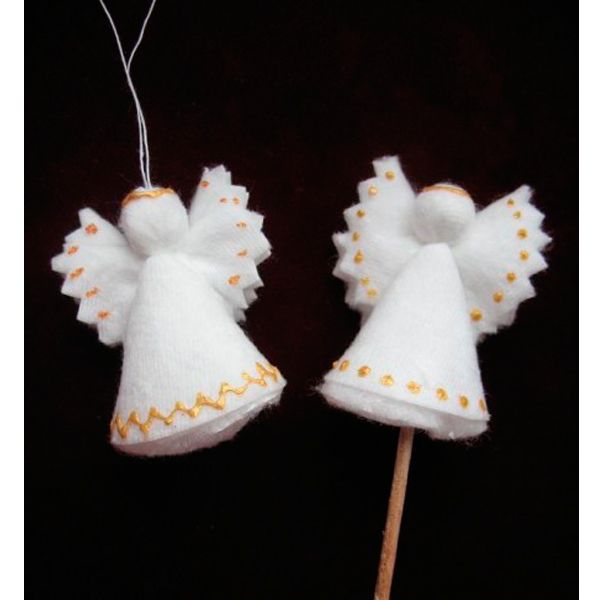
Angels from cotton pads
Other options for crafts from cotton pads:
Easter crafts from cotton pads
What crafts on Easter do you do with your own hands quickly?
In this section you will find descriptions of Easter crafts that can be done in 15 minutes:
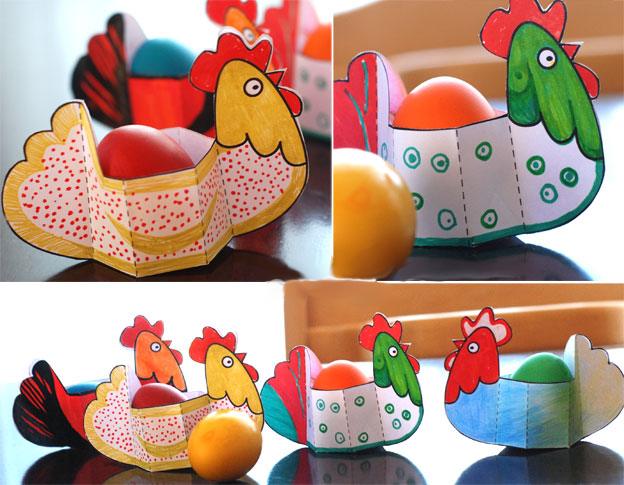
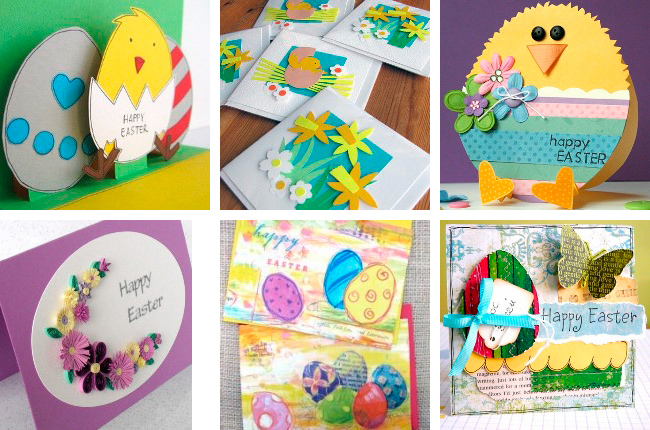
How to make an Easter chicken of paper

Easter chicken template
Paper chicken
For work you will need:
- paper plates or cardboard
- paints
- colored paper
- glue
How to make a paper chicken
- Cut the circle from a paper plate.
- We bend the circle in half
- Cut wings, eyes, crest and beak of colored paper
- Glue to the plate
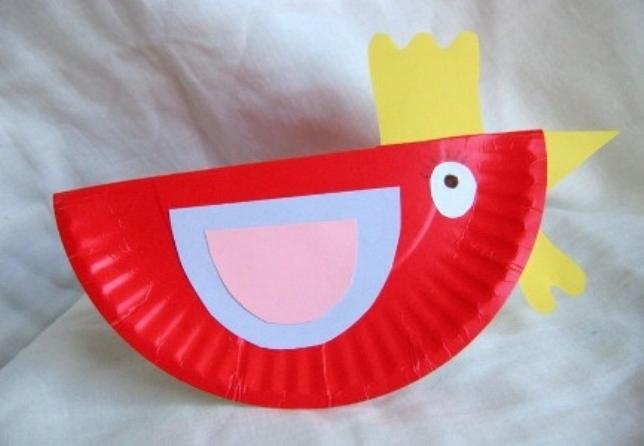
How to make a chicken out of a paper plate
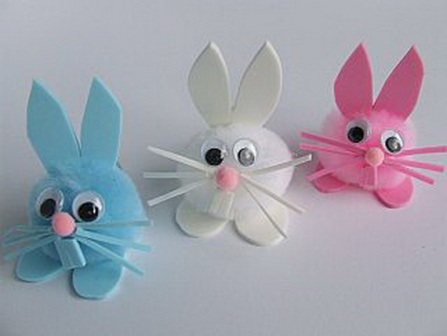
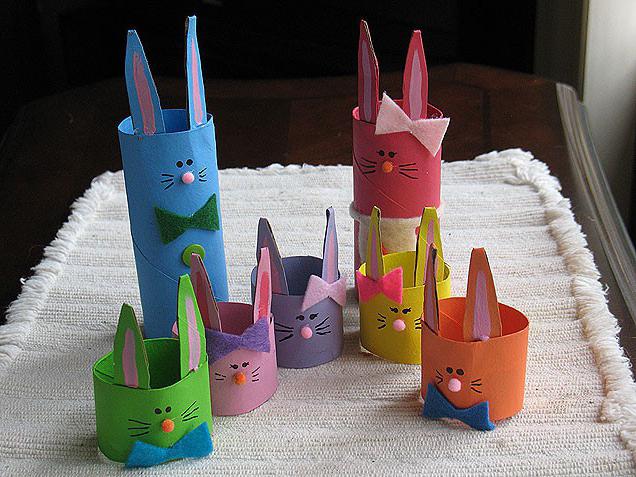
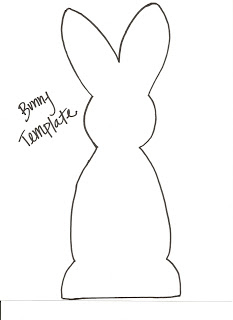
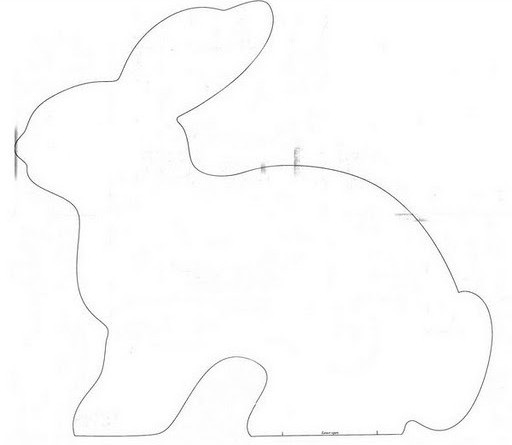
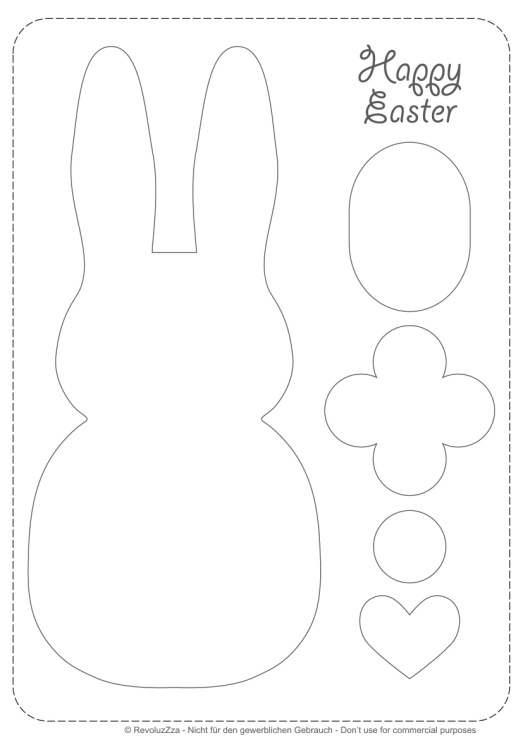
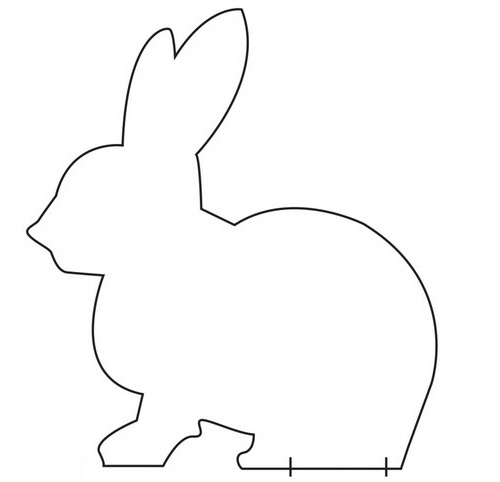
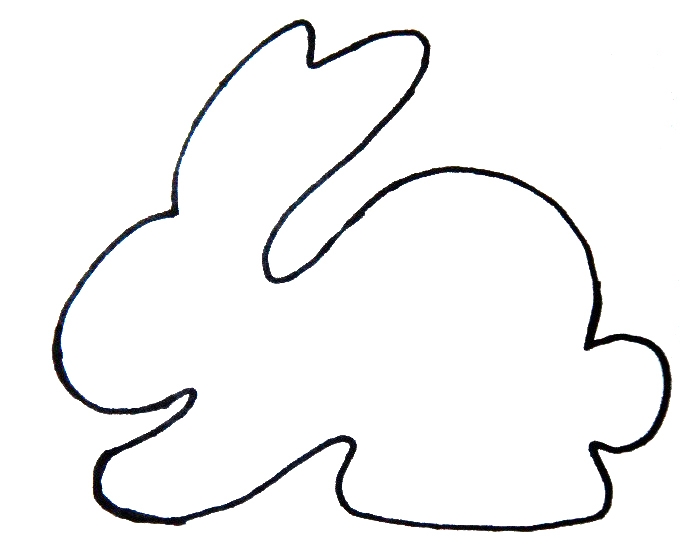
 Easter paper rabbits
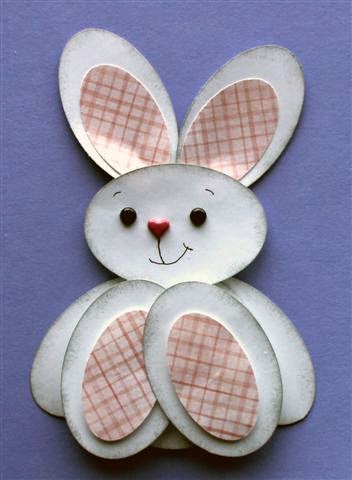
Easter paper rabbits
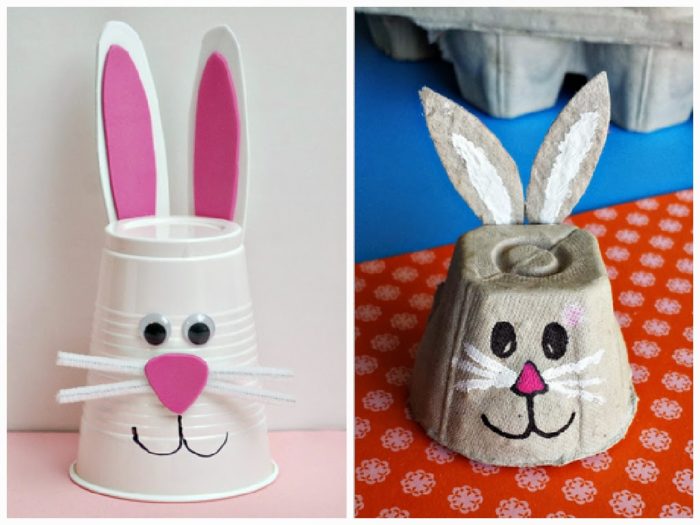
Easter rabbits from cups
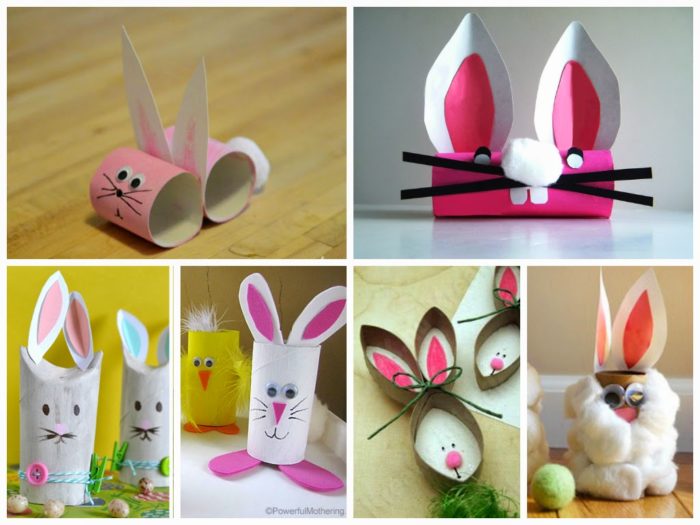
Easter paper rabbits
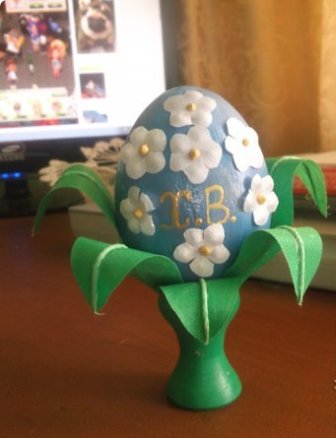
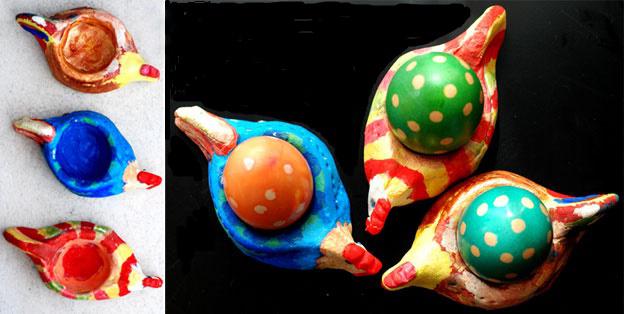
Easter egg stand:
This craft can be done with children in kindergarten.
For work you will need:
- white and green color
- pomponchik from white yarn
- scissors, simple pencil, glue
- pink felt -tip pen
- shell or wooden egg
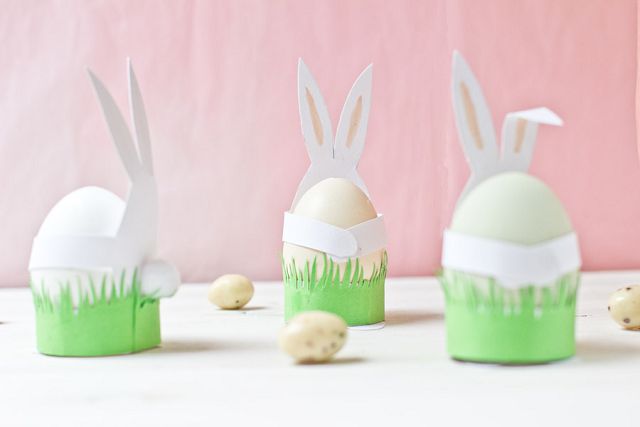
Egg stand: Easter rabbit
- For the manufacture of a stand under the egg, we transfer the contours of the rabbit to the paper: this is a figure with ears, paws and a strip for fastening around the egg. We decorate the middle of the ears with a pink color.
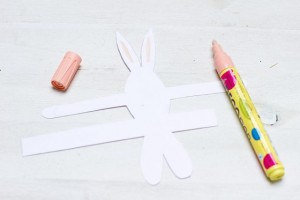
Cut the blank with ears
- The length of the strip should be such that the egg is on the stand that turns out after gluing the wide bands of the workpiece. We cut it out.
- We draw a strip of grass on green paper and cut it out. This strip we glue a white strip of stand.
- Fighting the hind legs forward. Glue the pompom.
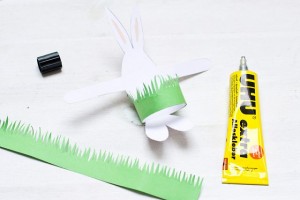
Cut the grass and glue the edges
- Put the egg on the stand and glue the front paws among themselves.
- The craft is ready. If you wish, you can finish the muzzle of the rabbit, and draw several flowers on the grass.
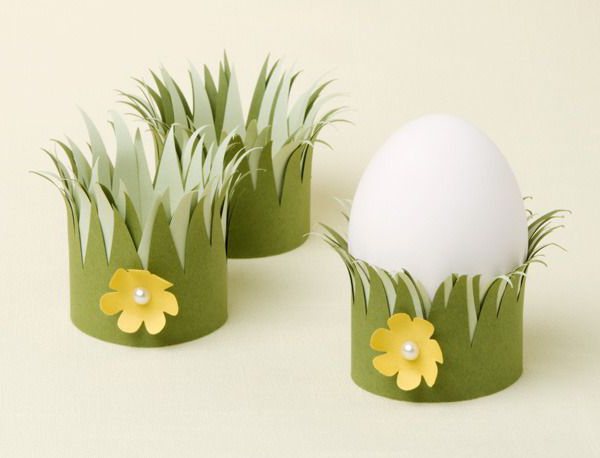
Other options for manufacturing a stand for Easter egg
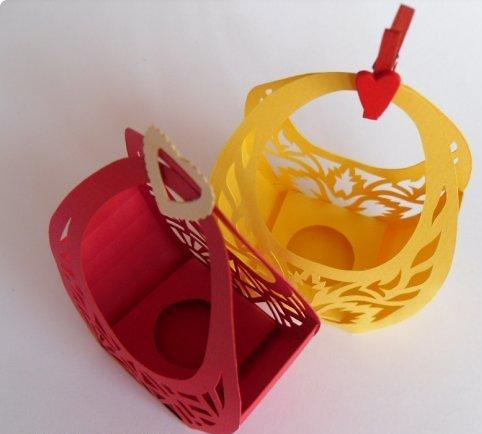
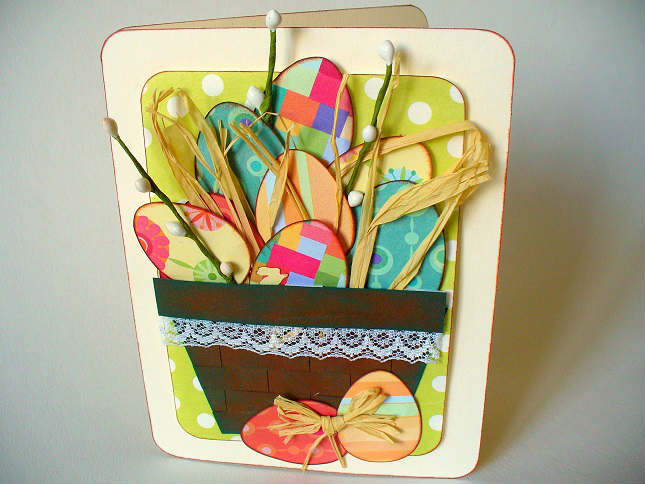
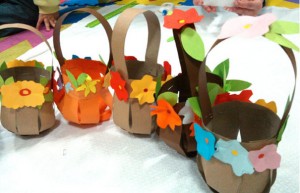
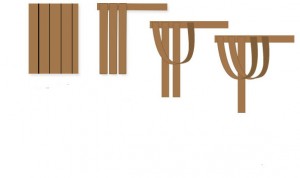
Easter egg basket
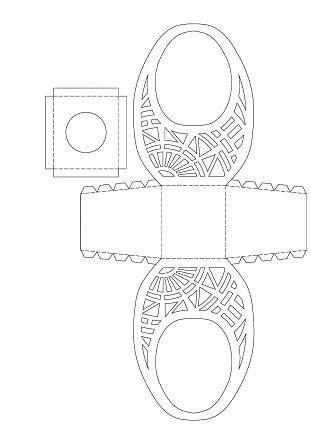
Easter basket template
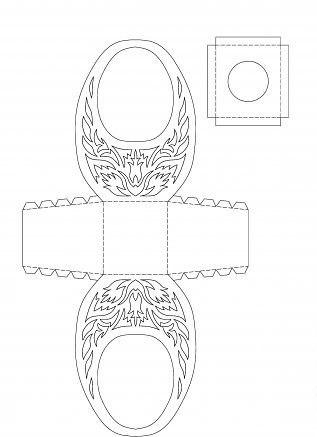
Easter basket template
Basket manufacturing process: Cutting
Basket manufacturing process: folding
Basket manufacturing process: connecting parts
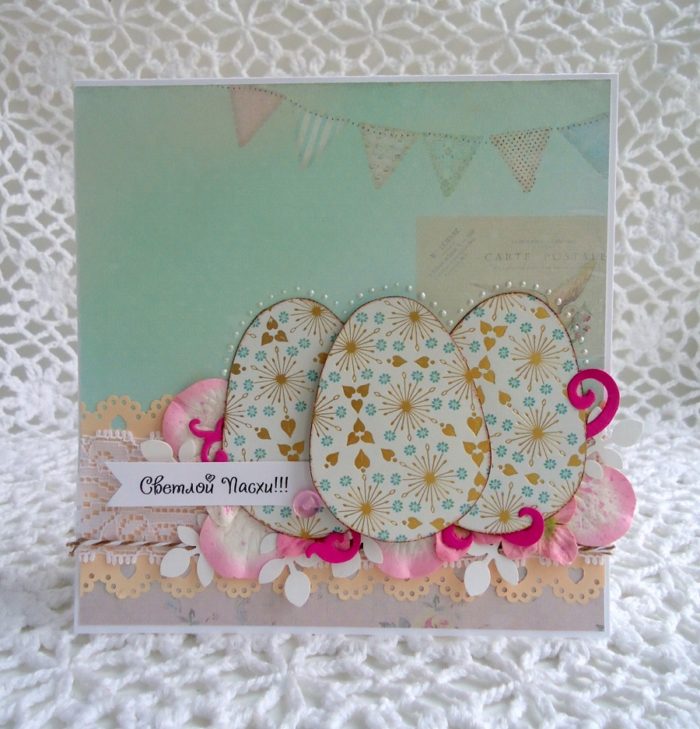
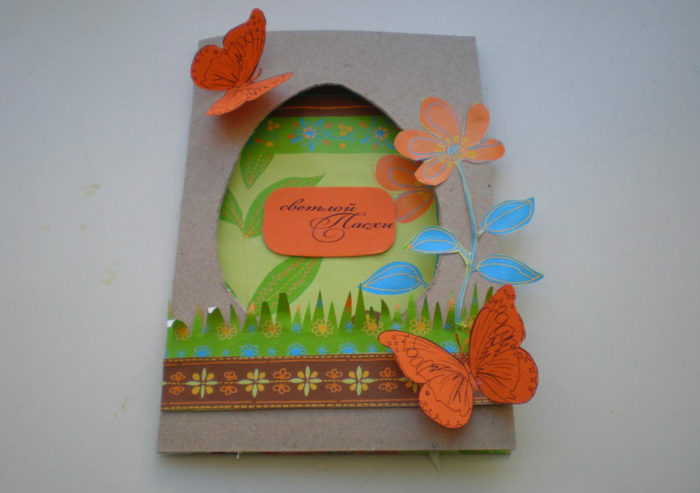
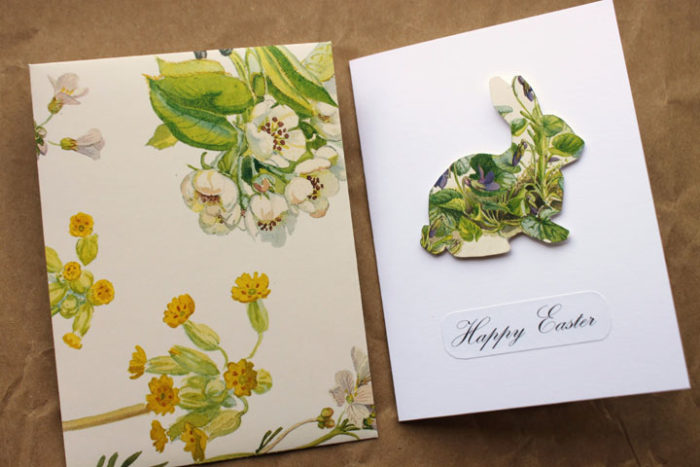
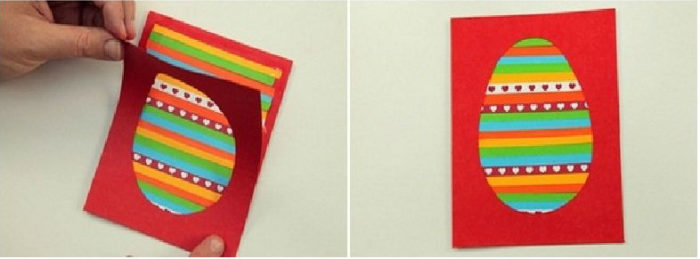
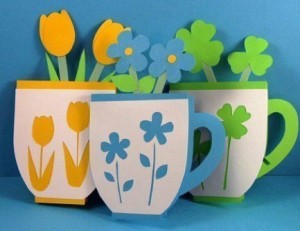
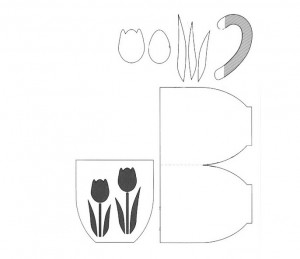
Easter card postcard
- A congratulatory card can be made from a sheet of cardboard. Draw or cut out of colored paper, chicken felt, rabbit, Easter egg. You can decorate the card with lace, applique, pieces of felt, buttons.
- If you are not interested in the usual application, then create voluminous at the place of bending of paper. You can make mobile compounds, or make a chicken peeping from the egg shell. To do this, cut out the top of the shell of dense cardboard and fasten on one side of the postcard.
- A postcard that you or your child did with your own hands will bring special warm emotions to the one who will receive it as a gift.
Options for Easter cards
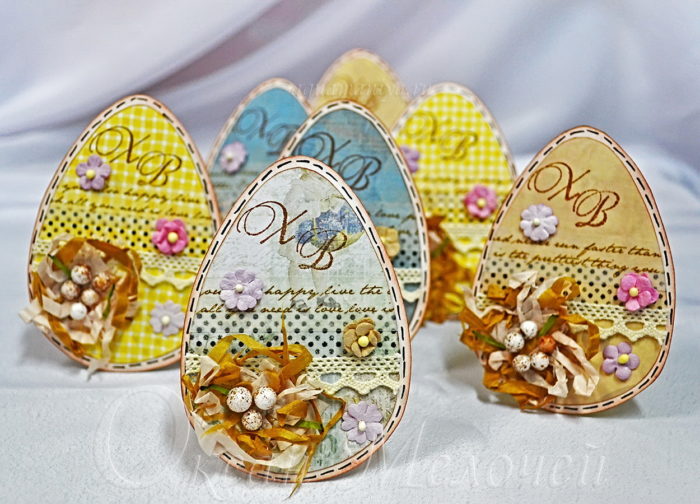


Salt dough crafts on Easter
We offer to make simple but beautiful Easter crafts from salty dough.
For work you will need:
- salty dough
- glass of water
- several different brushes
- stack
- paints (preferably gouache)
- rockbrush
- plunners or suitable children's molds
- a raw egg
Let's get to work!
Easter craft from salt dough
- First you need to blow out the contents of the egg, making holes at the opposite ends.
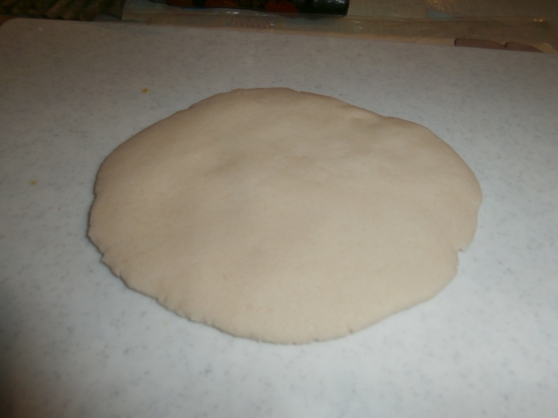
- We make long sausages from salt dough and roll them out with a rolling pin on flat ribbons.
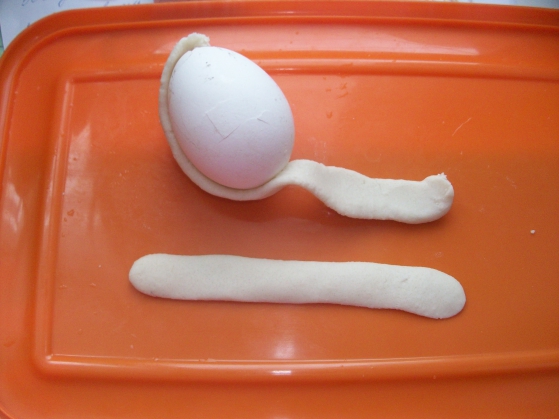
Cooking sausages from the dough and wrap the egg with them
- We take one tape and wrap around the egg. We take the tape again and glue until half the egg hides under a layer of dough.
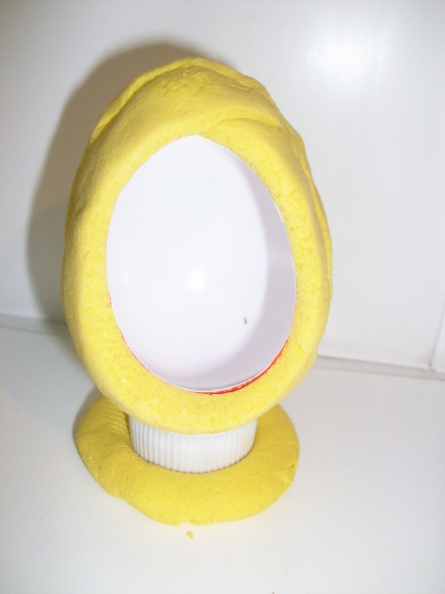
- We sculpt the egg stand using a cover of juice or plastic bottle for this, and put a wooden egg on it.
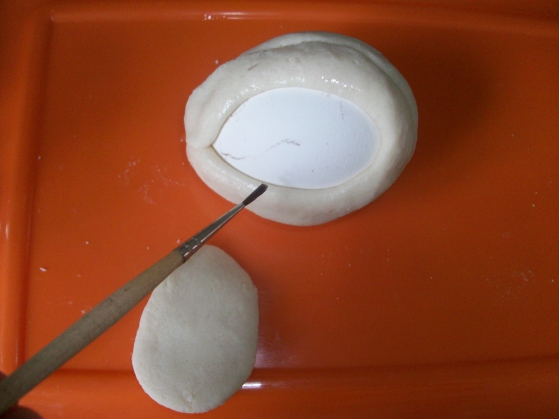
We leave the forefront empty
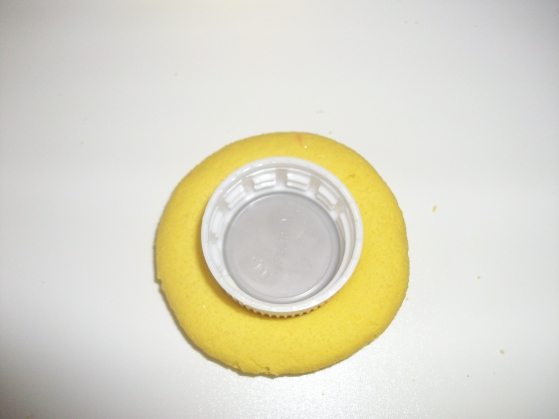
Cooking the egg stand
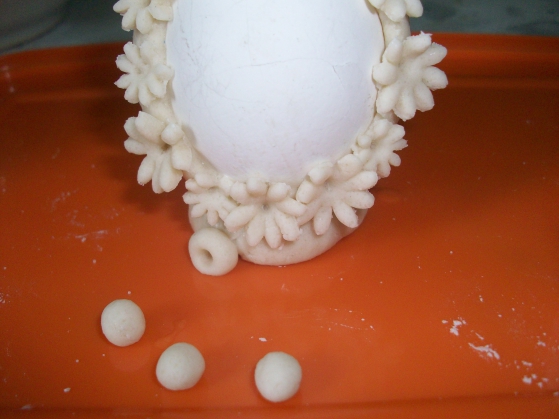
- Using molds or plunger, we cook flowers for decoration and, moistening with water the place where each flower will be attached, put the cut decor blanks.
We complement the composition with leaflets carved from salty dough.

Cut flowers for decoration. We use pliers or children's molds for this
- Inside the egg, a bird, a chicken or a candle will also be located, which also needs to be blinded from the dough.
Cooking a candle or bird from salt dough to place crafts inside
- Dry the product. In order for the drying process to pass faster, we place the product in the oven and dry on low heat with an open door for 2 hours. Then we leave with a closed door until it is cool and repeat until the product is dry enough.
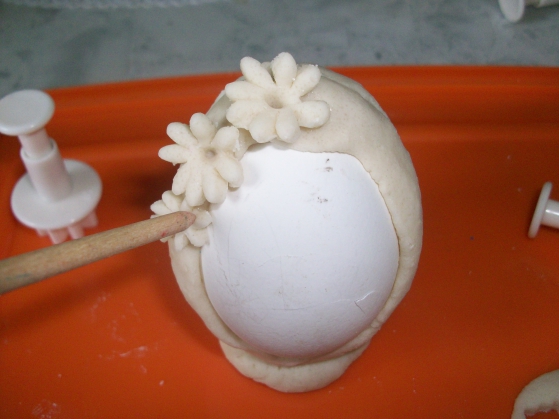
We fix the flowers with a wooden stick
- From a dried product, we extract an egg shell.
Inside the crafts we place the previously prepared figure from salty dough.

Ready craft
- We decorate the craft, decorate with beads or beads, cover with varnish. Easter chicken from salt dough
For work you will need:
- ready salt dough
- paints
- brush
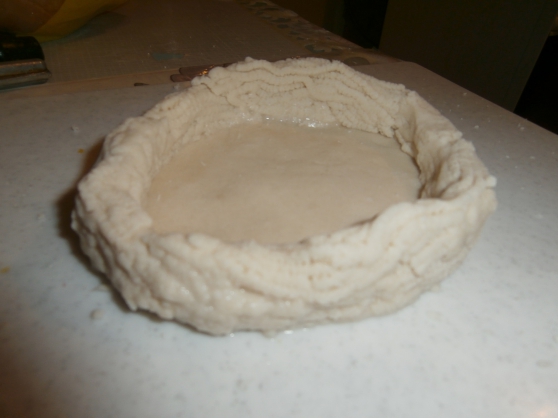
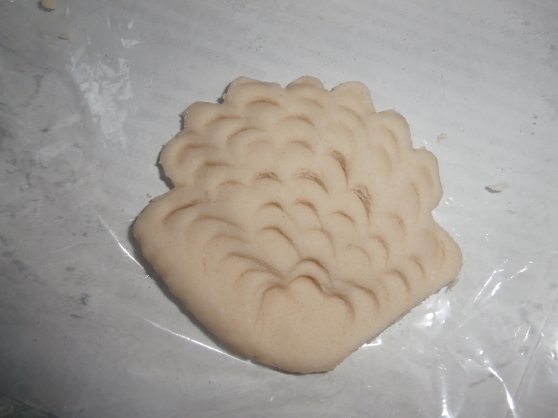
We blind a tortilla from salty dough - the base of the nest.
- We will make the nesting walls with the weaving effect, passing the salty dough through a garlic -codel. Put the resulting strips around the perimeter of the nest.
Cooking a cake - the base of the nest
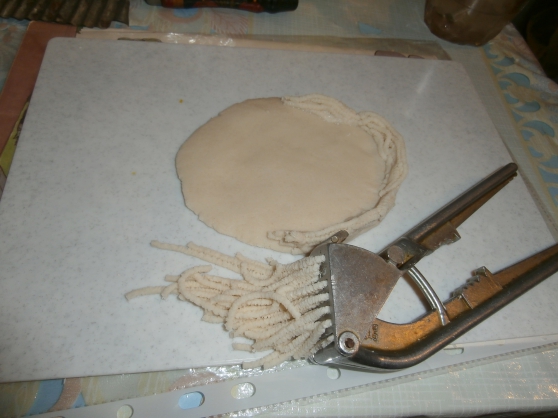
Using Chesnocodavilka, prepare the walls of the nest
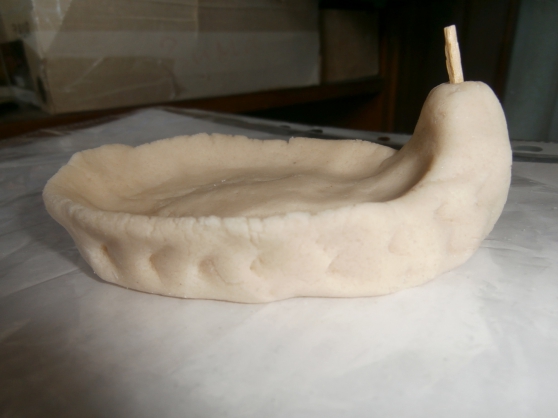
- Let's start making the body of the chicken. Again we blind the cake and pull the edges up to make the neck. We stick a match inside the neck so that later to fix the head on it.
How to make a nest
- The head of the chicken is spherical. Add the eyes of black pepper, make a crest and beak.
Cooking the body of the chicken
- We fasten your head to the body. We sit the chicken in the nest. We dry the design.

We make wings
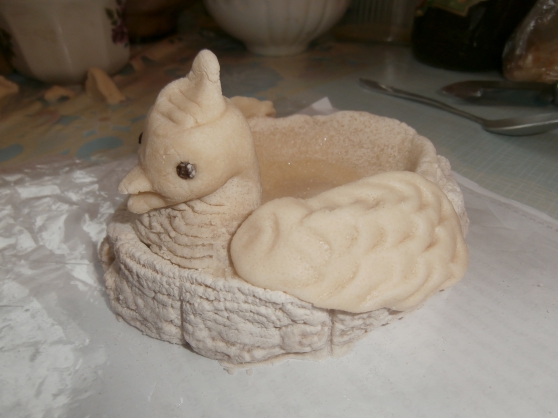
Combine wings wings with the body
- We make wings and attach them to the body of the chicken.
We make the tail and also attach to the body, beautifully straightening the edges.
We make the tail
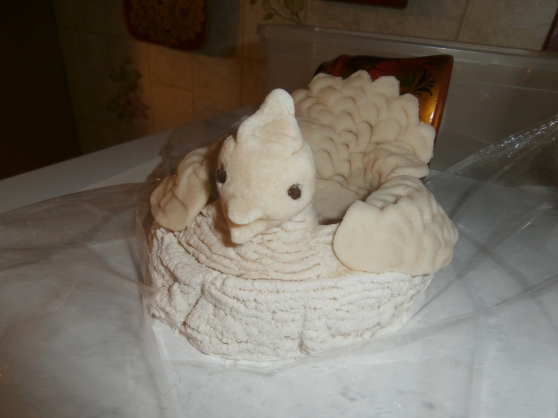
We fix the tail, straightening the edges
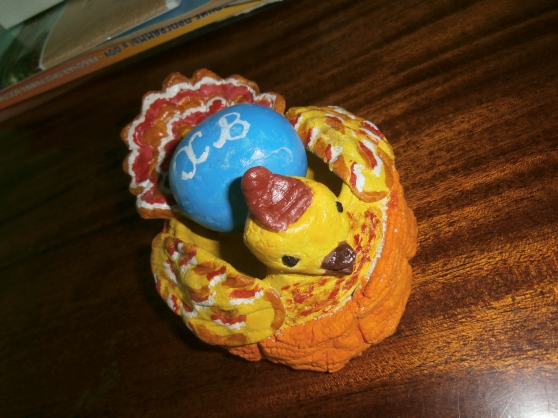
Easter egg for the chicken can be blinded independently. To do this, you need an egg kinder surprime. It just needs to be wrapped in salty dough and dried. After that, apply a layer of paint and the inscription. We cover the whole craft and egg with varnish.
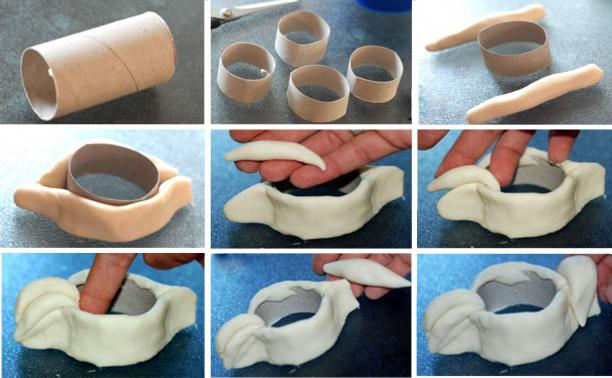
Another way to make a stand for Easter eggs:
DIY Fetra Crafts
What can be done from felt on Easter with children - watch the video.
Video: Fetra chicken. A detailed master class
Video: Easter egg from felt
Video: DIY Easter baskets from felt
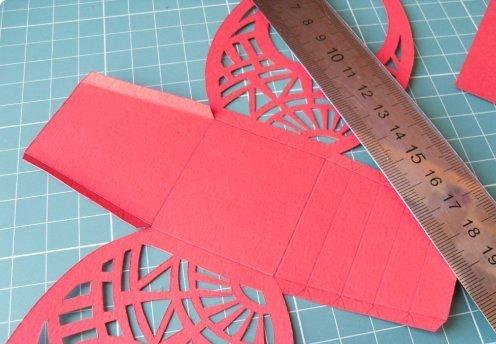
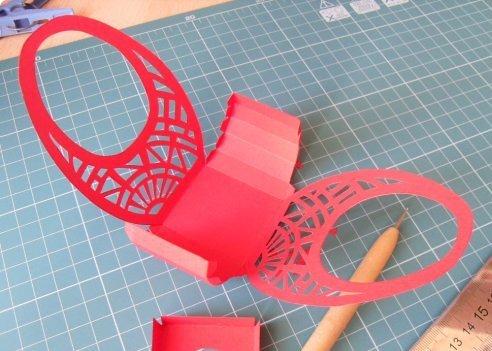
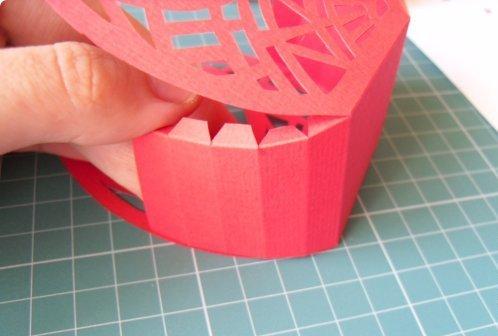
DIY crafts for Easter from corrugated paper and cardboard: schemes
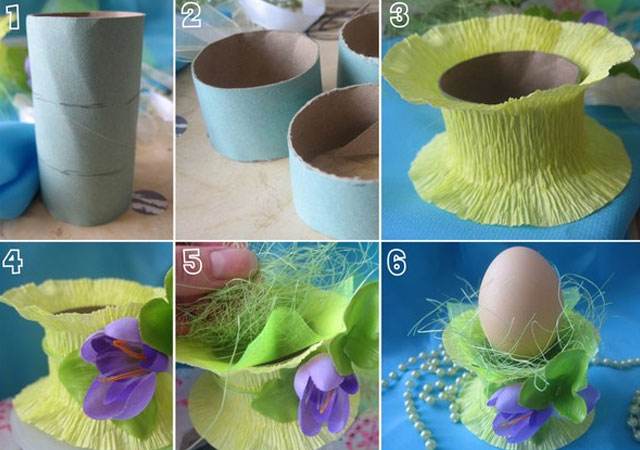
Making an egg for corrugated paper eggs
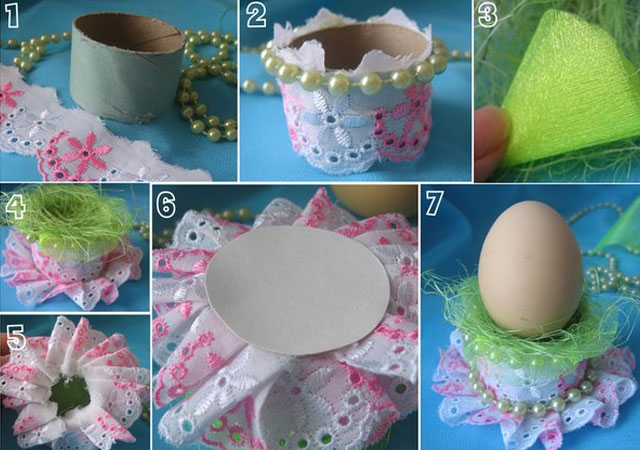
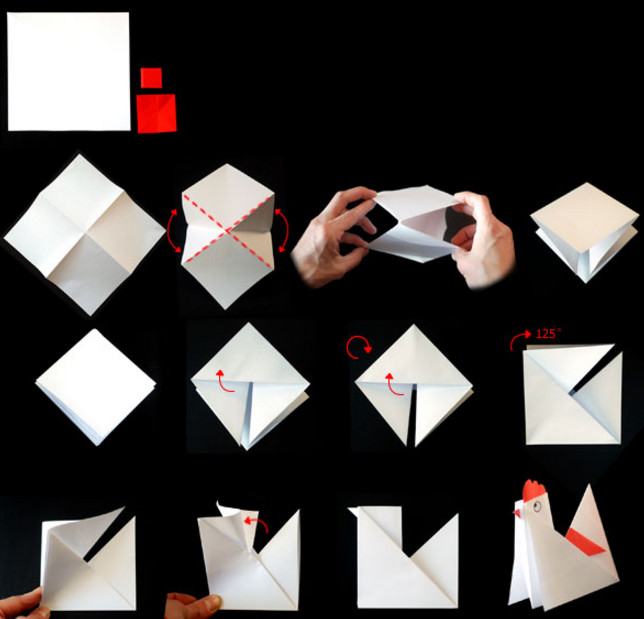
Easter chicken from paper
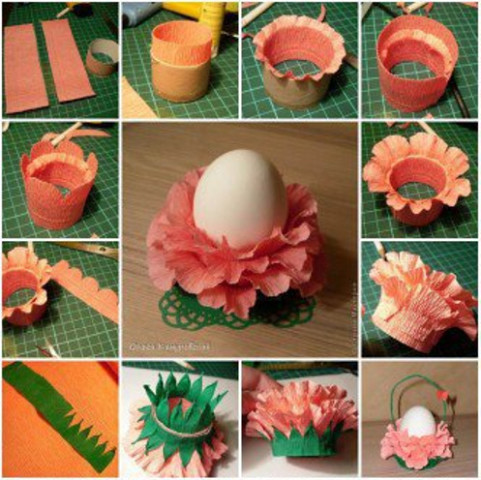
Cardboard egg and corrugated paper
Postcard cup
Template for postcards-shirts
Easter basket
Easter basket scheme
Video: Easter crafts with your own hands from corrugated paper
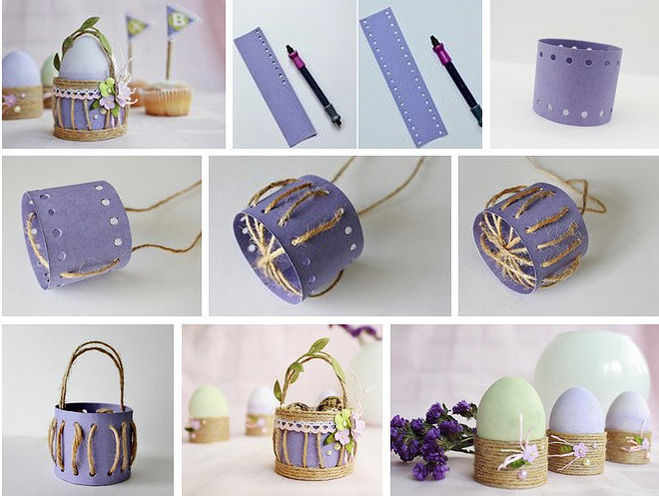
Crafts from Foamiran on Easter: Templates
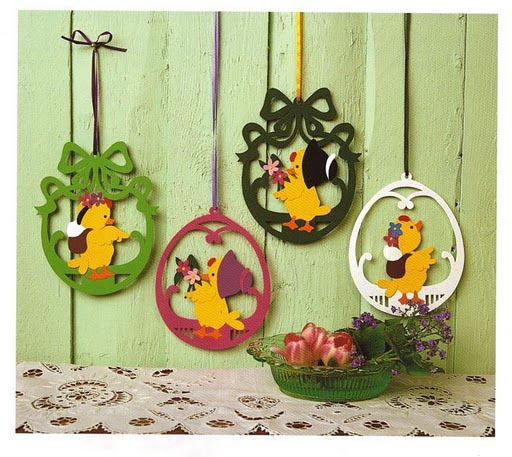
Easter pendants
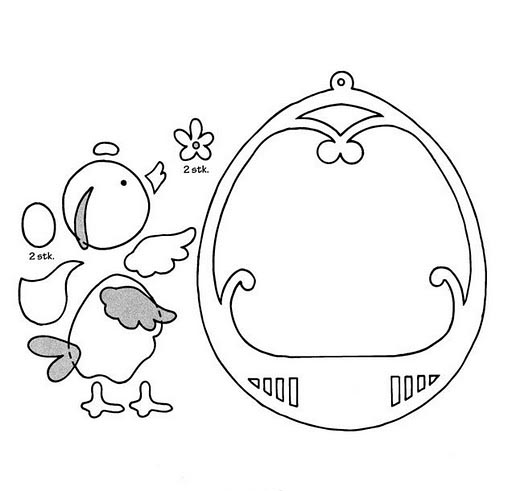
Easter suspension template

Easter suspension template

A basket from Foamiran
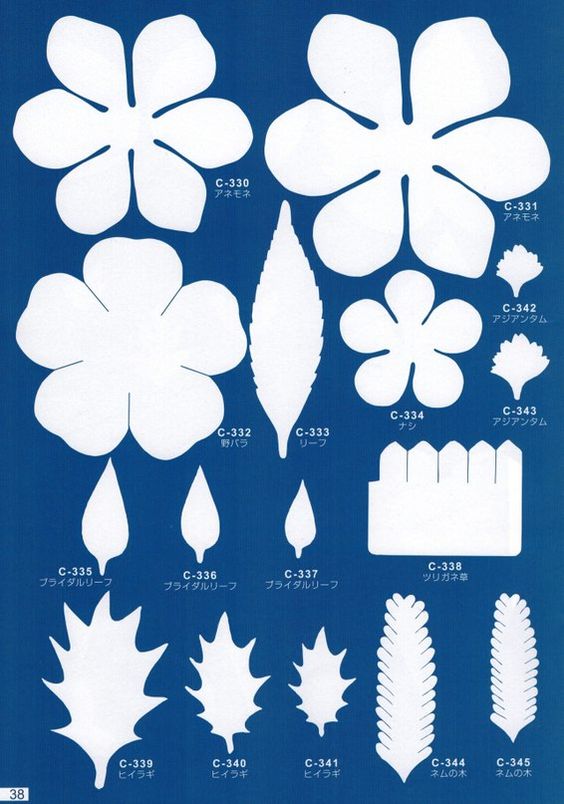
Flowers from Foamiran flowers
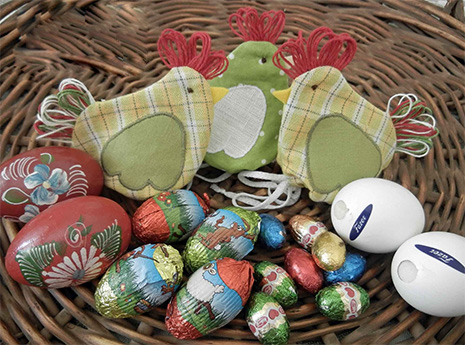
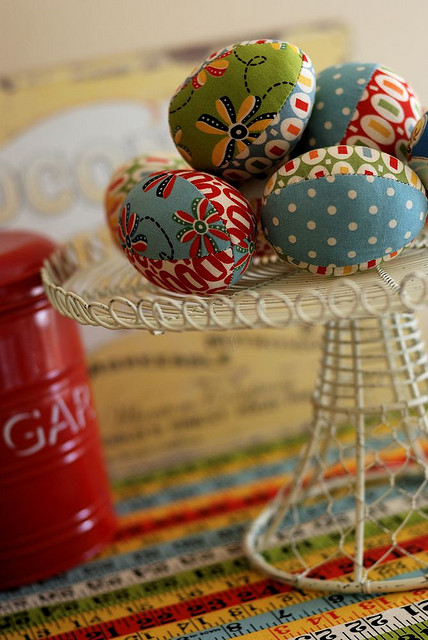
Crafts from fabric to Easter: Schemes
Textile Easter chickens-dryers:
- Such hens will decorate the festive table or become a bright element of the kitchen interior decor. Such a chicken can be presented as a souvenir for Easter for relatives and friends, friends.
- A real or decorative egg is placed in the chicken-smoker and the chicken becomes the keeper of Easter eggs. In addition, the needlewoman always has many colorful shreds of the remaining fabric that it is a pity to throw away.
- A great way to use them is to sew original souvenirs.
For work you will need:
- fabric shreds
- the threads are muline
- scissors
- needle and threads with which the seams will be performed
- ruler
- pattern
The entire manufacturing process is shown in the photo.
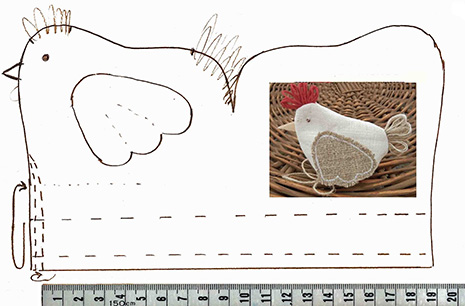
Preparation of a pattern of Easter chicken-sum
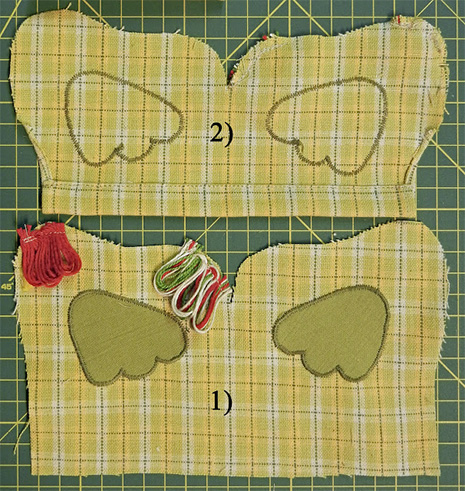
Connection of parts
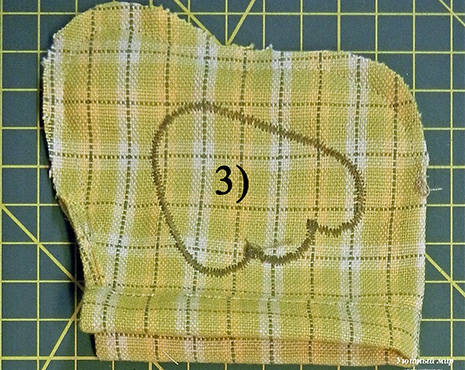
Kurochka-dryer without wings
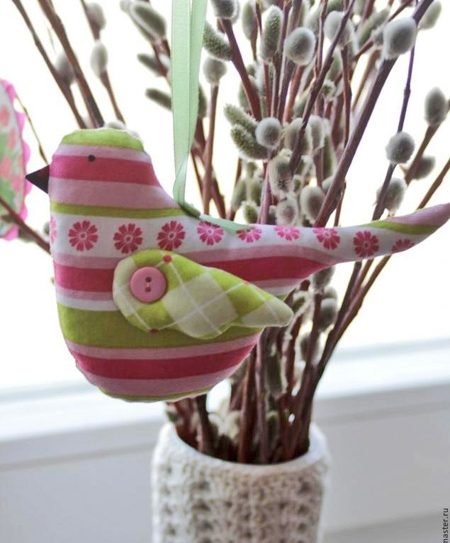
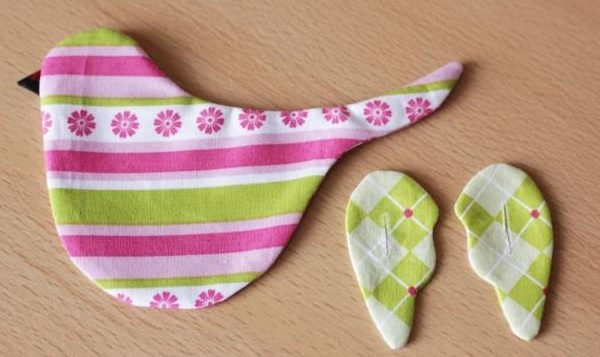
 Tilda bird
A cozy craft to Easter will be a cute textile bird, made on the principle of a tilde doll. Such a bright gift can be given to relatives or friends.
For work you will need:
- cotton segments of one or different colors
- a segment of dark fabric for beak
- filler (synthetic winterizer, holofiber)
- 3 buttons
- ribbons and lace
- acrylic paint
- threads
- needle
- scissors
- a piece of chalk or soap for a pattern
- wooden wand
- sewing machine (if any)
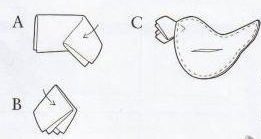
How to sew a Tilda bird
- We draw and cut out a pattern of paper: body, wings (if desired, you can make a bird without wings), beak.
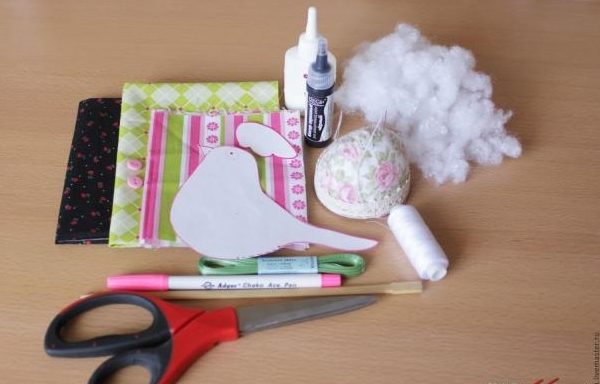
What will be needed for work

We cook the pattern
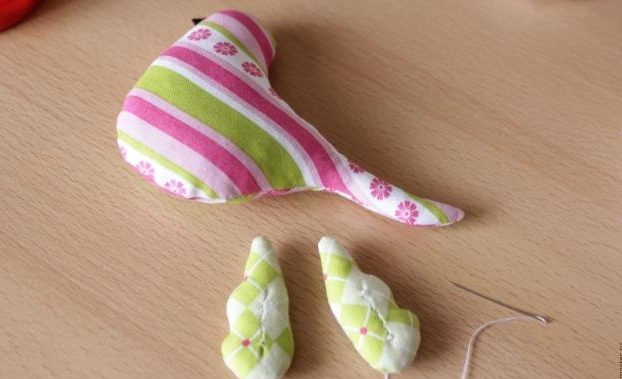
- We fold the part for the beak in half, bending both corners. See how to do it right in the photo.
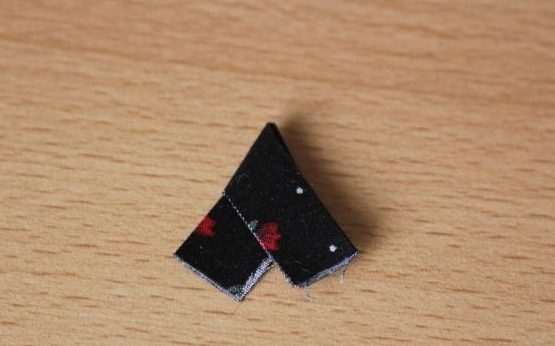
How to make a beak
How to make a beak
- We transfer the pattern to the double -folded fabric.
We immediately fix the beak between the two details of the bird, sew it, leaving a place to turn the workpiece.
By the same principle, we sew the wings and cut out the details, leaving the allowances.
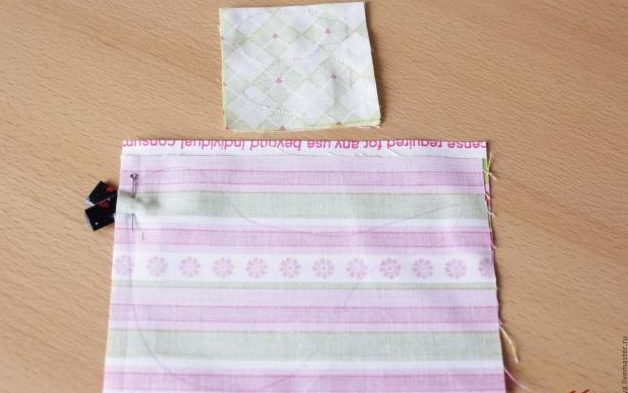
We insert the beak between the details and sew
Cut the details
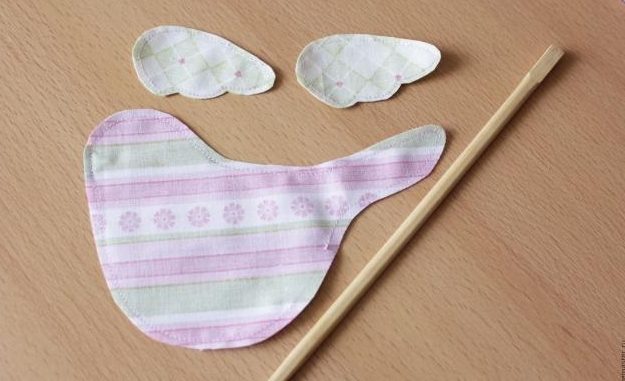
Turn the details
- Now you need to turn out and iron the details.
We take the filler and with the help of a wooden stick we begin to evenly distribute it inside the body of the bird.
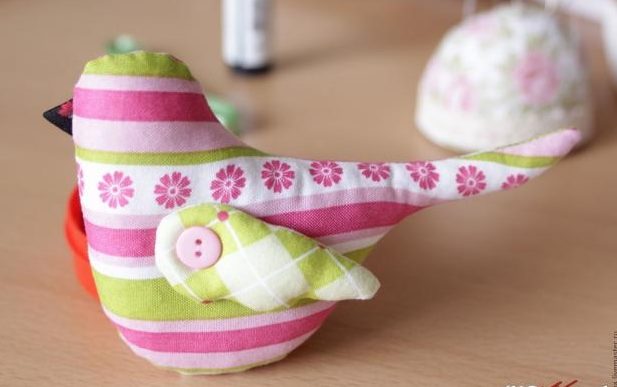
We close the holes left for turning using a secret seam. - We use two buttons to connect the body with wings. It remains to draw eyes and sew a ribbon for hanging.

We fill with synthetic winterizer
According to the same principle, you can sew both Easter rabbits and chickens. You will come in handy templates for making patterns:
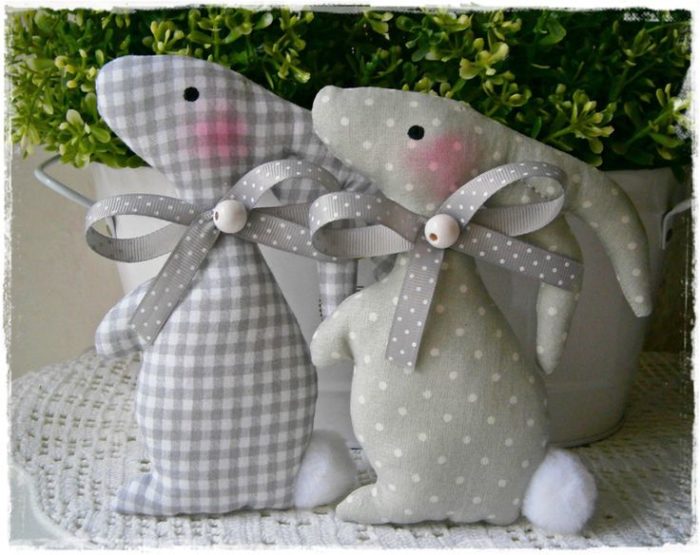
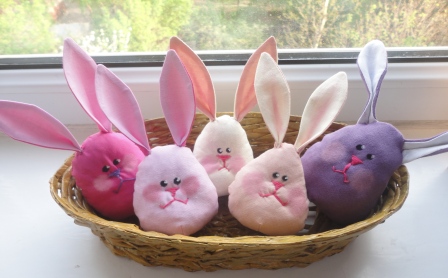
Easter textile rabbits
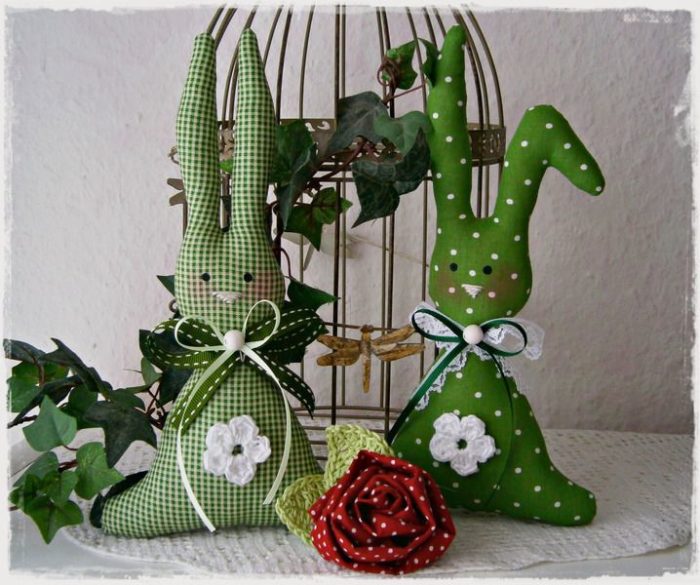
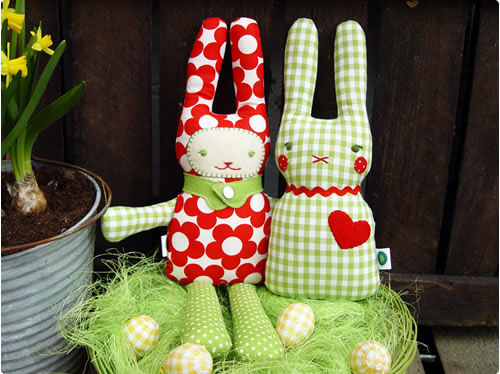
How to sew textile rabbits:
How to sew textile rabbits
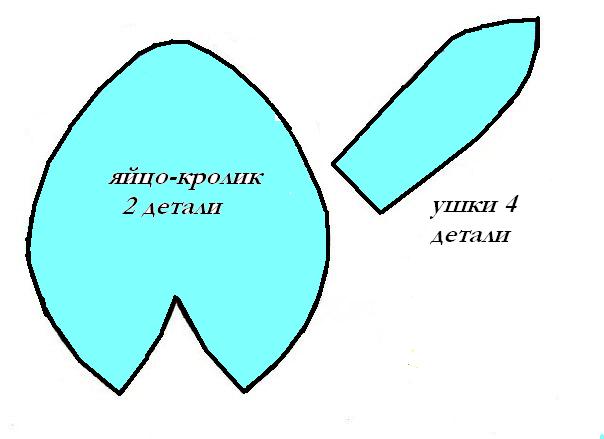
Pattern for the manufacture of textile rabbit
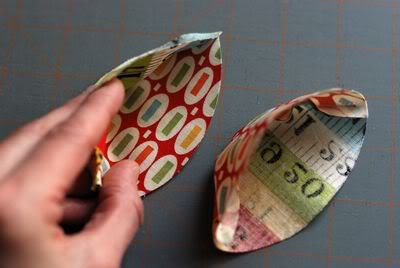
Easter egg
Patter for Easter Cap
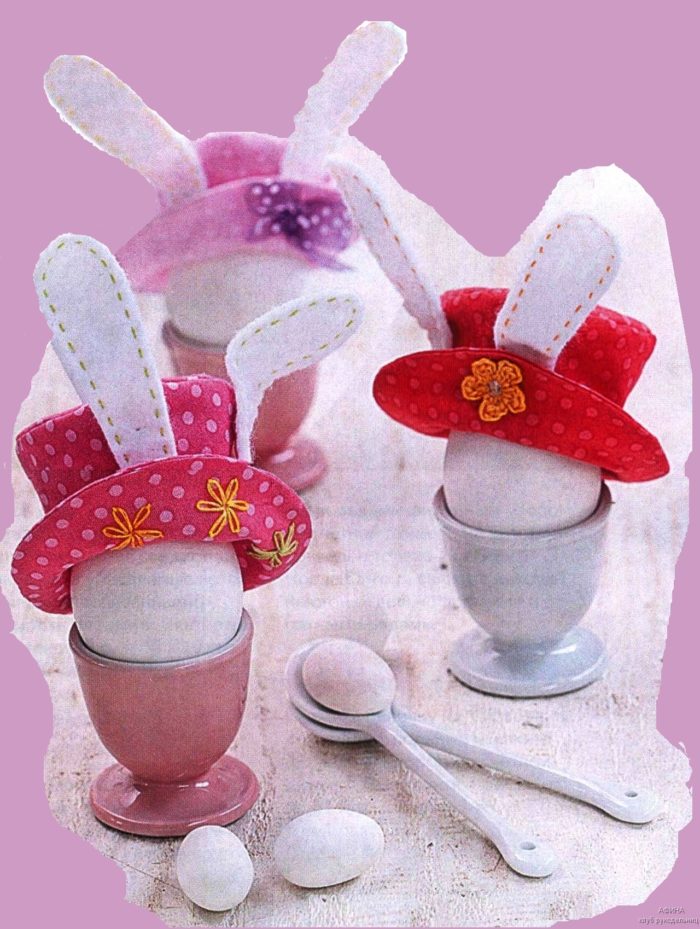
Hat with hare ears on Easter egg
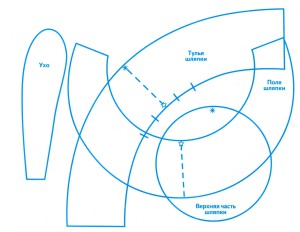
Hat pattern with hare ears
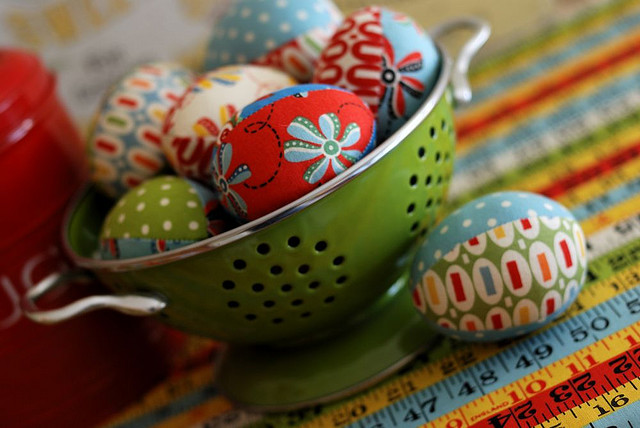
But how you can sew a bright souvenir - Easter egg.
For work you will need:
- shreds of fabrics (you can take anrtens, cotton, flax with ornaments and patterns)
- pattern (its size can be changed depending on which egg you want to sew: in full size, small - for a needle, a little more or completely large, which will then be used as a sofa cushion)
We draw a pattern on paper and cut out.
- We apply the pattern to the fabric on the wrong side, circle with a pencil or chalk. We cut out, transferring the points from the pattern to the fabric simultaneously.
- Fold two parts with the front side inside the point to the point and sew.
- Repeat with the second pair of flaps.
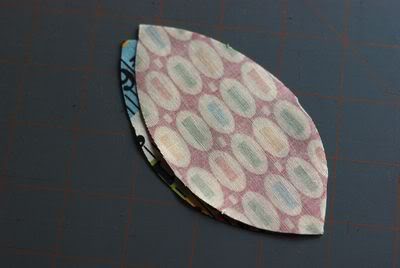
- Fold two halves of the workpiece nearby, and turn one of them on the front side. We put the turned part into another detail.
- We connect parts with pins. The main thing here is that the edges do not go out for each other. We sew up, leaving a hole for turning.
- We turn the Easter craft.
- We give the volume of the Easter craft, stuffing it with a synthetic winterizer.
- Close the left hole with a hidden seam.
Bright Easter eggs
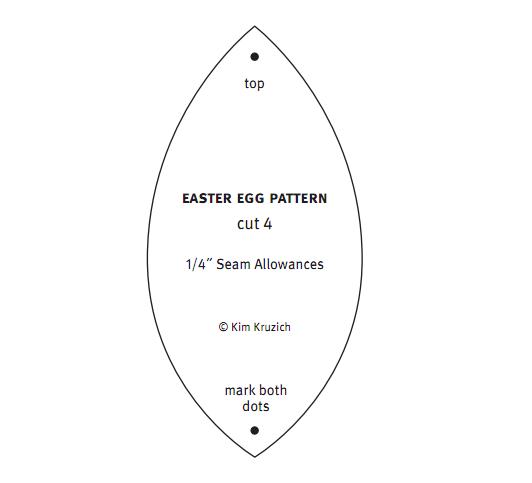
Pattern for the manufacture of textile eggs
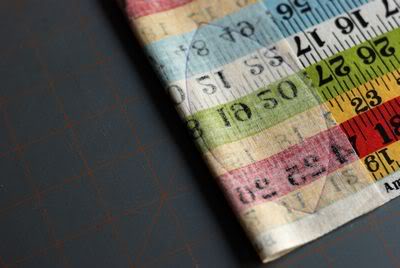
We transfer the pattern to the fabric
Folding parts for stitching

Sew the right side from the upper point to the lower
We turn one half
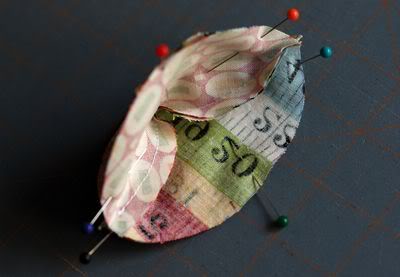
We fix the edges with pin and sew in small seams
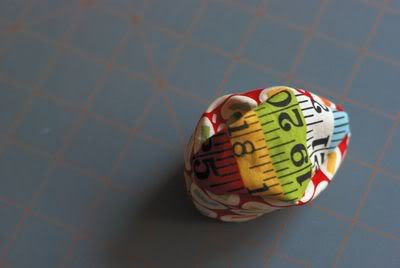
Turn off
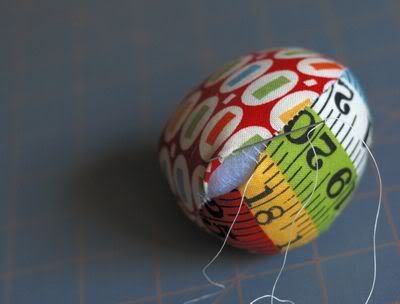
We fill up with a filler and sew a hidden seam opening for twisting
Crafts on Easter from Kinder Jita
What crafts can be made on Easter from the cinter of the ores you will find out by watching the video.
Video: We make a chicken from a container from Kinder Surprise
Video: how to make Easter chicken: crafts for Easter with your own hands
DIY ribbons for Easter
How to make Easter souvenirs from ribbons? The video presented below reveals the secrets of creating original Easter eggs.
Video: Easter eggs from satin ribbons
Video: Easter souvenir in the technique of artichoke
Crafts from plasticine to Easter
The video tutorial will tell you how to make an Easter rabbit of plasticine.
Video: Easter crafts with your own hands
From the video you will find out what kind of plasticine crafts can be made with children to decorate the house to Easter.
Video: Three Super Cool Crafts for Easter with kids
DIY crafts for Easter for competition
The video presented below will inspire the creation of the original crafts for Easter for the competition.