Crafts from paper, and especially airplane, love to make children, regardless of their gender. And parents must help them in this matter. After all, paper crafts are safe, do not burden the budget and help the child develop thinking.
The content of the article
- How to make a paper aircraft that flies for a long time?
- How to make a paper aircraft that flies far?
- How to make, fold a simple airplane from a sheet of paper: step -by -step instructions, scheme
- Origami Paper Aircraft
- What paper and materials can be needed?
- What to pay attention to when modeling?
- DIY crafts - DIY crafts: schemes
- Paper aircraft: tips and reviews
- Video. How to make a paper aircraft MIG-29?
The aircraft made in the technique of origami are very popular all over the world. There are over 100 schemes of such aircraft. Competitions for the flight range of paper aircraft and the amount of time spent by this craft in the air are held annually.
It is known that the first modern paper model was made in 1930. It was made to test the characteristics in the Lockheed Corporation aerodynamic pipe. After that, paper aircraft began to be made as independent models.
How to make a paper aircraft that flies for a long time?
Launch of paper aircraft
At the moment, the maximum time of the paper aircraft in the air is 27.6 seconds. This record was set by Ken Blackburn, an American enthusiast of paper aircraft construction in the distant 1983. He built such a longending plane with the help of this design:
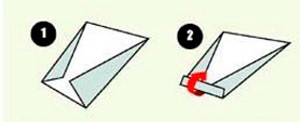
1-2. In a standard sheet of A4 format, we bend the edges as shown in the figure. Then we bend the 1-cm strip in the lower part of the sheet
3-10. We continue to turn the strips moving to the second third of the sheet
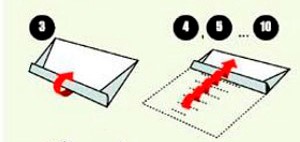
11-12. Now we turn the sheet in the middle for the formation of wings
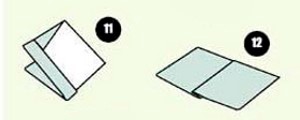
13-14. Such a paper aircraft should be obtained. Do not forget to unscrew him “flaps” at the ends of the wings. They are one of the "secrets" of the long flight of this model of paper aircraft.
Try to make a paper aircraft according to this scheme and maybe you will be able to break Blackburne's record.
By the way, on Aliexpress, you can buy such a longending paper aircraft with an electric drive. Cm here https://ru.aliexpress.com/item/power-up-electric-paper-plane- airplane-kit-kit-fashion-water-toys/3262797044.html
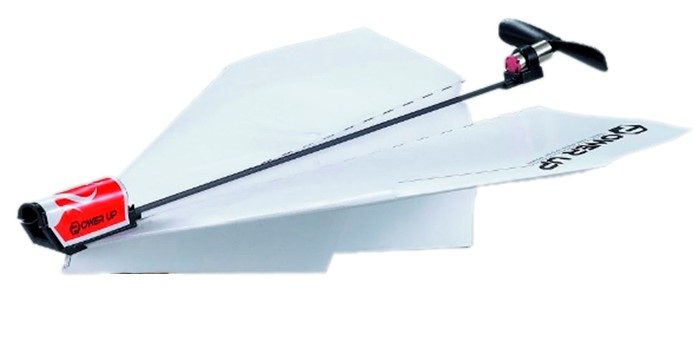
Its cost is 400 rubles
How to make a paper aircraft that flies far?
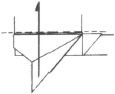
If your goal is to make a paper plane, characterized by a large flight range, then this scheme may be useful for you:
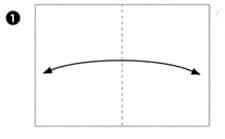
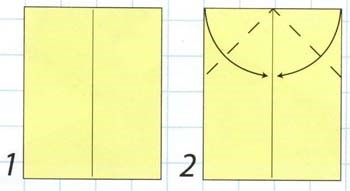
1. We take a standard A4 sheet of thick paper. We begin to fold the aircraft using bending along the central longitudinal line.
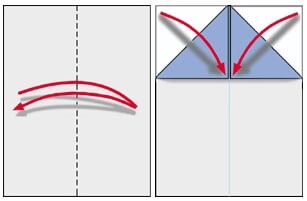
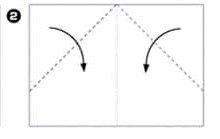
2. Now we bend the edges diagonally. The bending line of the wings should be held as noted in the diagram of the dashed line. It is due to this corner that this plane is able to fly beyond other models.

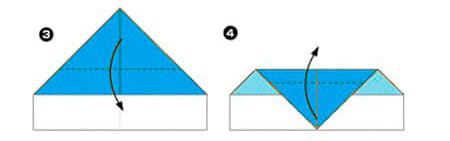
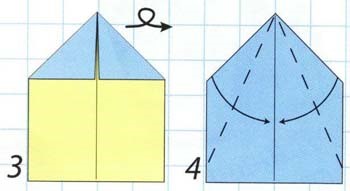
3. We again use the longitudinal line and fold the aircraft in half. The edges need to be bend as noted in the diagram.
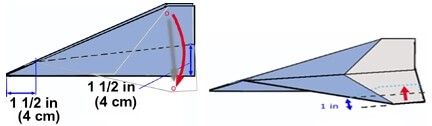
4. It should turn out such an airplane. Start its tests.
You can improve this model by changing balance. To do this, roll a small ball of plasticine and place it closer to the nose of the aircraft. In its tests, find the optimal place of placement of such a balance.
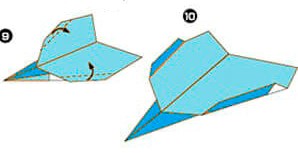
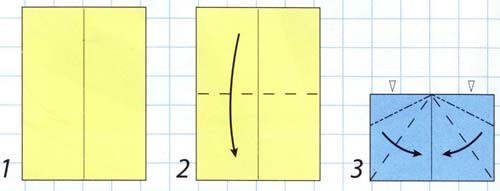
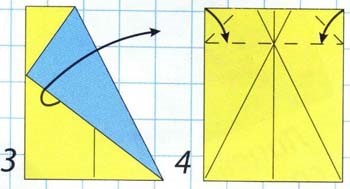
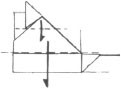
There is another design of origami that will allow you to build a longending airplane. As its basis, you can try not thick cardboard.
1.We use the album location of the sheet and fold it in half
2.Fold the wings as in the classic design of paper aircraft
3-4. We bend the triangle of the nose along the dashed line as in the figure
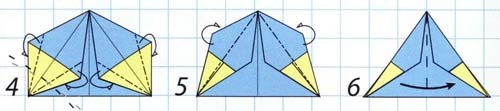
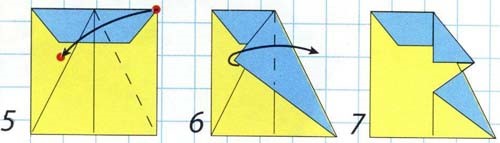
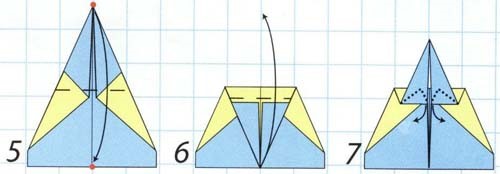
5.We turn the two halves of the aircraft

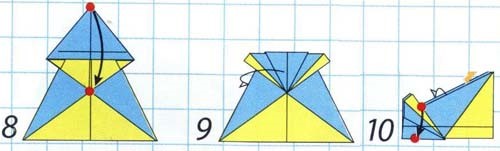
6-8. Bend the wings given the angle indicated in the figure
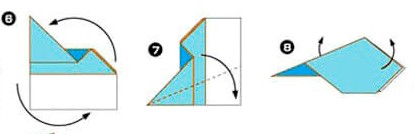
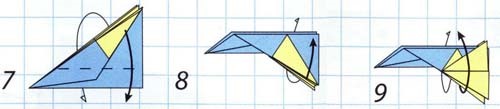
9-10. We form flaps and prepare the plane for testing
How to make, fold a simple airplane from a sheet of paper: step -by -step instructions, scheme
Simple design of paper aircraft
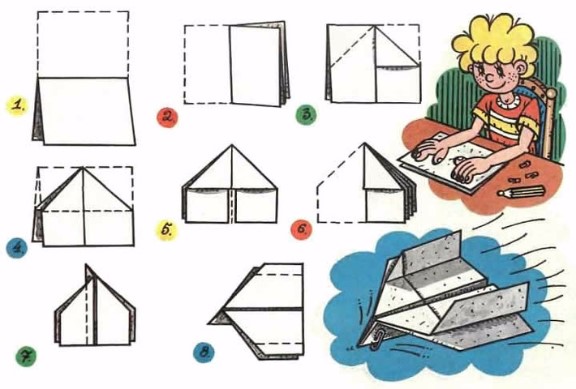
A simple classic design of the aircraft is also very popular today. Probably everyone can fold such an airplane with their own hands. But, if you do not succeed in a great scheme in order to learn how to add such airplanes.
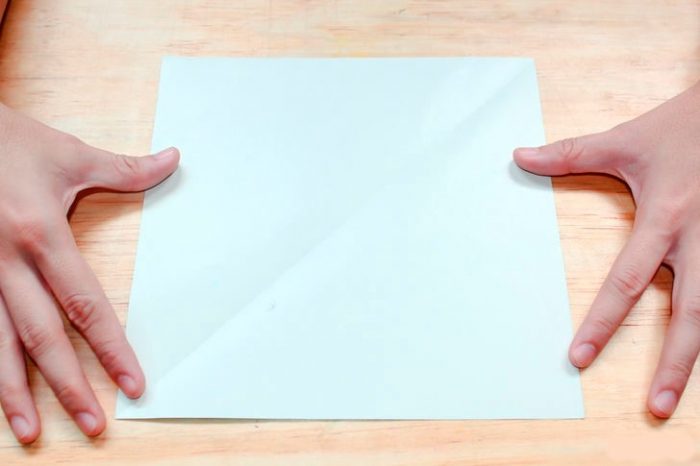
1. We take a sheet of paper A4 and A3 format and bend its left and right edges to the middle
2. We turn the left and right corners to the central line and turn the two halves of the aircraft
3. We turn off the wings as shown in the figure
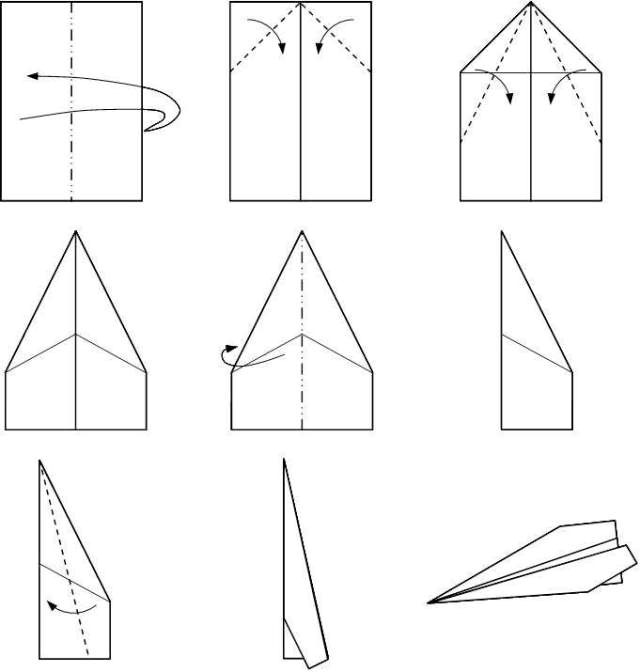
The simplest plane is ready.
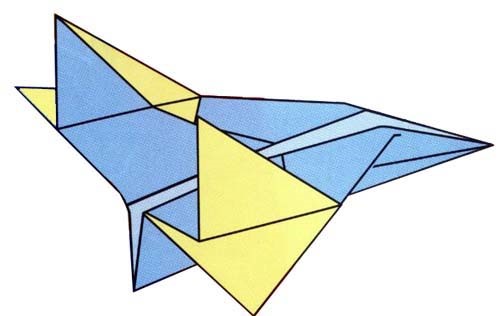
Origami Paper Aircraft
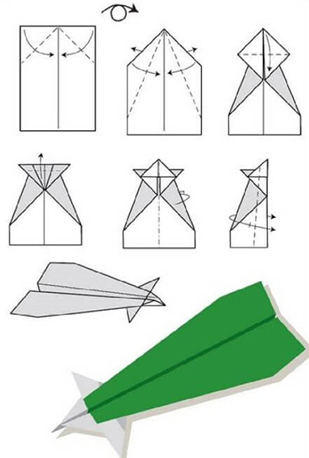
Origami is the Japanese technique of folding paper figures. In this case, you can not use scissors and glue. Only a piece of paper and hands. The history of origami has many centuries. The appearance of this technique is associated with Buddhist monks, who, in order to think about the meaning of life, closed in their cells and folded figures from paper. In principle, all of the above schemes for the addition of aircraft can be called origami. Below is a modern scheme of paper fighter.
1. We take the standard sheet A4 and fold it in half
2. Bend the upper corners to the middle and straighten them as shown in the figure
3. In order to make it easier to work with such an airplane further fix the straightened angles
4. In the resulting rhombuses we bend the stupid corners back
5. We also wrap the side corners back. The correct triangle should turn out
6. We turn off the wings at the workpiece. They need to be bent and inserted perpendicular
 A finished paper fighter flies very well and will bring a lot of pleasure to your children.
What paper and materials can be needed?
Origami is very exciting and useful
The popularity of paper aircraft is that for their manufacture, nothing but paper is needed. Tetrad sheets, printer paper, newspapers, not thick cardboard, etc. are suitable. As for the stiffness of the paper, experiment and find one that is suitable for a specific model.
And if you want your aircraft model folded from paper to look beautiful, paint it with felt -tip pens, pencils or paint. When giving an exclusive design to your plane, consider photos of such a technique on the Internet. After all, if you make it as similar as possible to real planes, this will bring even more joy to you and your children.
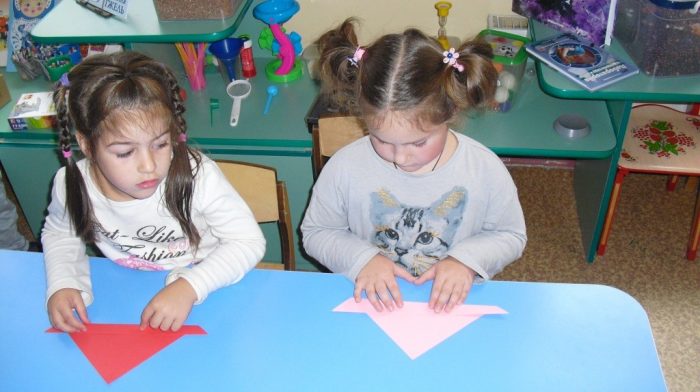
Speaking of children, in the manufacture of such paper crafts, the child improves fine motor skills of the hands, develops his fingers, applies his imagination and learn to think logically.
What to pay attention to when modeling?
Even children can add aircraft
Almost all designs of paper aircraft can be divided into two groups: disturbing and lonancing. In order to make an airplane that will fly as far as possible, use a long and narrow paper design. Such airplanes are usually a rigid design and the center of gravity shifted closer to the nose.
In airplanes, which are longer in the air, the main constructive feature is a large wingspan. At the same time, longending aircraft should not have a rigid design. It is much more important her general balance.
In addition, in the manufacture of paper aircraft, symmetry is important. If one wing of such a paper structure will be more than the other, then such an airplane will fall into it and will not fly even a few meters. Remember that not only wings, but also the tail of the aircraft should be symmetrical.
And another important point is balance. In the designs of real paper aircraft, additional elements are not used. But, if you make the plane for yourself, and not for the competition for the duration or range of the flight, you can use plasticine or additional paper or cardboard inserts to make a more optimal design of the structure.
DIY crafts - DIY crafts: schemes
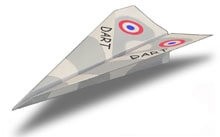
Concord
The notorious, but very beautiful supersonic liner "Concord" can be made according to this scheme:
Concord
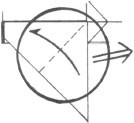
Stunt
Here is another scheme for the manufacture of a paper aircraft. Unlike previous models described in this article, this plane flies along a rather original trajectory.
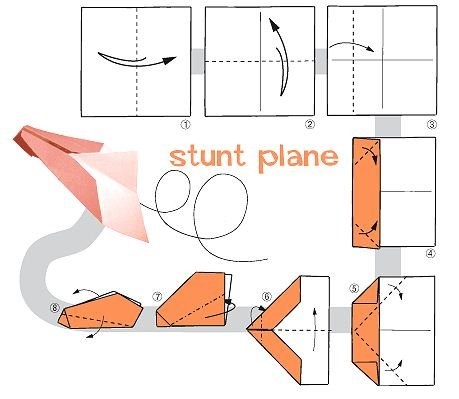
Brushkach aircraft
Fast plane
1-3. We turn a sheet of paper in half along the transverse line. Then unfold and fold along the transverse line. We turn the sheet along the lines marked by dotraries.
4-6. We unfold the side sides. Bend each lapel inside. We do this first for the internal corners, and then the external. Then we form wings.
7-9. We turn off the wings at a certain distance from the bottom. The fold line must be carefully ironed. Then you need to unscrew the anti -wing.
As a result, such a plane should turn out.
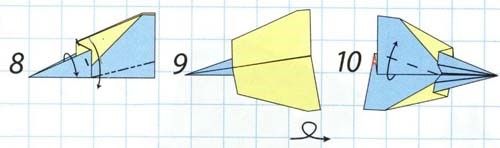
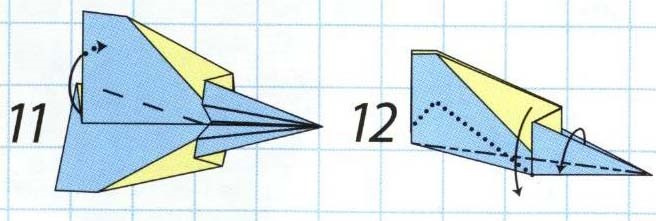
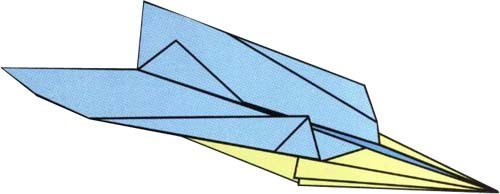
Golden sting
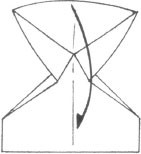
1-2. We bend the sheet of paper in half and return it to its original position. The right upper angle of the paper is turned to the middle of the lower side. The fold line does not need to be ironed.
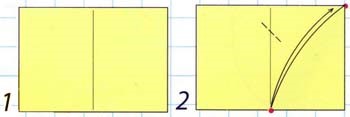
3-4. We bend the sheet in the area of \u200b\u200bthe intersection of the fold lines. Then immediately return the sheet to its original position. We bend the upper corners of the paper along the result of the resulting bend.
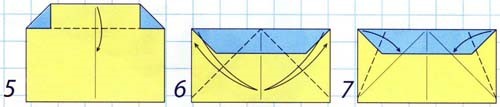
5-7. We bend the upper edge along the already intended bend. We bend the corners from the center to the lower corners. We bend half of each bent angle.

8-10. Now we bend the corners along the line marked in the figure with pre -bent corners. We iron the fold lines and bend the tip to the point of connecting the wings of the aircraft.
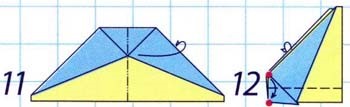
11-12. We fold the wings and connect the fractures. They are indicated in the figure with red dots.
If you did everything right, you should get such an airplane
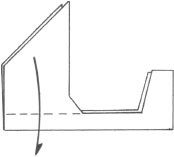
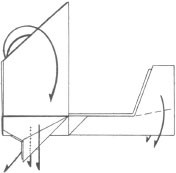
Skat
1-2. We put the paper sheet in half along the longitudinal line. We extend the sheet and connect the right sheet with the left edge along the dashed line.

3-4. We bend the sheet and repeat the above action with the opposite angle. Then we bend the small corners and the top of the sheet.
5-7. On the line that we have already formed bending the right corner. We bend its corner along the vertical line (see drawing). Bend the lower corner.
8-10. We repeat the above points for the opposite part of the sheet. We bend the nose and bend the aircraft in half. When forming wings, you need to carefully iron the fold line.
It should turn out such a plane
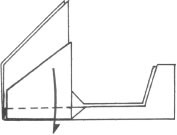
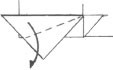
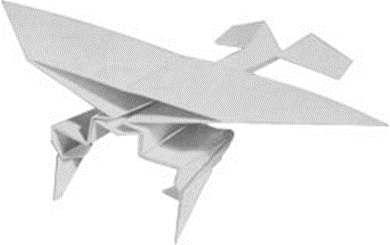
Sword -bearer
1-2. We form a longitudinal line of bend as we did with the above model. We wrap the corners of the sheet along the dashed lines.
3-4. Now you need to turn the sheet of paper and bend the upper edges to the central line.
5-7. We put a sheet of paper on ourselves and bend the top as shown in the figure.
8-10. We begin to form wings. First we bend one wing along the dashed line, and then the second. We iron the bending lines very carefully.
11-12. Squeeze the paper tail between the wings. Give a plank aircraft with a finished look focusing on the drawing of the finished model.
And here she
German plane of the First World War
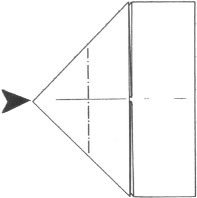
1. Take the standard sheet of paper and bend it along the dashed lines indicated in the figure. Then, return it to its original position.

2. Fold the corners inside.
3. The future airplane should develop in this way.

4. We turn the sheet.
5. According to the point marked in the line, fold the corner inward.
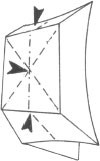
6. If everything has done correctly, then such a figure should turn out.
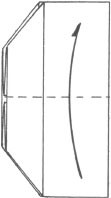
7. Fold in half, bending the lower part to the top.
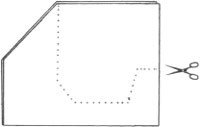
8. We cut out the contour of the aircraft along the line marked with points.
9. And we form the wing bending along the dashed line.

10. We retreat a short distance and bend the wing up.
11. And again bend down.
12. The drawing of the enlarged wing shows how to bend it.
13. First we bend the upper corner, and then the whole wing down.
14. On the second wing we carry out mirror actions and give the shape of the tail.
Such a model of the aircraft should turn out
In order for it to fly well, you need to run it with great force.
Paper aircraft: tips and reviews
Ivan. I remember at the school some planes did not do. You need to recall youth and try to make models from this article. I think to please my son.
Eugene. As a child, I had a book in which it was, if not 100, but at least 80 models of paper aircraft. Dad and I really liked to make some interesting model, and then launched. It was very fun.