
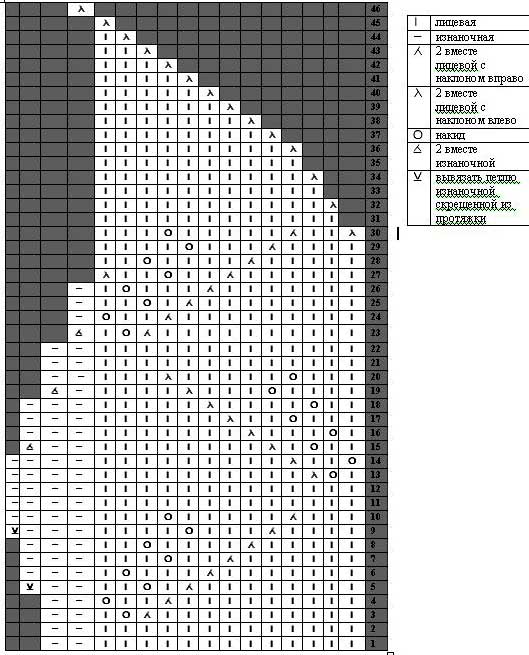
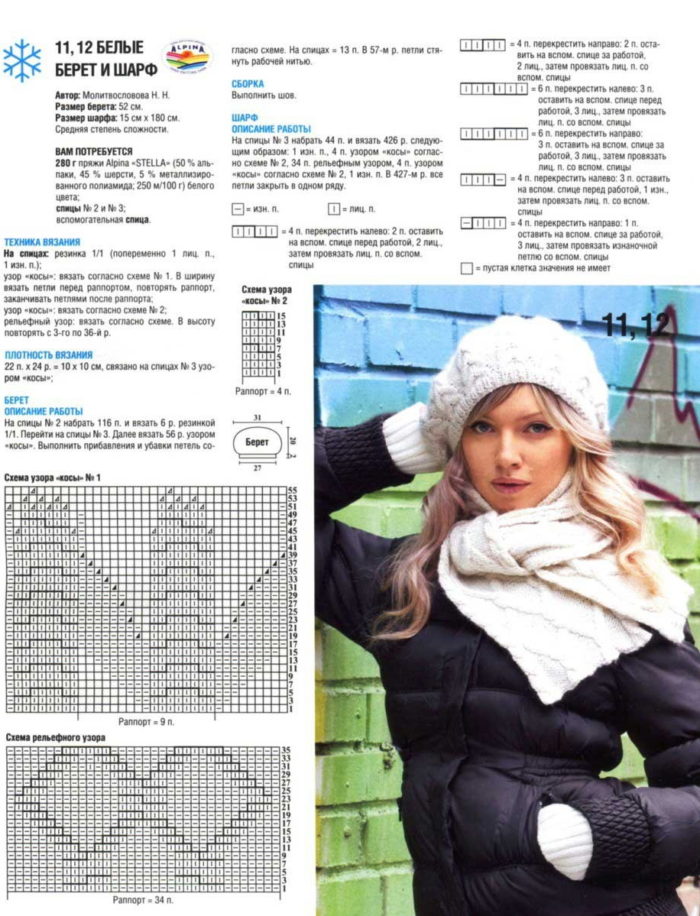
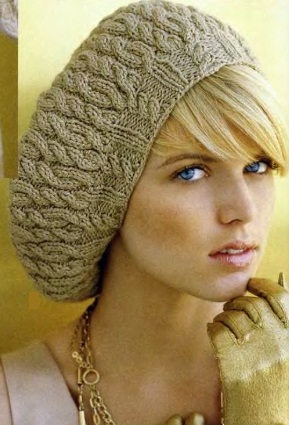
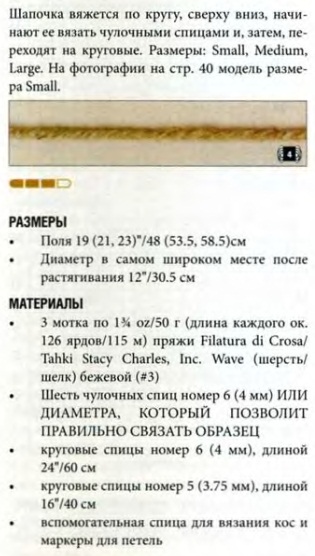
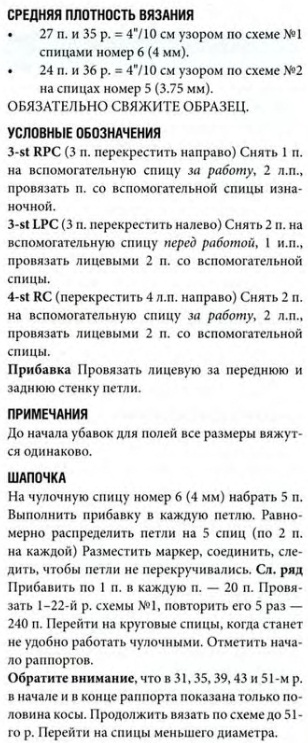
The article gives descriptions and knitting patterns.
The content of the article
- How to knit a volumetric beret with knitting needles for a woman?
- Video: knitting knitting.
- How to tie it from a mohair with knitting needles: a scheme with a description?
- How to tie the berets by Herda: a scheme with a description?
- Video: Gerda takes - knitting
- How to connect with knitting needles: a scheme with a description?
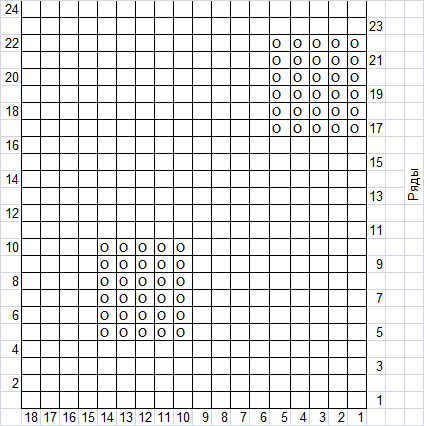
- How to tie it with braids with knitting needles: a description scheme?
- How to tie a braid beret with knitting needles: a scheme with a description
- Video: Wicker pattern with knitting needles
- How to tie the summer openwork beret with knitting needles: a scheme with a description?
- Video: How to bind a summer beret?
- How to tie it with knitting needles with a gastard: a scheme with a description?
- How to tie with an English elastic band with a description scheme?
- Video: Takes with needles with an English elastic band
- How to tie a pumpkin with knitting needles: a description scheme?
- Video: Takes with knitting needles (part 1)
- Video: Takes with knitting needles (part 2)
- Video: takes with knitting needles (last part)
- How to tie a NAKO (fiber) with knitting needles: a scheme with a description?
- Video: How to connect with wedges classic knitting needles?
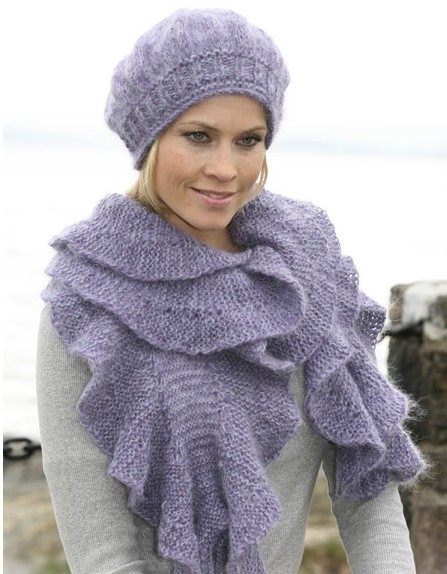
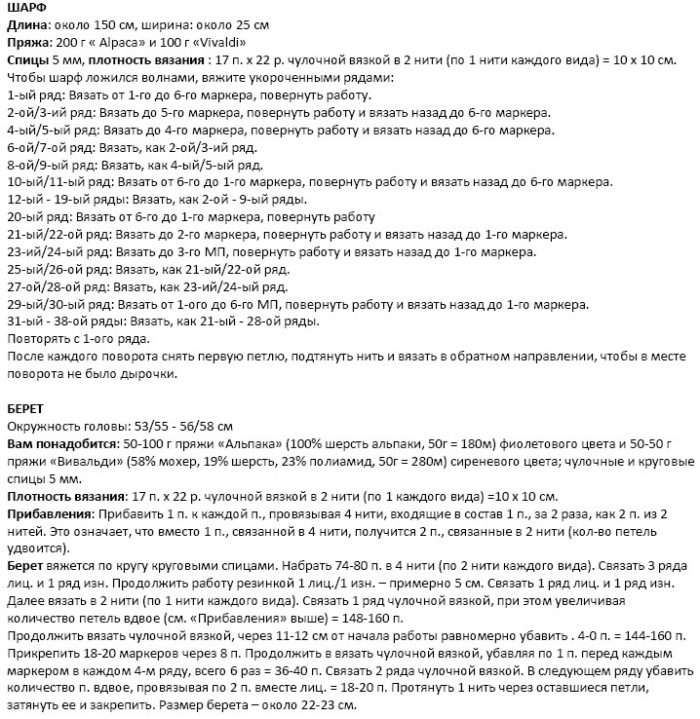
With the onset of cold cloudy and windy days, I want to wear warm knitted things. If you know how to knit, you will always find what to take yourself in the evenings: for each season, needlewomen have a whole list of compulsory knitted products that are constantly updated. After all, new models are replaced by new ones, using fashion and beautiful patterns.
From this article you will learn how to connect one of the permanent companions of elegant women in the cold season - beret. You can connect a simple model connected by ordinary hitchful viscous and openwork.
If you have knitting skills at the highest level, then for you - a beret scheme knitted with a pattern of braids or a braid. Follow step -by -step descriptions, and you will get an original headdress that cannot be found in stores.
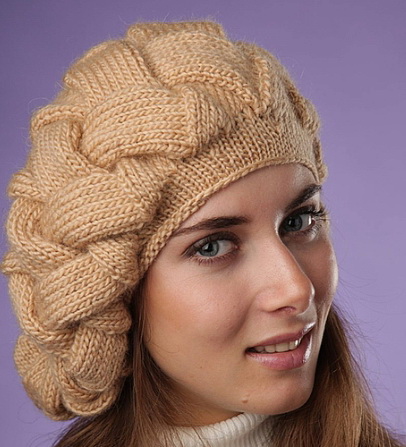
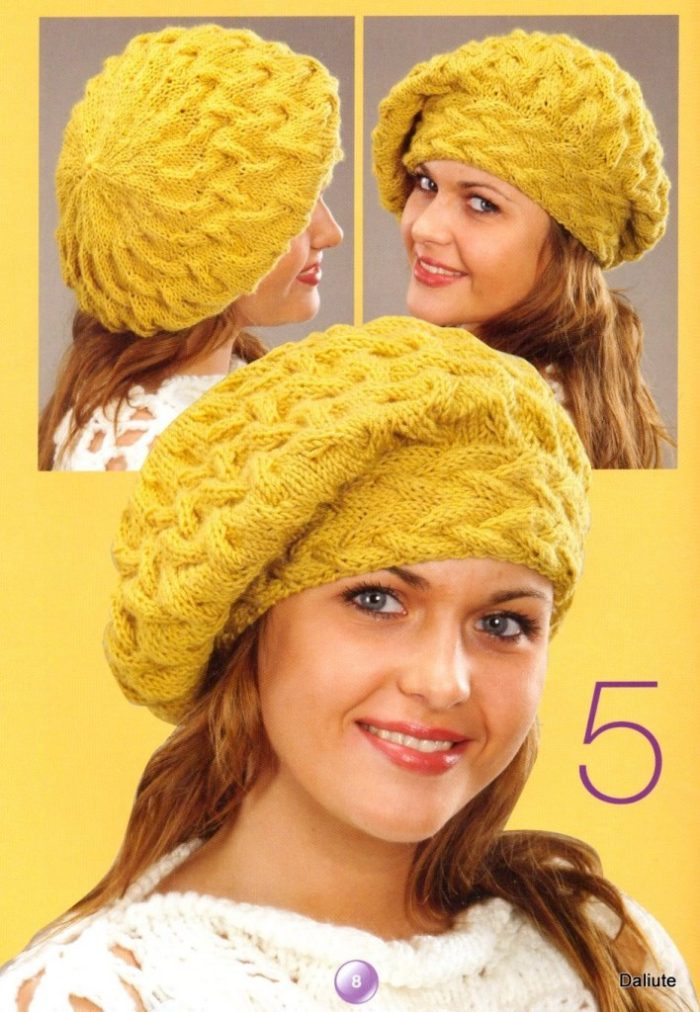
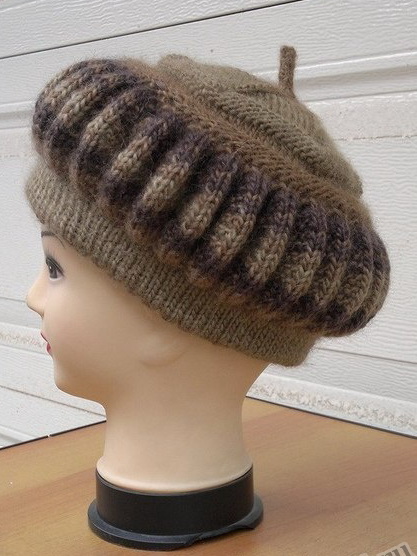
How to knit a volumetric beret with knitting needles for a woman?
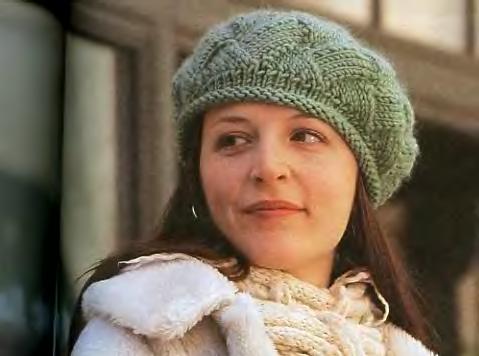
Volumetric berets, it seems, is not inferior to their positions this season: in addition to the fact that they are very warm, they look better and more interesting than small hats and berets connected by a patch.
With the help of such a beret, it is easy to create both a classic image and shocking. He master the presented knitting scheme for a volumetric beret on straight knitting needles an experienced knitter, because there are quite complex elements.
What you need to cook for knitting a volumetric beret:
- yarn from 100% mohair (150 gr)
- straight knitting needles No. 7 and additional knitting needle
- carved cardboard circles for the manufacture of pompon
- scissors and a needle (darn)
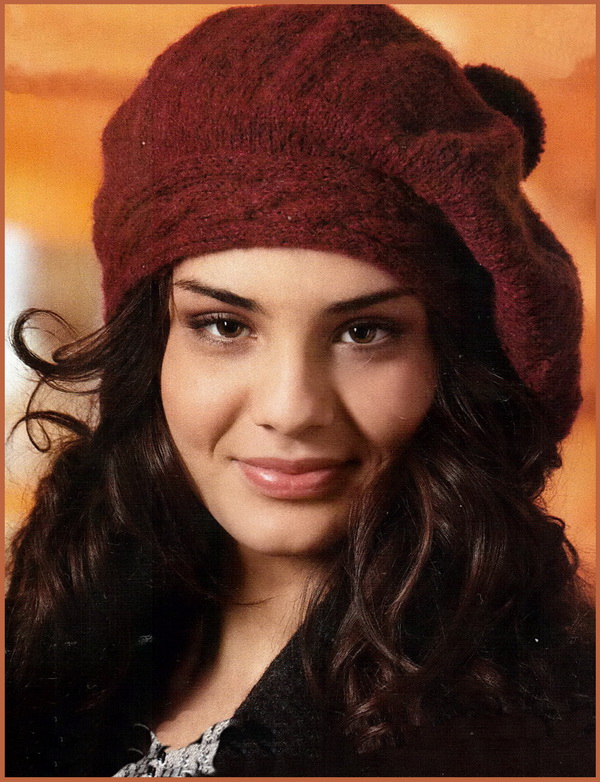
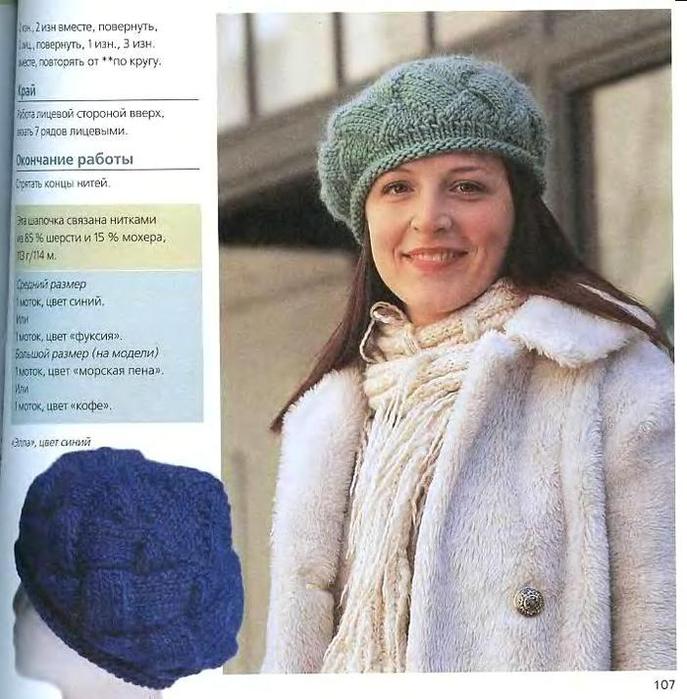
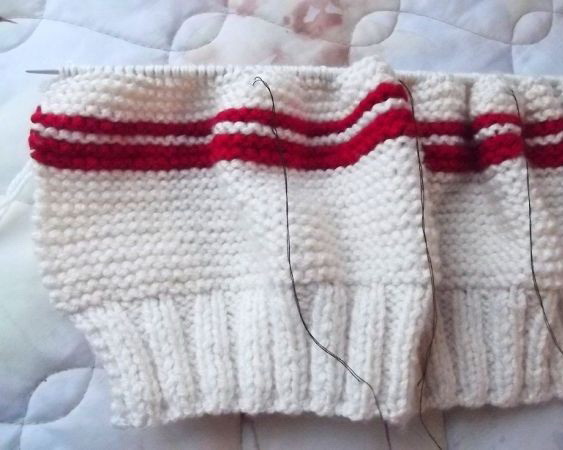
Volumetric red beret decorated with a relief border
Volumetric headdress knitted
We will knit in several stages. Let's start with knitting the upper part of the beret. Then we will tie the box. Let's make a pompom and collect everything in a stylish headdress.
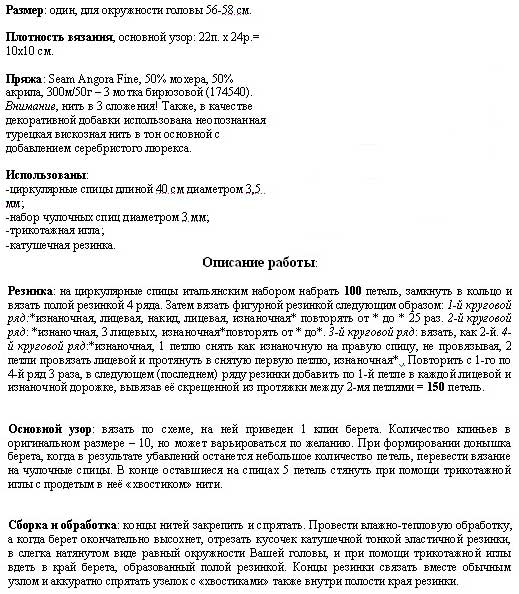
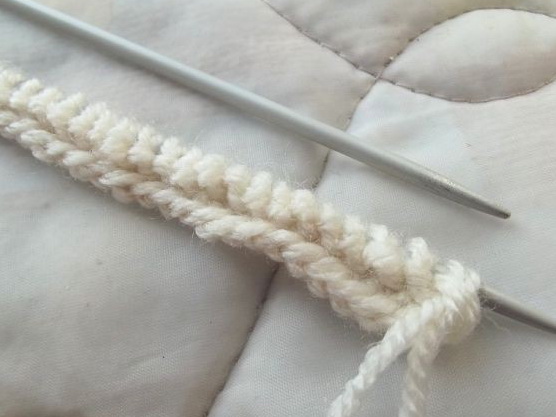
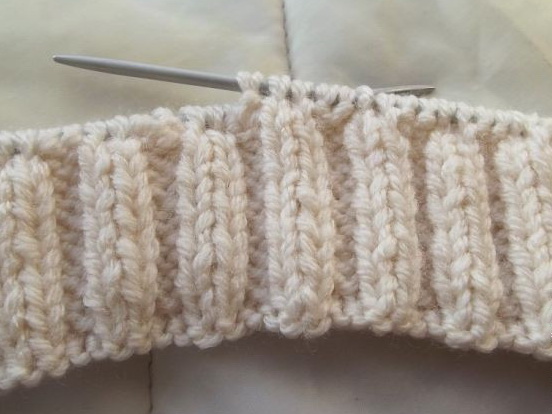
- As we have already said, we will knit from the upper part of the headgear. We take 91 loop on the knitting needles and knit the canvas with an ordinary elastic band 1/2.
- The elastic band is as follows: 1 front loop/2 wrong.
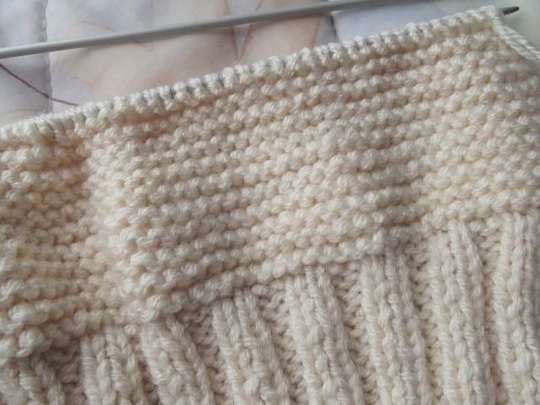
- After we knit 23 cm from the setting edge, we will reduce the number of loops. To do this, reduce the first row evenly by 30 loops immediately. We should have 61 loops on the knitting needles. Again we will knit with an elastic band according to the same scheme.
- We knit 3 centimeters and in the next row we begin again to decrease by 30 loops. As a result, we should remain 31 loops, which we knit with an elastic band until 28 cm of the height of the beret top. We tighten open loops.
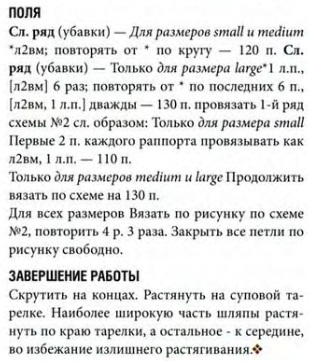
- The density of knitting should be as follows: 18 rows of 13 loops are equal to a square with a side of 10 cm.
Knitting the box
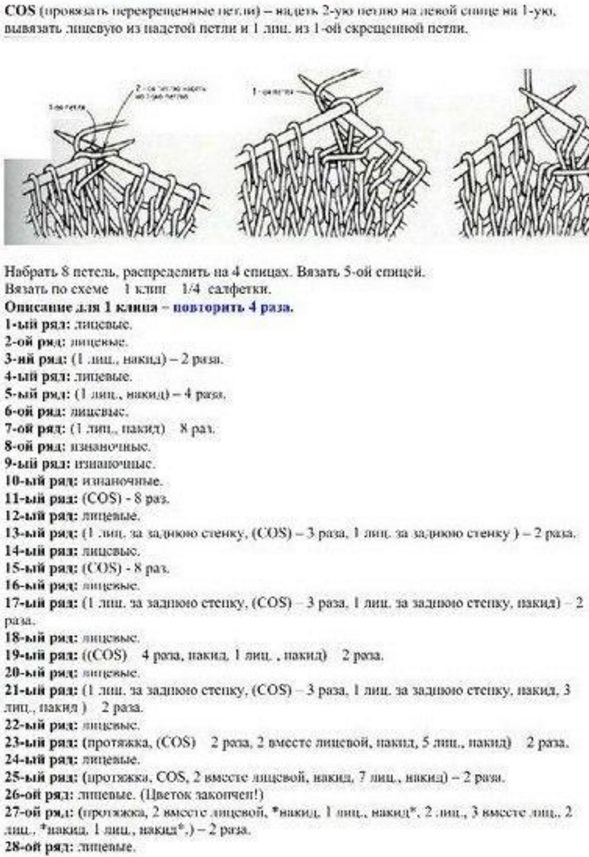
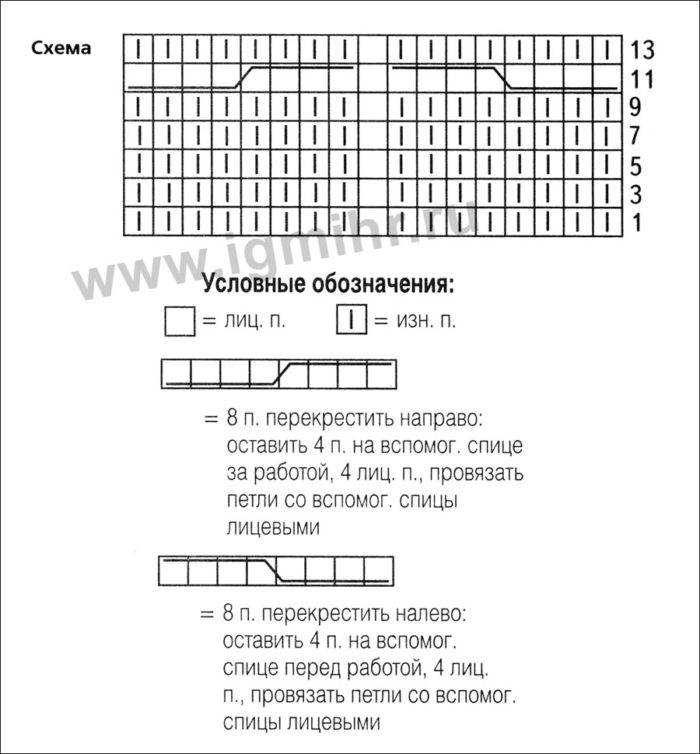
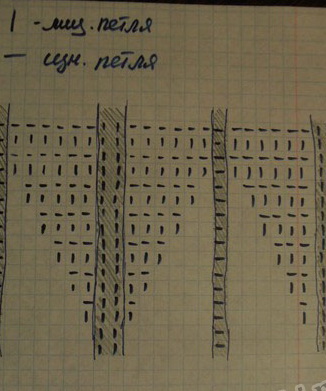
We collect 11 loops on the same knitting needles. We knit the pattern according to the following scheme:
Row 1-2:
• 1 out., 9 persons., 1 out.
Row 3:
• 1 out., 3 persons. Next, you need to remove 3 loops using additional knitting needles. After that, weat 3 loops with the facial. We repeat the same with the loops removed. We knit the last loop in this row with the wrong eye.
Row 4:
• 1 out., 3 persons .. 3 loops using additional knitting needle before work. The next 3 loops are facial, we also knit the front ones. The last loop of this row is the front.
Rows 5 and 6:
• 1 out., 9 persons., 1 out.
Rows 7 and 8:
1 out., 3 persons .. 3 loops using additional knitting needle before work. The next 3 loops are facial, we also knit the front ones. We knit the last loops as follows: 3 - facial and 1 wrong.
If you want to bind the pink with a braid pattern, then knit according to the described scheme until the length of the box is 56 cm (this is the circumference of the head). Close 11 loops and you will get a box connected by a “tourniquet”.
Pink beret with textured braids
- For the manufacture of pompon, you will need two cardboard circles (diameter - 11.5 cm). In them, you need to cut the circles of a slightly smaller diameter (1/3 of the diameter of a larger circle).
- Between the circles, we will lay out the double -folded thread, which we will tighten the pompom.
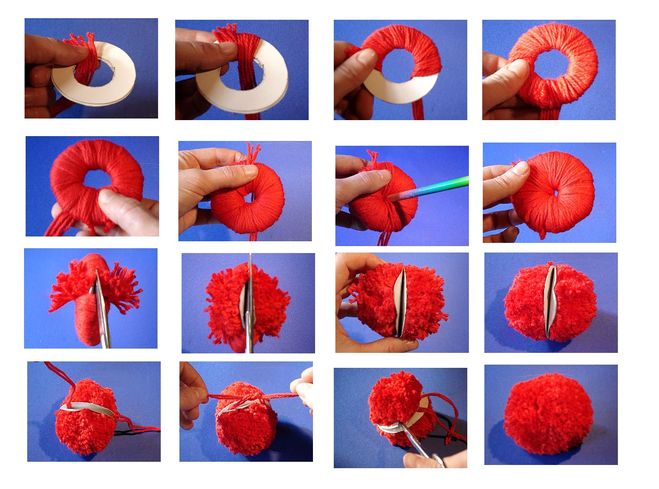
How to make a pompom
- The pompom can be made colorful, from multi -colored threads. On cut cardboard blanks we wrap the yarn, filling evenly the entire circle.
- Let's go scissors at the top of wound threads, pushing the edges of cardboard blanks.
- We tighten the folded thread and carefully pull the cardboard circles. If necessary, cut off the broken threads with scissors.
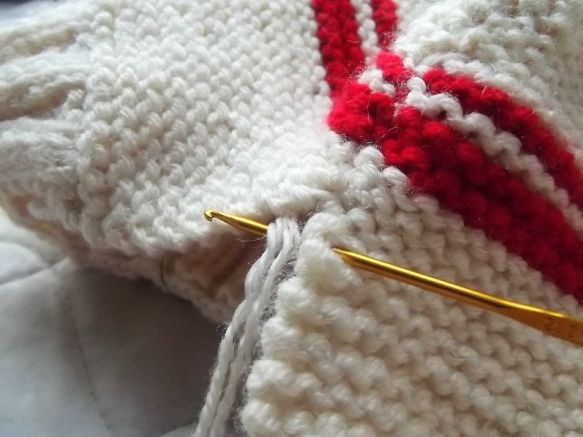
Collection of details:
- So that all the details are connected in one headdress, we need to make a seam in the upper part of the beret and flash the smaller edge of the box.
- We connect the box with a seam to the lower part of the upper part. At the same time, we carry out a small assembly.
- After all the details of the beret are sewn, add a pompom.
- It remains to moisten the finished headdress and wait until it dries.
From the video you will learn one of a way of quick and simple knitting beret.
Video: knitting knitting.
Another way to knit a volumetric beret:
The volumetric beret
Description
How to tie it from a mohair with knitting needles: a scheme with a description?
A classic headdress in the cold season - it takes from Moher.
Takes with a pattern
Tie a voluminous model of an interesting texture, then the hairstyle for the time spent on the road to work will not lose their splendor. Dilute the image with a scarf of a contrasting color and you will look stylish.
We will need to work:
- 3 skein of turquoise yarn (acrylic and moher in a ratio of 1: 1)
- poster knitting needles No. 3
- circular knitting needles 40 cm long
- coil gum
- needle
Here is a detailed description of how to bent:
Work description
Pattern of pattern
Pink beret from mohair

Pink beret
Scheme and description
Delicate beret from mohair and scarf: scheme and description
Beres from Moher
Description for a beret from a mohair
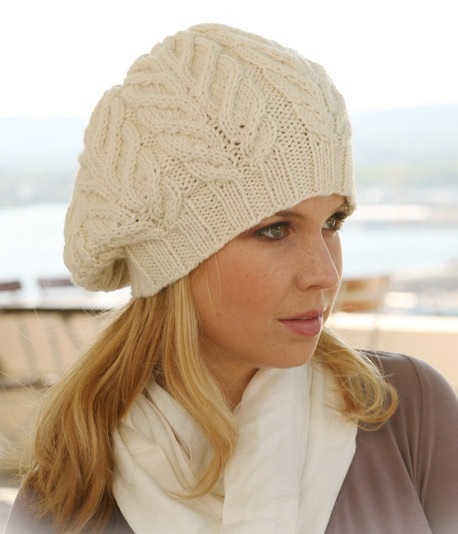
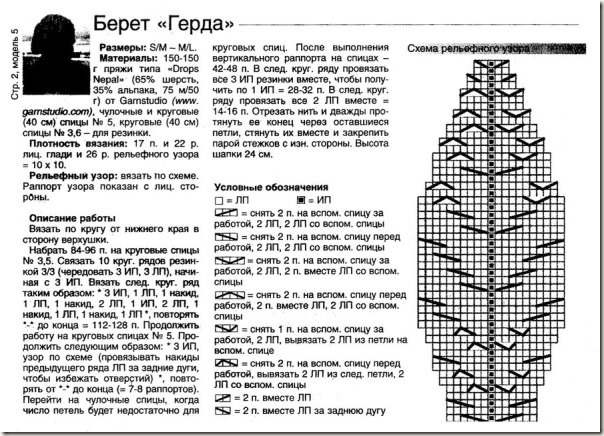
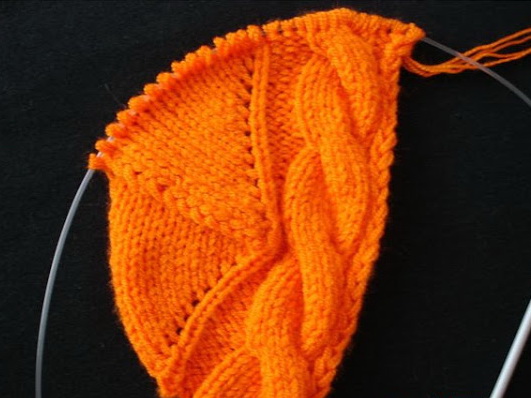
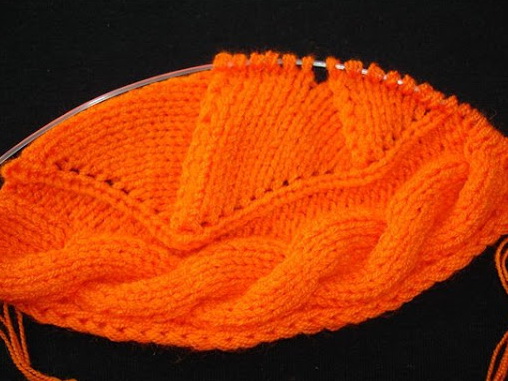
How to tie the berets by Herda: a scheme with a description?
Needlewomen who are fond of knitting with knitting needles have long appreciated the beauty and convenience bereta "Gerda". Many craftswomen very much love this design model and use a pattern for knitting other things, as well as to create whole sets for cold winter days.
A feature of this model is the ornate embossed pattern that decorates the beret. How to knit such a wonderful headdress, you will learn from the scheme of the pattern and descriptions below.
Fashionistas will certainly evaluate textured knitting. A flat hat that has survived a centuries -old history personifies Parisian chic and elegance.
If you have questions or something from the description is not clear, then watch the video that tells about the technology of knitting beret.
Gerda takes
How to knit gerda
Video: Gerda takes - knitting
How to connect with knitting needles: a scheme with a description?
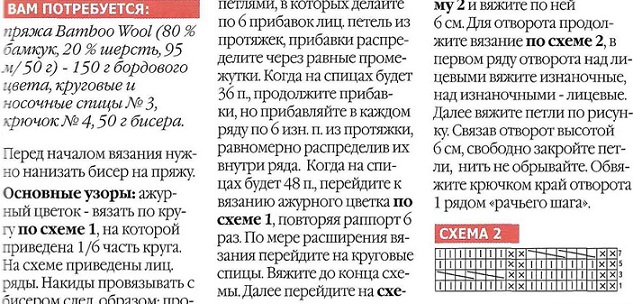
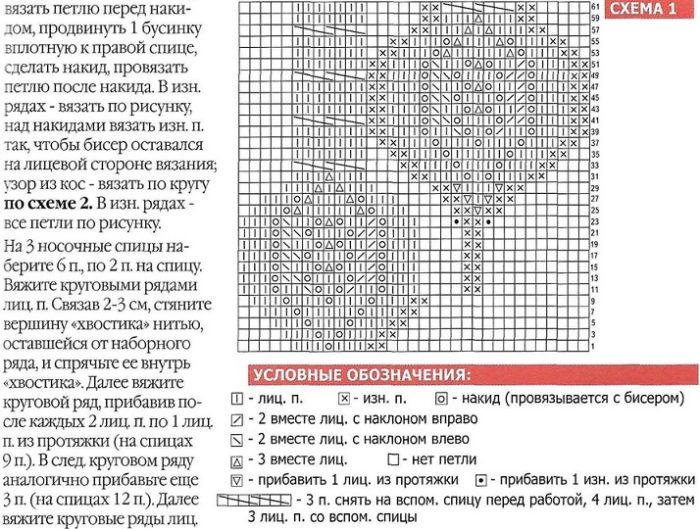
An elegant burgundy beret is knitted in circular and sock knitting needles No. 3. For work, you will also need hook No. 4. The decoration for the beret is beads. It will need about 50 g.

Burgundy beret, knitted with a pattern "openwork flower"
It is necessary to start knitting a beret with a “braid” pattern, which will then go into stylized large leaves.
Below are given scheme and description of the work:
How to tie burgundy beret
The end of the description

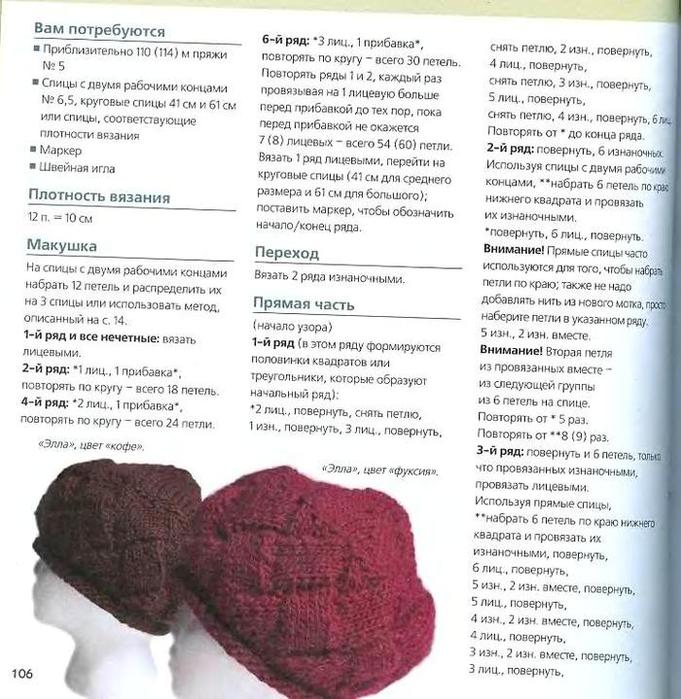
To tie the melangee beret, you will need:
- 200 g of melange yarn
- nominal knitting needles No. 4
The elastic band is performed according to the following scheme: 1 persons. p. and 1 out. P.
The scheme of the main pattern:
Knitting scheme of beret
When performing a pattern in the wrong rows, knit all loops by the wrong ones.
We collect 90 loops and knit 5 cm with an elastic band. So that we get a hem, we perform 1 row as follows:
- *2 knit with the front viscous and make the cloak*. We knit 5 cm with a “elastic band” with a pattern, knit the crochets with the wrong knitting.
- Now we proceed to the knitting of the main pattern. We make uniform additions in the 1st row. We need to add 54 loops.
- We will reduce these loops according to the scheme.
- After 12 loops remain on the knitting needles, cut the thread and tighten its ends, we will fix it.
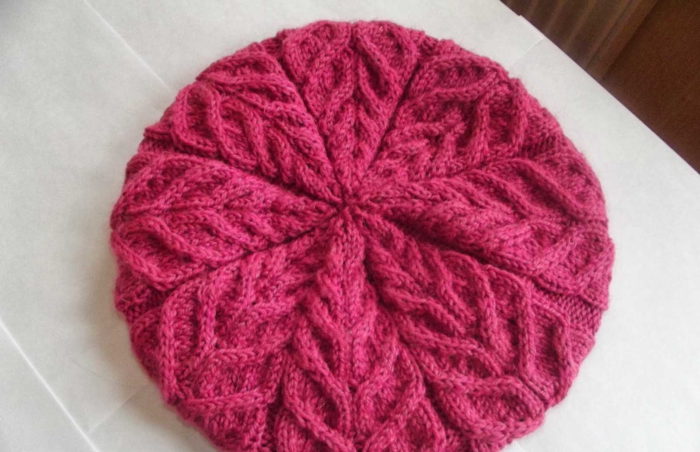
How to tie it with braids with knitting needles: a description scheme?
Scheme and description of the beret white, knitted with a pattern "Spit":
Takes with braids
To bind such a “sunny” one, you will need a bright yellow yarn. The scheme and a detailed description are given below.
Takes "Sun"

Description and scheme
Knitting patterns can be used and others:
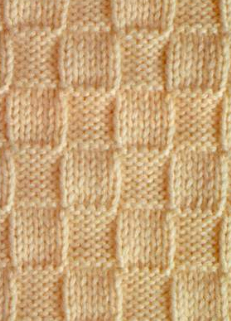
Pattern "Cell"
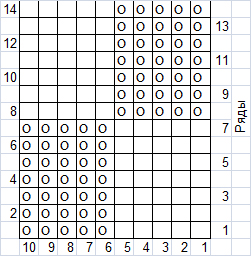
Scheme of pattern "Cell"
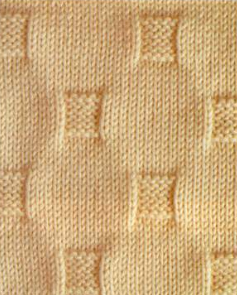
Pattern of pattern
Beret connected by the pattern "braids"
Takes a knitted pattern "braids"
How to beret beret
How to tie a braid beret with knitting needles: a scheme with a description
It looks very impressive and always fashionable beret, connected by the embossed pattern of the "braid". Here scheme and description:
Beret, knitted with a pattern "braid"
How to knit
Video: Wicker pattern with knitting needles
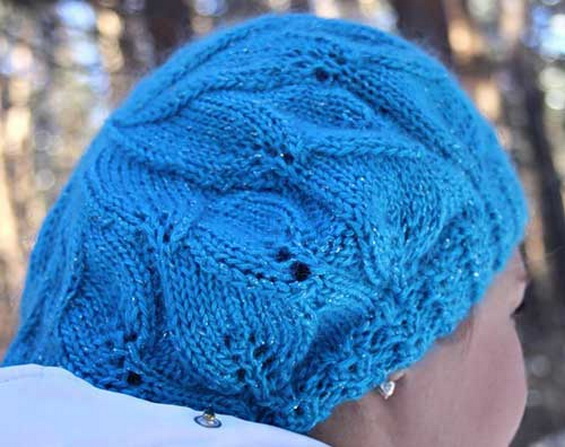
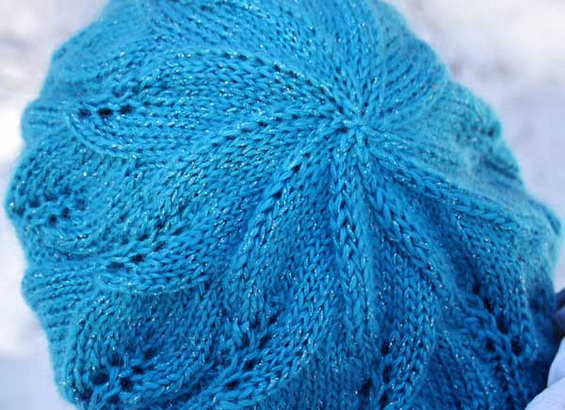
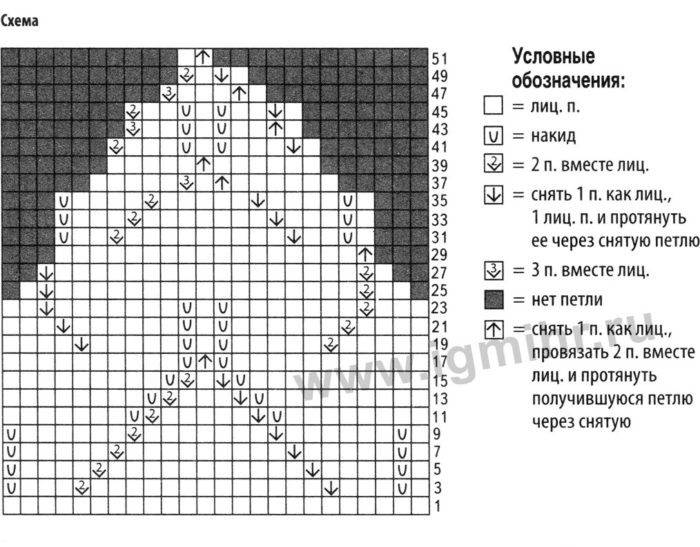
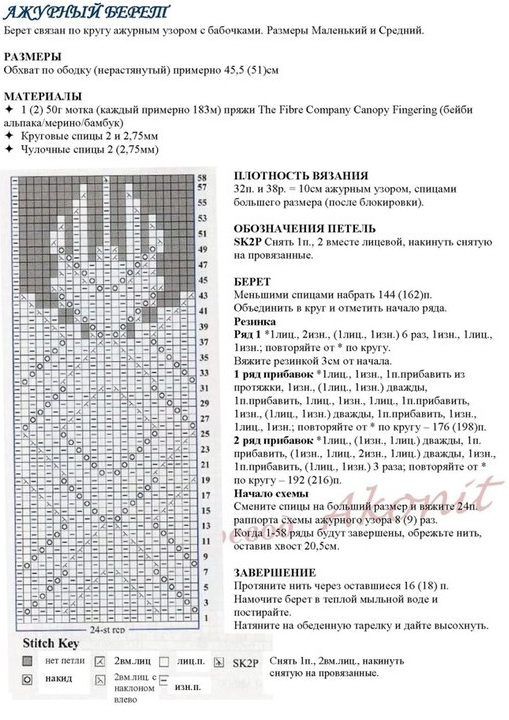
How to tie the summer openwork beret with knitting needles: a scheme with a description?
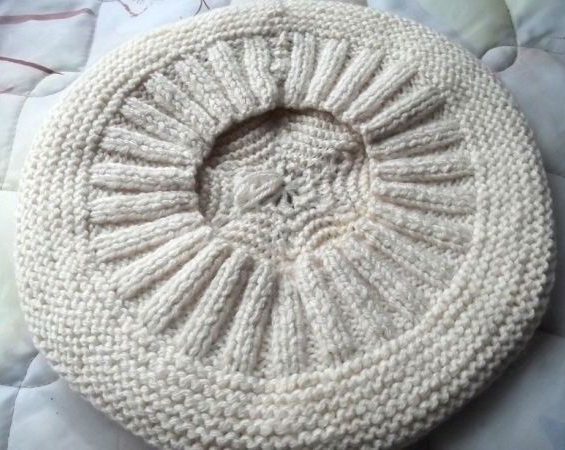
The summer openwork beret is knitting on the principle of napkin: the beginning is in the center, and then additions are made in each row. You need to knit on 5 knitting needles.
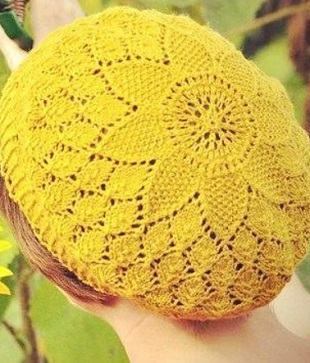
Sunny beres
Work description
Continuation
Below are the scheme and description of the lace of the openwork.
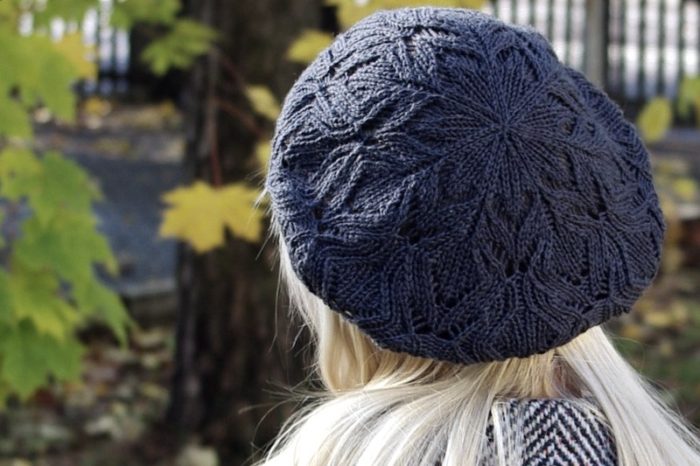
Takes openwork:
Video: How to bind a summer beret?
How to connect with motives "Heart": a scheme with a description?
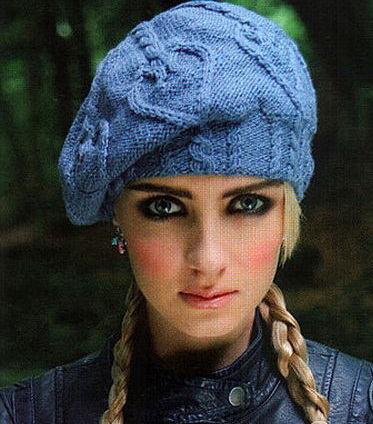
Takes with a pattern "heart"
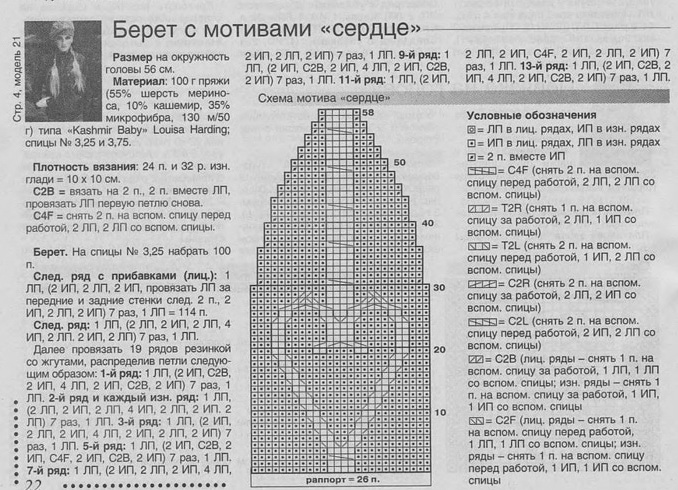
Description for the beret
Continuation
How to tie it with knitting needles with a gastard: a scheme with a description?
If you like the classic more, then tie it with a patch. Even that needlewoman, who takes its first steps in a knitting business.
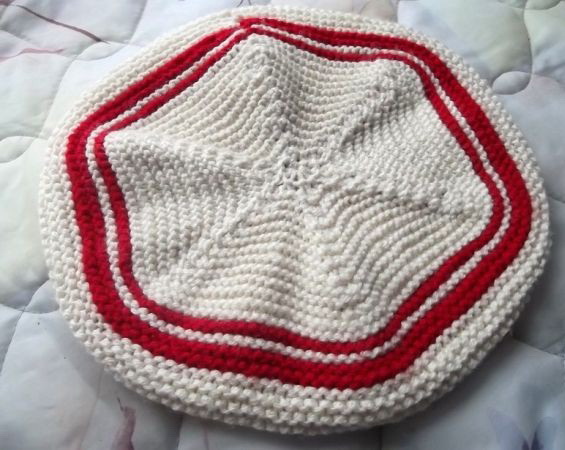
Beret, knitted with a pantry viscous
What you need to cook:
- 1 skein of milk yarn
- red yarn (remains from the previous knit)
- knitting needles
- the hook with which we will connect the rear seam of the headgear
We start with a set of 110 loops.
We collect the loops
We knit the first row
We knit the gum
- 1st row: facial loops
- 2nd row: gum of 2 facial and 2 wrong
- Then we knit the wrong line in accordance with the resulting pattern
- We knit again with an elastic band 5 cm
- We finish the gum with the wrong loops, while making the additions of 28 loops in it
- To get an additional loop, we need to make a yarn between the facial loops
- After that, we proceed to the patch. Here's a scheme:
The scheme of patch knitting
- As can be seen from the scheme, the front and wrong loops are knitted by facial
- The tied with a patch viscous can be quite dense. This is just suitable for a winter beret
- We continue to knit with a gastard viscous 11 cm or a little more (at your discretion)
11 cm of patch knitting
The knitting scheme of these 11 cm is as follows:
- 22 rows - milk color of yarn
- 4 rows - red
- 2 rows - milk
- 2 rows - red
- 8 rows - milk
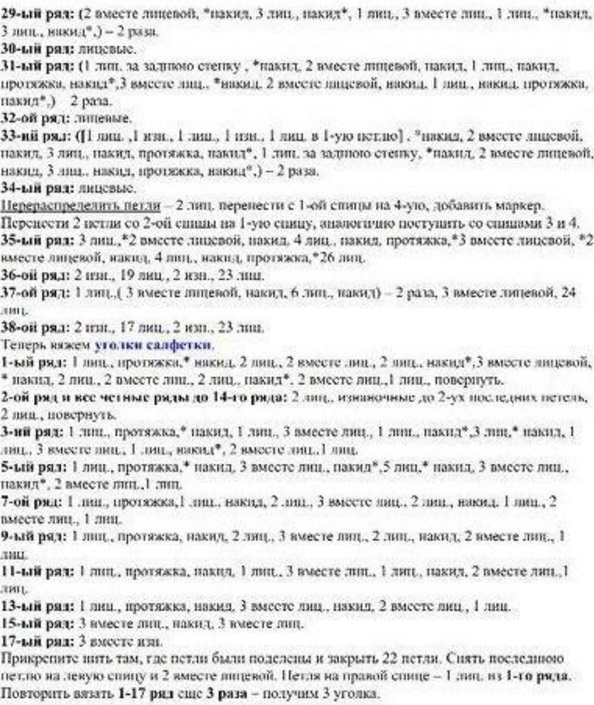
Now we will make decreases: we will divide the canvas into 6 parts, in each - 23 loops. We tie the threads in the places of separation, so as not to go astray.
- 1st row: we knit the front row in which we knit the first 2 loops with one front,
- after that, we also knit to the designated thread every 2 loops,
- after the thread - one front. The remaining 2 front we knit as one front.
Divide the canvas into 6 parts
- The row after that decreased by 12 loops
- 2nd row and 3rd We knit a row with a pattern "Plative knit"
- We do not make decrease
- 4th row: We repeat according to the same scheme as in the front row with decreases, we are reduced by 12 loops
- 5th row and 6th row: patch knitting without decrease
- 7th and to the endand - decreases for 12 loops
We knit the wrong rows without reducing the number of loops.
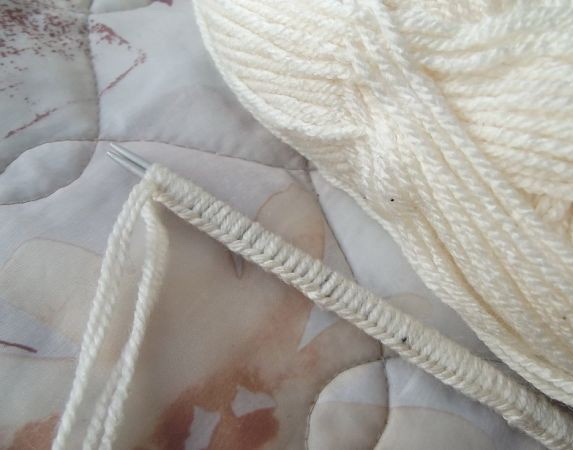
We drop the remaining nine loops onto the thread and tie it. We sew the side seam
- After 18 loops remain on the knitting needles, we will decrease half: we will knit every two front - one loop
- We have 10 loops left, which need to be thrown on a thread (easier to do it with a hook) and tie it
- We sew the rear seam (again useful for this hook) milk yarn
We sew the rear seam
How to tie with an English elastic band with a description scheme?
Video: Takes with needles with an English elastic band
English gum circuit:
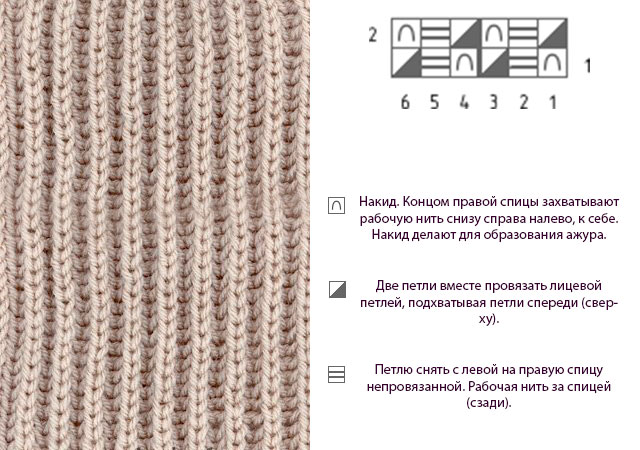
Scheme of pattern "English elastic" with knitting needles
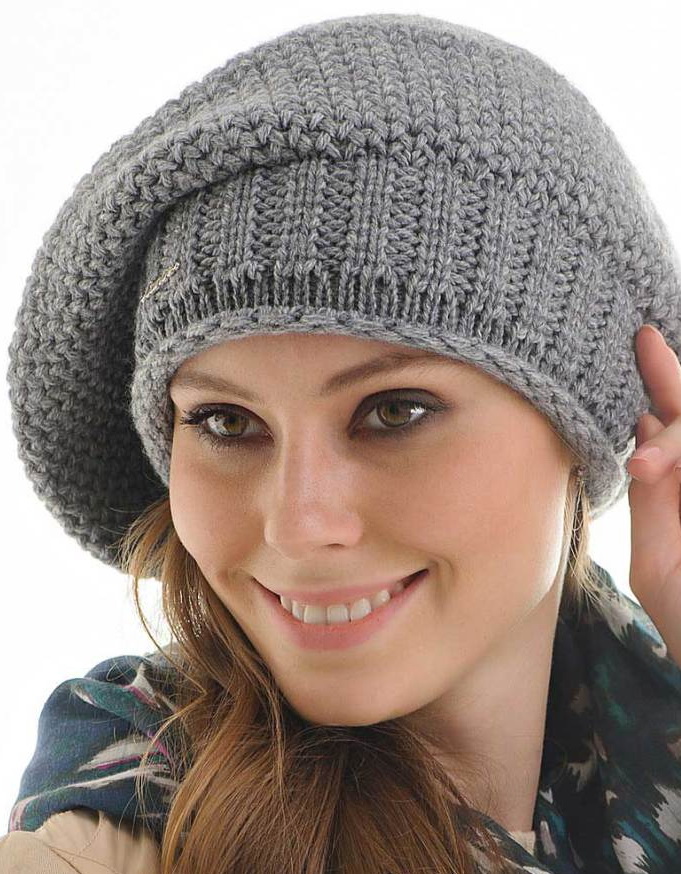
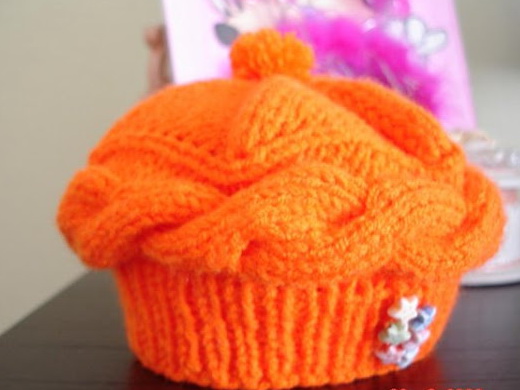
How to tie a pumpkin with knitting needles: a description scheme?
About how to connect the pumpkin, is described in detail in the video.
Takes a pumpkin
Video: Takes with knitting needles (part 1)
Video: Takes with knitting needles (part 2)
Video: takes with knitting needles (last part)
How to tie a NAKO (fiber) with knitting needles: a scheme with a description?
When you knit it with knitting needles according to the scheme, do not tighten the threads much, and take the knitting needles not thin, otherwise the headdress will be just right for the doll.
Knitting scheme is this:
- We collect 16 loops.
- We start knitting 1 row. We use the following combination: we knit 3 output.
- Then we knit 8 facial loops (we form a braid), 3 out., knit 1 by the face with a front, make a cloak, and finish the front loop.
- 2nd row: We knit the wrong ones in accordance with the pattern.
- 3rd row It is knitted as the 1st, only 2 front loops will be the last, instead of 1.
- Then everything is repeated: 5th row and remaining Up to the 11th row, we knit, similarly to the 1st row, with the only difference being that in 5th Add at the end of 3 facial loops, in 7th - The last 4 facial loops are knitting, in 9th row -The last 5 facial loops are added, in the 11th-6 facial loops.

Breaking the pigtails every 12 rows
- We begin to knit 12th rowd. We knit 3 loops of the wrong viscous, 8 - front, cross 4x4.3 wrong loops, knit 1 loop with the front knit, make 1 crochet and complete with the front loops in an amount of 7 pieces.
- In each 12th row We make crossing the pigtails. When the desired beret height is set, we knit an elastic band from the brown hinges of the pigtail. We sew the finished headdress.
When the triangle is from 14 loops begin to decrease
- Change the direction of the pigtail. Having knitted the 4 first loops, using an additional knitting needle we throw them into the place of the other 4 hinges. We knit the next 4 loops, and then we knit 4 loops, removing from an additional knitting needle.
- We have formed a triangle of 14 loops. There should be 6 triangles throughout the canvas. It is necessary to make decreases after the 14th loop. Thus, we will make from a large triangle - small.
- In a large triangle, we reduce the loops, and in a small one - add.
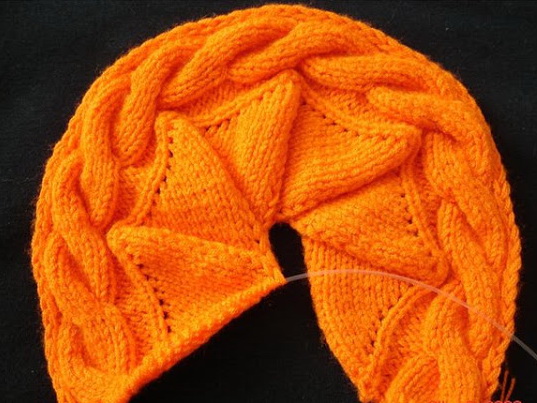
Beret consists of 6 triangles
How to do loops crossing in every 12th row?
- We knit all the facial ranks with decreases by the 1st loop after the crochet, in other words, we knit the 2nd loops together and turn the work.
- We do not knit the remaining loops, leaving on the knitting needles. So we have a large triangle less, and in a small loop are added.