From this article you will learn how to make a necklace, beads with your own hands.
The content of the article
- Necklace, beads with your own hands from beads
- Necklace, beads with your own hands from rings
- Necklace, do -it -yourself beads from pearl beads
- Bizer necklace
- Amber necklace
- Beads from beads with threads
- Large beads
- Necklace, do -it -yourself beads from textile threads
- Necklace, with your own hands from multi -colored threads
- Beads with your own hands from beads "Rainbow"
- Necklace "Blacksmith"
- Necklace, with your own hands from laces
- Necklace, do -it -yourself beads from small beads
- Necklace, beads with your own hands from T -shirts
- Necklace, beads with your own hands from circles
- Video: create a necklace with our own hands
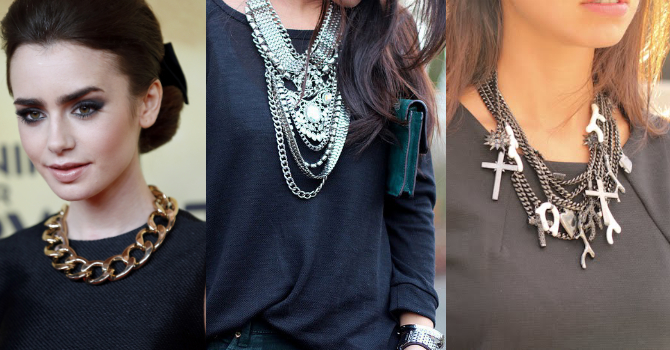
It is very easy to give some highlight of your own image - it is important to apply the necessary accessories. The necklaces from beads and other materials will emphasize femininity, plus they will be able to attract attention. Since such jewelry has a certain uniqueness, they have a big charm, and therefore are always considered fashionable.
Necklace, beads with your own hands from beads
In practice, the most popular are those jewelry that are made of simple and affordable details. Since today in the store you can find a wide range of material, you may get an accessory that Jessica Alba wears.
Stock up for him:
- Muline threads - 2 pcs.
- Beads
- Large elongated beads
- Round rhinestones
- Wire
- Threads under the tone of beads
- Clamps
- Rings

Gorgeous necklace
Production process:
- Tie 2 threads together.
- Tie a knot, put on a clamp on it.
- Stop the beads on the threads. So you should get 6 threads with beads.
- Weave the resulting threads with beads in the form of a pigtail, attach the rings to the ends, and attach the chain of the desired length to them.
Necklace, beads with your own hands from rings
In the summer, these beads will be an excellent decoration.
For them you will have to stock up:
- Nylon cord of a bright shade
- Brass rings of various sizes
Stylish
Production process:
- Make a template from the rings, then take a picture so as not to forget the shape.
- Next, tie the rings as indicated in your template.
- Tie the tips of the threads into the knot, cut off the extra pieces.
- Bind 2 long cords that you will have instead of a chain.
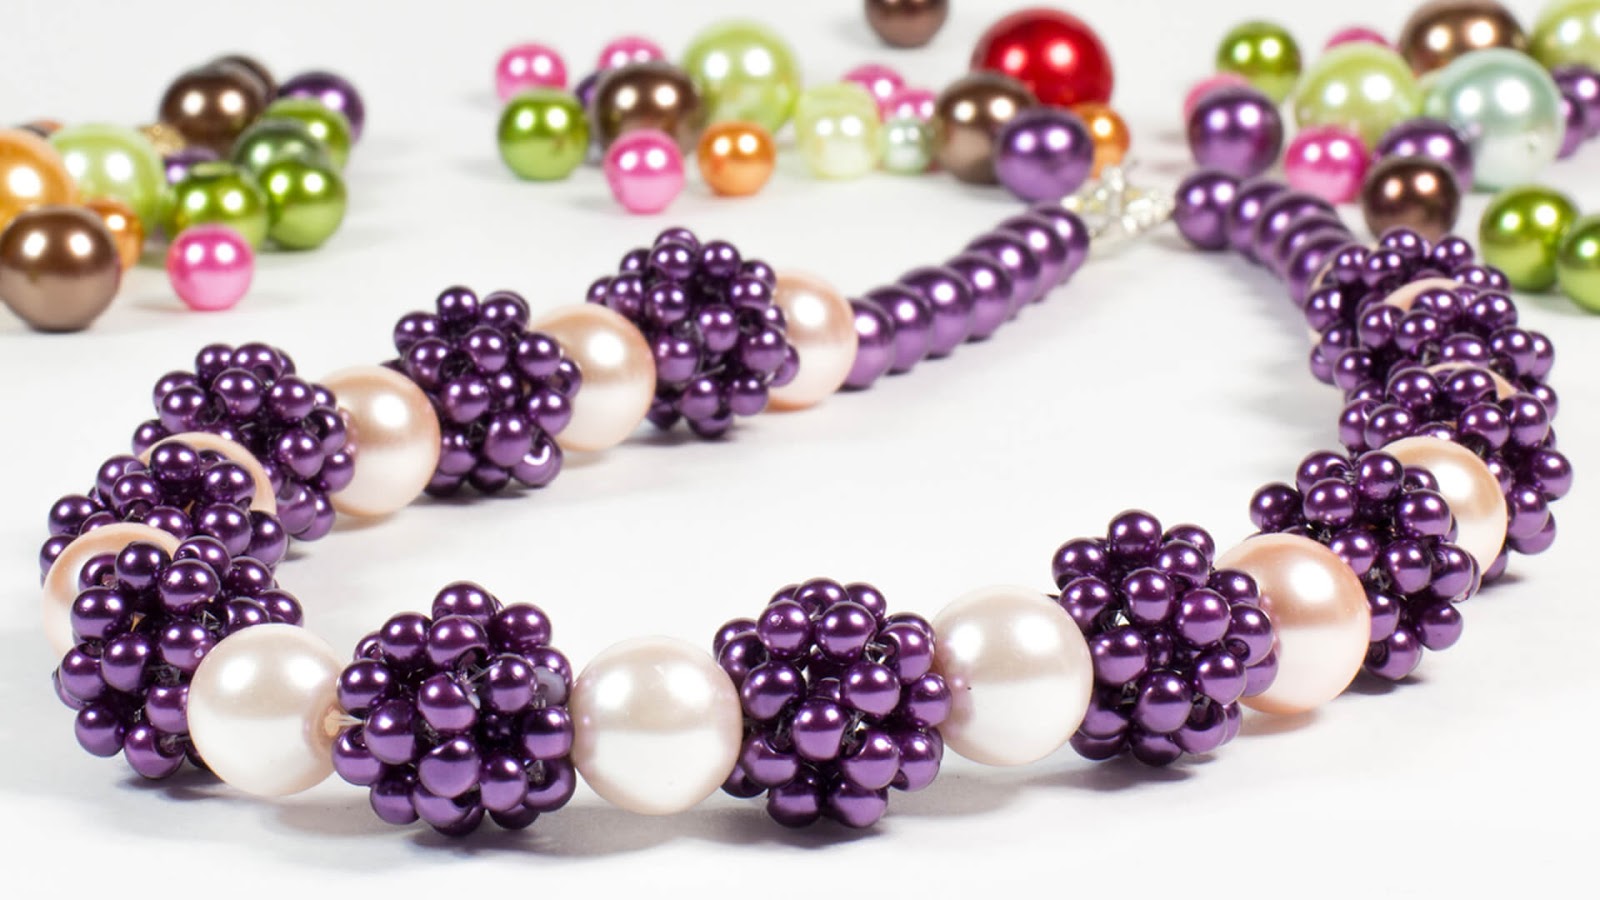
Necklace, do -it -yourself beads from pearl beads
Stock up for the necklace:
- Жемчужными бусинами – не более 60 шт.
- Threads
- Карабином с застежкой
- Концевиками – 2 шт.
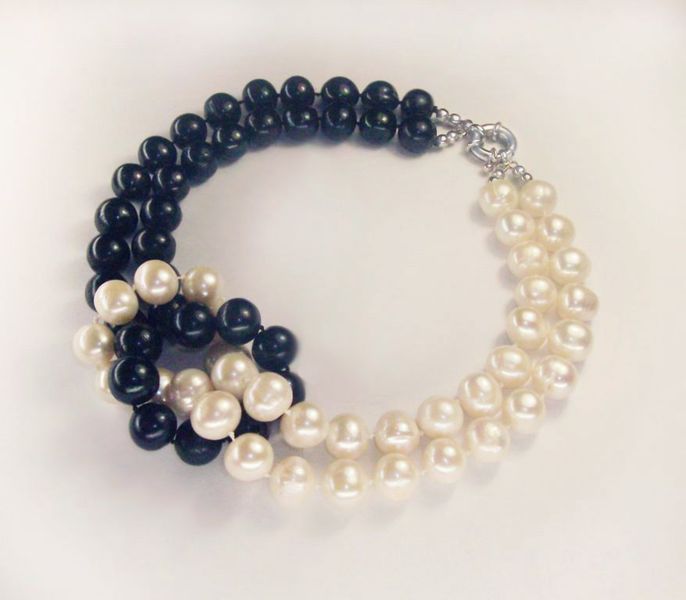
Always in trend
Production process:
- Для закрепления концевика припустите иголку в его центре, сделайте узелок.
- Сверху полученного узла сделайте еще один. Закройте концевик.
- Начните нанизывать бусины.
- Дабы узлы после бусин смогли лечь впритык, можете применить шелковую нитку и крупное шило. Так вы сможете переместить узелок в нужное место, завязав его там.
- Когда нанизаете каждую бусину, наденьте оставшийся концевик. Просто пропустите иголку сквозь обратную сторону концевика, сделайте двойной узелок.
- Закрепите карабин при помощи круглогубцев.
Ожерелье из бисера
Изделие требует запастись такими материалами:
- Бисером
- Бусинами различных размеров
- Леской
- Булавками – 40 шт.
- Спиральными концевиками – 2 шт.
- Замком
- Cardboard
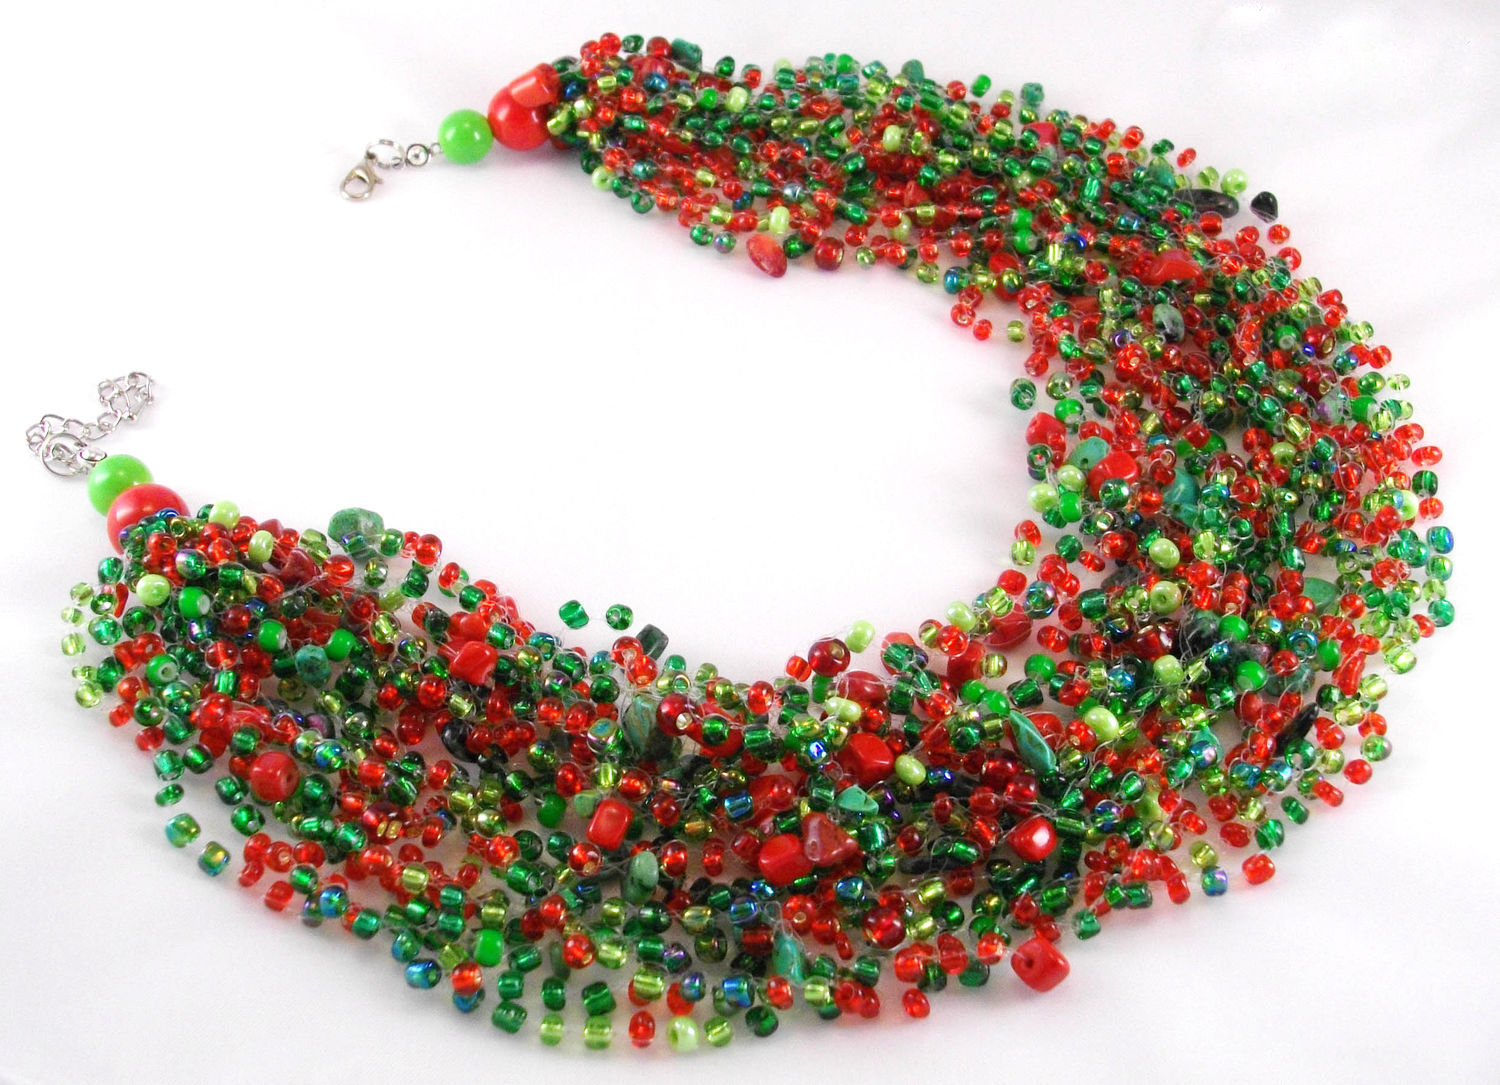
Многослойно
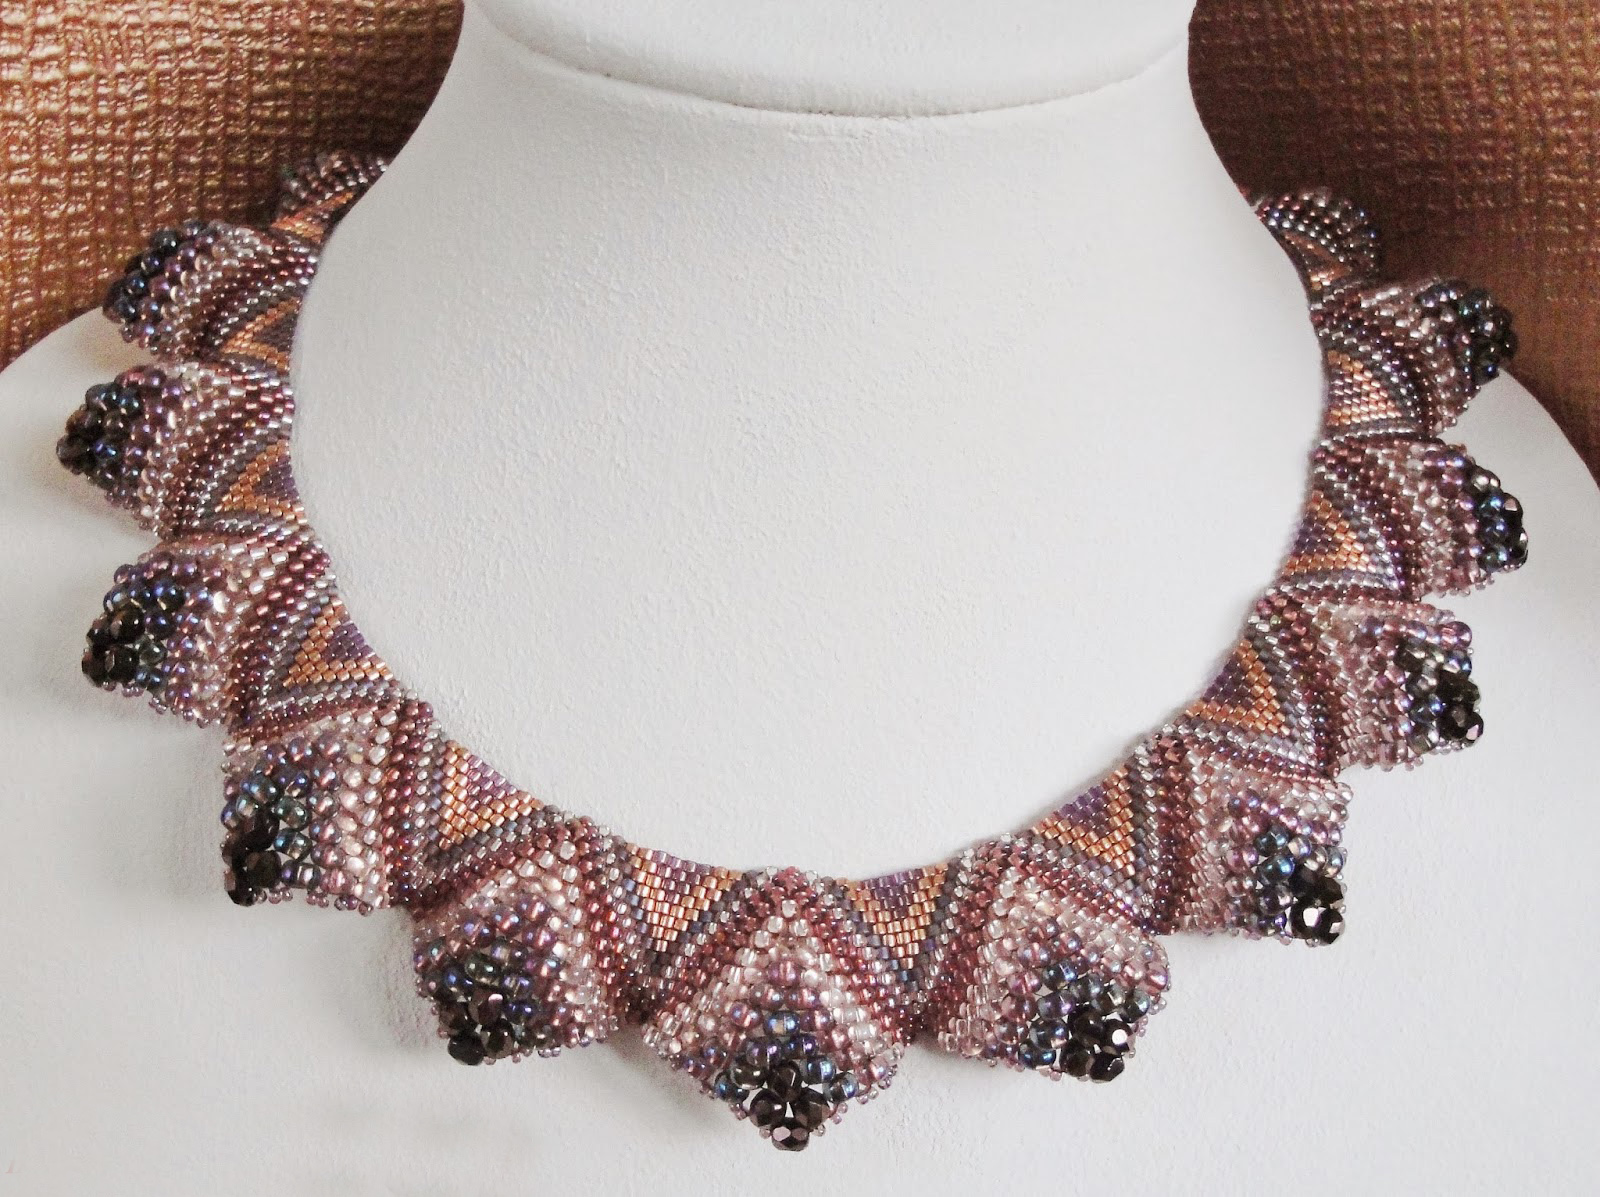
Perfect
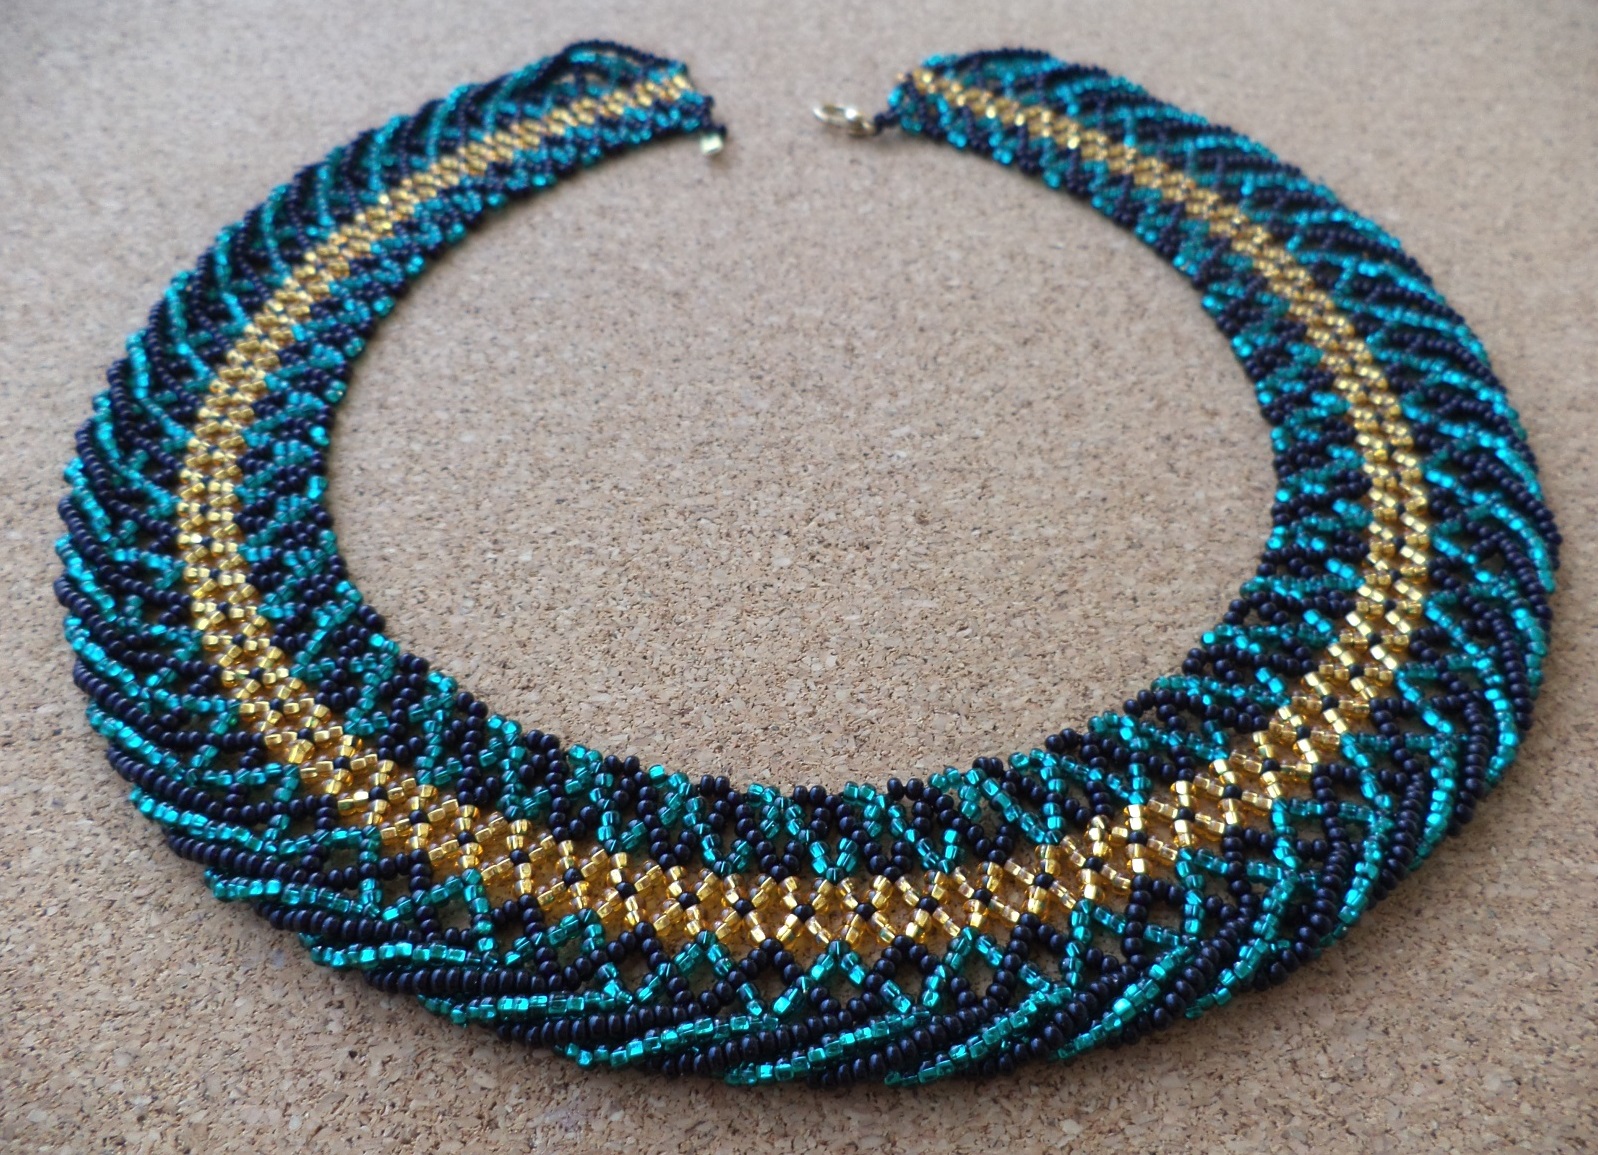
Stylish
Production process:
- Нанизайте бисеринки на леску на свое усмотрение. При этом леску отрезать не нужно.
- Вам потребуется заполненная бисером леска длиной около 5 м.
- Когда заполните леску, оставьте не заполненный кончик длиной 15 см.
- При помощи вязального крючка сделайте воздушную цепочку, используя воздушные петли. На каждую петлю поместите 1 бусину.
- В конце вязания завяжите узел, потом отступите еще 15 см, обрежьте леску.
- Начните формировать многоуровневое украшение. К картону прикрепите пару булавок такой длины, как конечное украшение.
- Оставшиеся булавки воткните по 2 шт. под первыми булавками. При этом немного увеличивайте расстояние между булавками.
- У вас должно получиться приблизительно 18 рядов, может немного больше. Постарайтесь их равномерно распределить.
- В тех местах, где булавки и воздушные петли прикасаются, наденьте сами петли на булавки. Не натягивайте леску, бусины должны лежать свободно.
- Воздушные петли и с правой стороны соберите, используя крючок. Через данные петли протяните один кончик, который вы оставили на краю цепочки.
- К кончику прикрепите концевик и замочек.
- В конце завяжите узел, оплавив его при помощи зажигалки.
- Также поступите с петлями на другой стороне.
Ожерелье из янтаря
Stock up:
- Лентами
- Янтарем
- Кольцами – 2 шт.
- Фиксаторами – 6 шт.
- Кабашоном
- Тросиками
- Threads
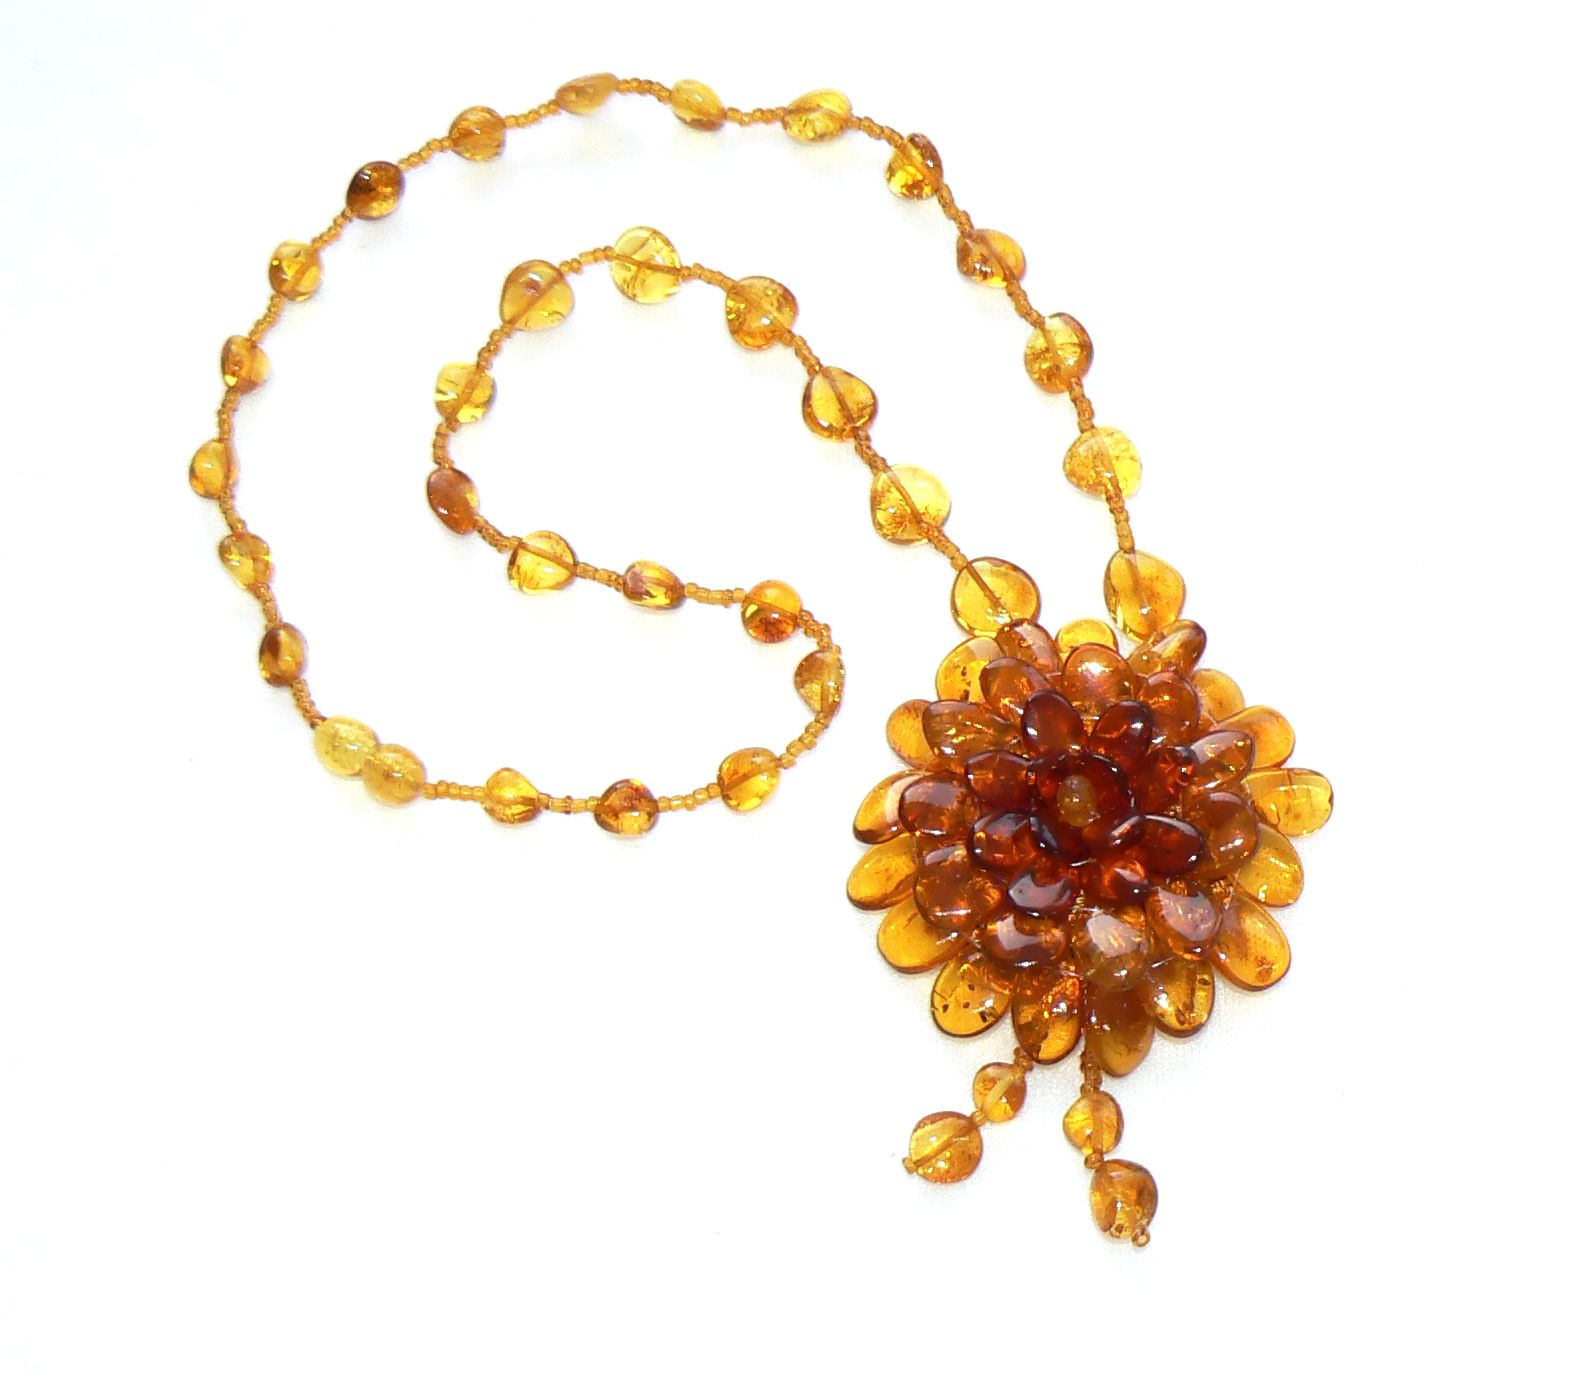
Янтарный цветок
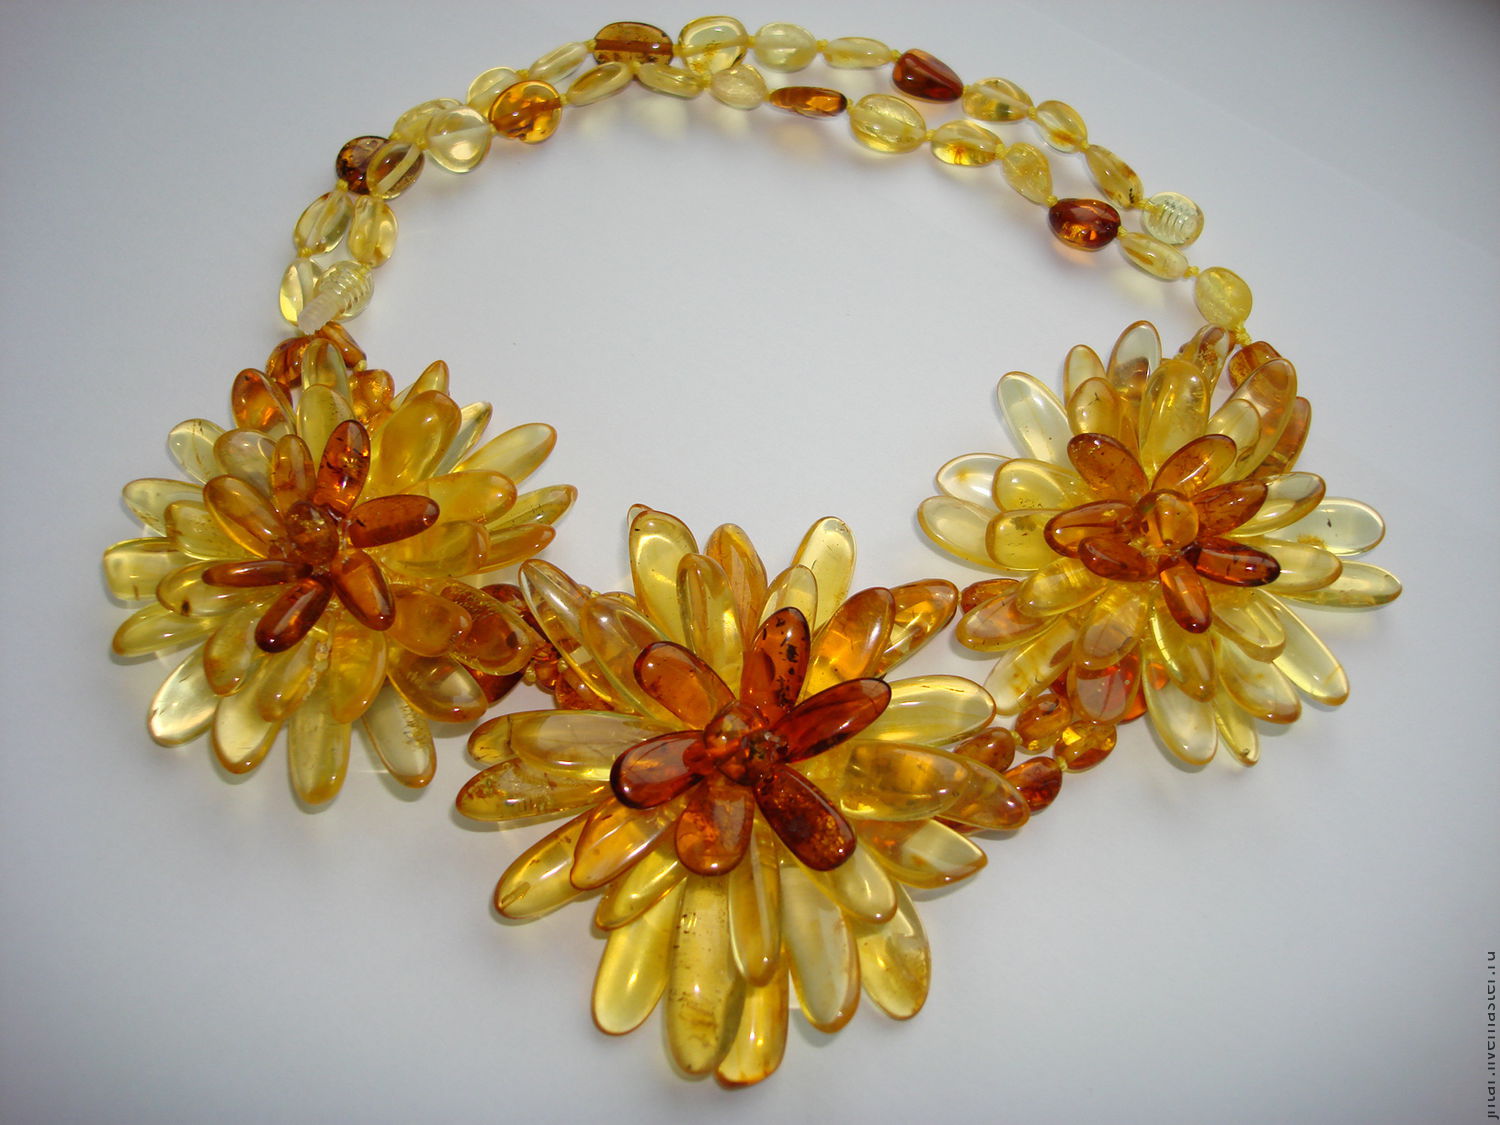
Янтарные цветочки
Production process:
- Возьмите фиксатор. Закрепите декоративное колечко на небольшом кусочке тросика.
- Нанизайте на тросик ожерелье необходимой длины, зафиксируйте вторым фиксатором край на другом колечке.
- Следующие ряды сделайте таким же методом. Но при этом старайтесь немного укоротить каждый следующий ряд, дабы ярусы легли красиво.
- Take 2 ribbons large in width. Cut the strips from them. From the thicker, cut 7 strips, from another - 6.
- Determine the length of the strips, given the flower splendor: the strips will be longer, the product will be more magnificent.
- Using a needle and thread, string the ribbons folded to 2 equal parts of the ribbon alternately. Start with large ones, finish less.
- Tighten the thread, so your petals will be pressed to each other. Turn the workpiece so that you get a flower.
- Fasten the product with the stitches, and decorate its center with a wild bond.
- Sew the flower to the decorative ring.
- Take a thin tape, cut 2 strips of identical length. It will be your future ties. Pass them through the rings, fold them in half, tie it on the neck.
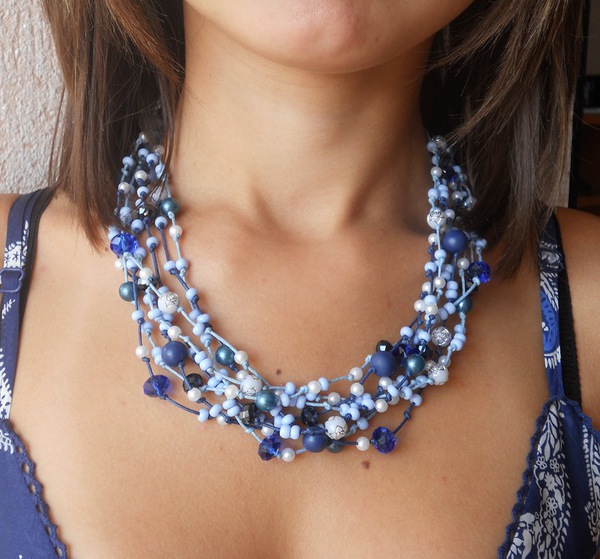
Beads from beads with threads
Stell the necessary materials:
- Beads of the same size
- Chain with rounded links
- Ribbon
- Muline threads
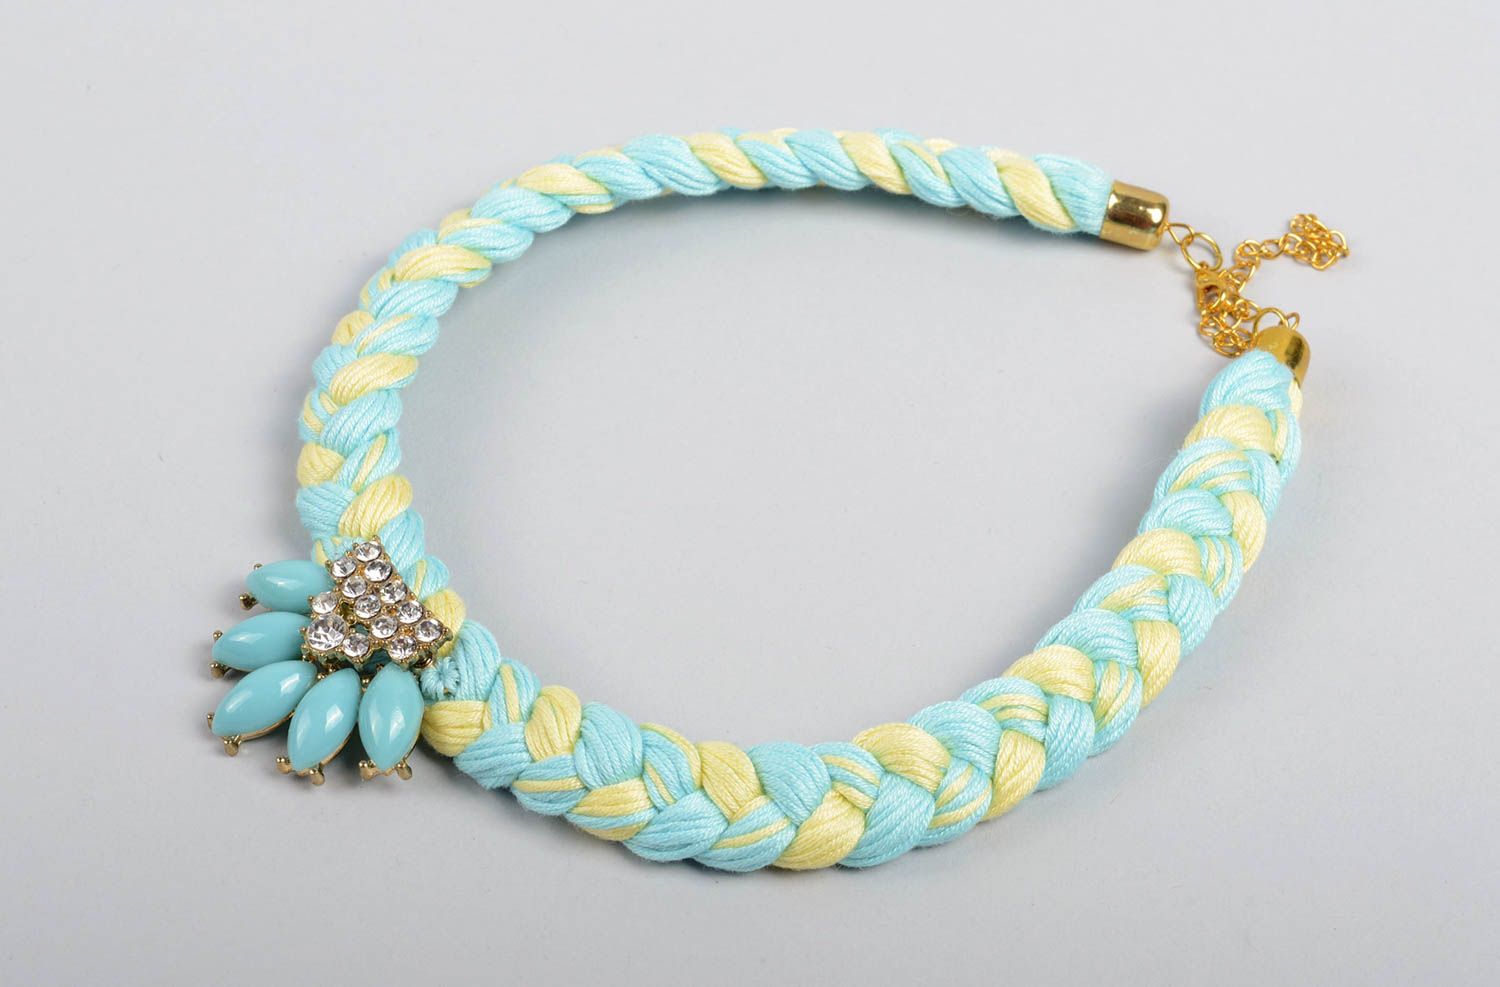
Yourself
Production process:
- Take the usual chair. Wrap the muline on his back.
- When you form the winding of the necessary thickness, cut it on one edge. On the other hand, hold the winding at this time so that it does not crumble.
- Having outlined the center, fix this place with a thread of an identical tone. Divide the resulting "tail" into 3 identical parts, weave a braid out of it.
- Weaving the braid of the desired length, decorate its edges. Make a dressing, cut the extra threads. Make sure that the ends are the same.
- Using a thread and needles, attach the braid to the chain.
- On the other side of the braid, sew beads.
- Instead of the lock to the edges of the necklace, attach the ribbons.
Large beads
It is necessary to stock up on the following materials:
- Beads, the diameter of which is 1 cm. 4 mm
- Pinins 3 cm long - by the number of beads
- Fastener-karabin
- Connecting rings - 2 pcs.
- Transparent beads
With large beads
Production process:
- Take a pin, string the beads on it, then bead.
- Determine the desired length of the accessory, cut the chain.
- Piece the pin in the chain, bend to form a loop.
- At all links, fix the beads. When you make a decoration of the desired length, attach carbines.
Necklace, do -it -yourself beads from textile threads
Stock up with the following materials:
- Cords
- Dividing beads - 12 pcs.
- Carbine
- Connecting rings - 2 pcs.
- Концевиками – 2 шт.
Festive
Production process:
- From the cords, make the base, folding the segments to each other.
- Determine the thickness of the product, given the diameter of all beads.
- In thin cords, wrap the same bases of the base, carefully fill the ends under the winding.
- Design the edges of the "insert" by gluing the dividing beads.
- The edges of the product are designed by the ends. Then attach a carbine on the rings.
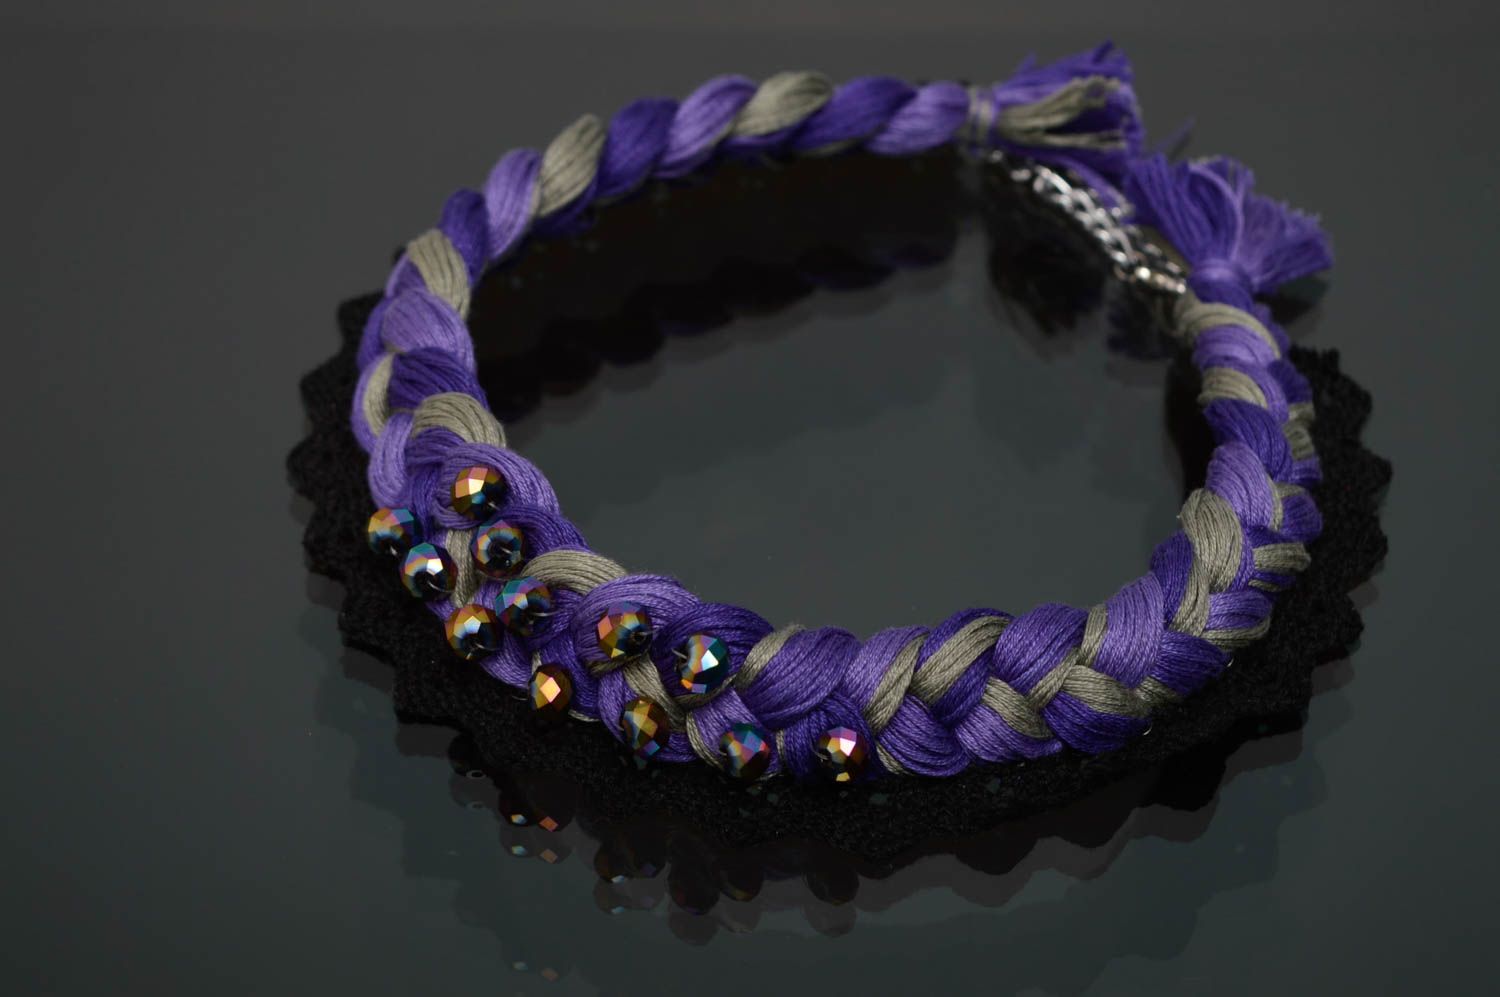
Necklace, with your own hands from multi -colored threads
Buy in advance:
- Chain
- The threads are different - 3 pcs.

Use bright threads
Production process:
- Take 2 metal chains.
- Connect the chains to get one single product.
- Fasten the ends along the edges with a long chain.
- Fix the ends with a thread or links.
- Cut 3 threads from the threads so that each length is 2 m.
- The threads of an identical shade are tied on one side with a knot.
- Fasten the edges of the threads near the joints using circuits.
- Weave the braid from the threads, pass the extreme threads into the chain so that part of the metal and part of the threads of the necklace form an unusual crescent.
- Finish decorating decorations, weave excess tails into the braid of the desired length. Also do in the other side of the jewelry.
Beads with your own hands from beads "Rainbow"
Stock up:
- Fixators - 2 pcs.
- Castle toogle
- Multi -colored beads 8 mm
- Yellow beads 10 mm
- Jewelry cable - 4 m
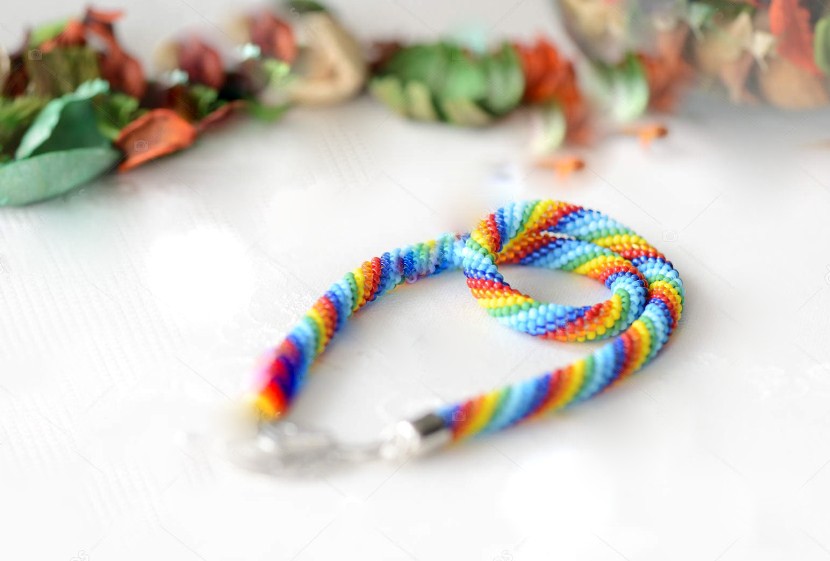
Bright
Production process:
- Trush 2 m folding in half. Pass the ring that is on the castle. Fix with a clamp.
- From multi -colored beads, weave beads. Try to observe the sequence of colors.
- When you weave the desired length, fix the cable in this way: put on the latch, enter the ends of the cable into the ring of the second element of the lock, enter the tails into the latch. Close with pliers, hide the edges of the cable inside the beads, cut the remains.
- In order to increase the length of the product by 2 rows, prepare beads of other colors (orange and yellow).
- Enter one edge of the cable in the bead on the necklace, enter the other end into the yellow bead, then into the orange bead.
- In the inside of the orange bead, enter 2 tips of the cable, tighten it. Also do the decoration to the end.
- Find the tips of the cable with a strong knot, then draw them under a row of beads, cut them.
Necklace "Blacksmith"
You will need to stock up:
- Beads 4 mm - 134 pcs.
- Chain
- Pins with loops - 2 pcs.
- Carbine
- Ring for connection
- Thin wire or fishing line
Blackberry
Production process:
- To get started, make the blanks using beads.
- Fasten 12 beads on the fishing line.
- Take a pin and beads. Make blanks with 2 loops at the edges. Make 2 pcs of similar elements.
- Divide the chain into 3 parts.
- At one edge of the chain, attach a bead with loops, and at the rest of the end, string the “blackberry”.
- Cut the excess chains, combine the edges of the product with the loop of the second bead with Pin.
- Those beads that are at the edges will serve as fixers so that the pattern is motionless.
- Attach chains to free loops.
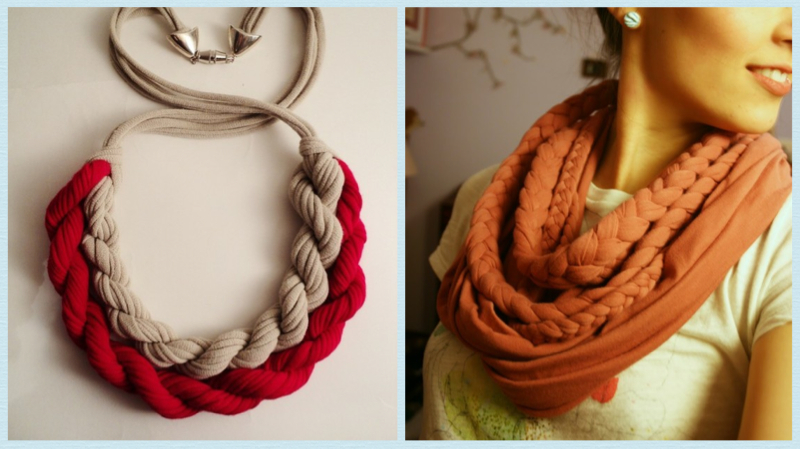
Necklace, with your own hands from laces
You should get an original decoration.
Stock up for him:
- Laces of various colors
- Beads
- Glass pebbles
- Glue

Stylish
Production process:
- If you have thin beads, then sew the laces to them. If you purchase beads, then apply them one at a time.
- Sew the laces to each other. You should get a wide strip of necklaces. Attach stones with glue.
- Also attach the fastener.
Necklace, do -it -yourself beads from small beads
The next jewelry will require you to stock up:
- Леской
- Бисером
- Fastener
From small beads
Production process:
- To get started, string the beads on the fishing line.
- Stitch the resulting workpiece using a chain with air hinges. However, the loops should turn out different. Many make many from several beads, do not weave beads into other loops at all.
- When you knit completely a necklace, arrange a fragment. Just knit 5 loops from the fishing line.
- Fasten this fragment using a node.
- Also do with other elements, making them 10 pcs.
- All fragments obtained should be of different lengths, but each one is longer than the past by 5 mm.
- Pass the ends of the forest in the fastener, fix them.
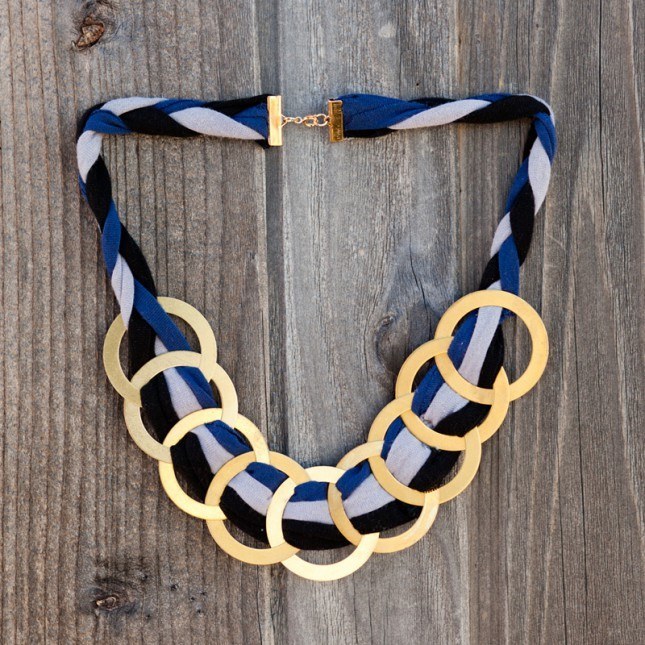
Necklace, beads with your own hands from T -shirts
T -shirts are the perfect material for stylish decoration.
You will have to stock up on the necklaces:
- Knitted T -shirt
- Metal ring
- Threads
Economy
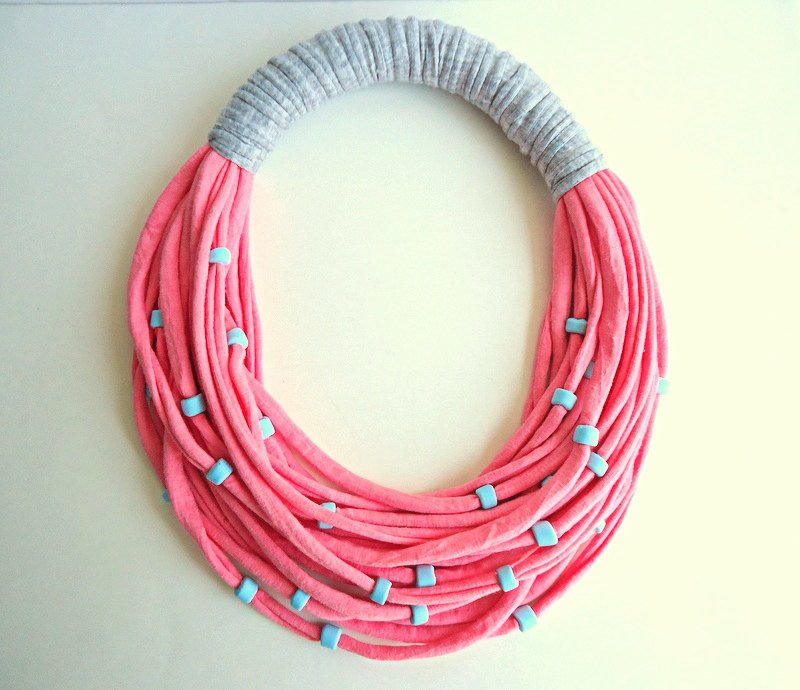
From old T -shirts
Production process:
- Take the old T -shirt. Make the strips from it so that their width is no more than 3 cm.
- Make a loop from each strip.
- Attach the loops to the ring. Bind the ring with knitwear so that it is invisible.
- If your ring is located in front, then in this case, throw the ends of the strips on the shoulder, braid the braids from them.
- Still the remaining ribbons, and then fix it with a regular hair clip.
- You can put into work absolutely any things from knitwear. They also cut them in stripes, attach them to the ring.
Necklace, beads with your own hands from circles
Stock up:
- Metal circles
- Ribbon
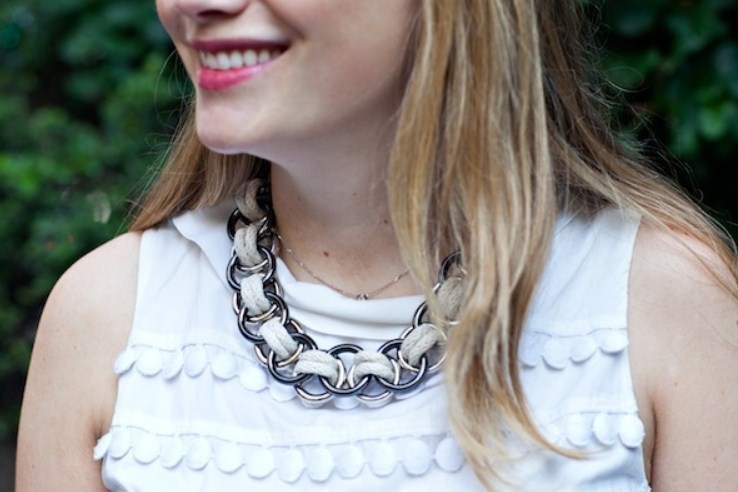
Exquisite
Production process:
- Take one workpiece, take the ribbon into it.
- Take another circle, place the first. Pass both the tip of the ribbon in this element.
- Tighten the tape. Through the second end, so that both details of the necklace are fixed.
- At the same technology, attach the remaining details. Create a decoration of any length.
- Attach the fastener, try on a new necklace.