
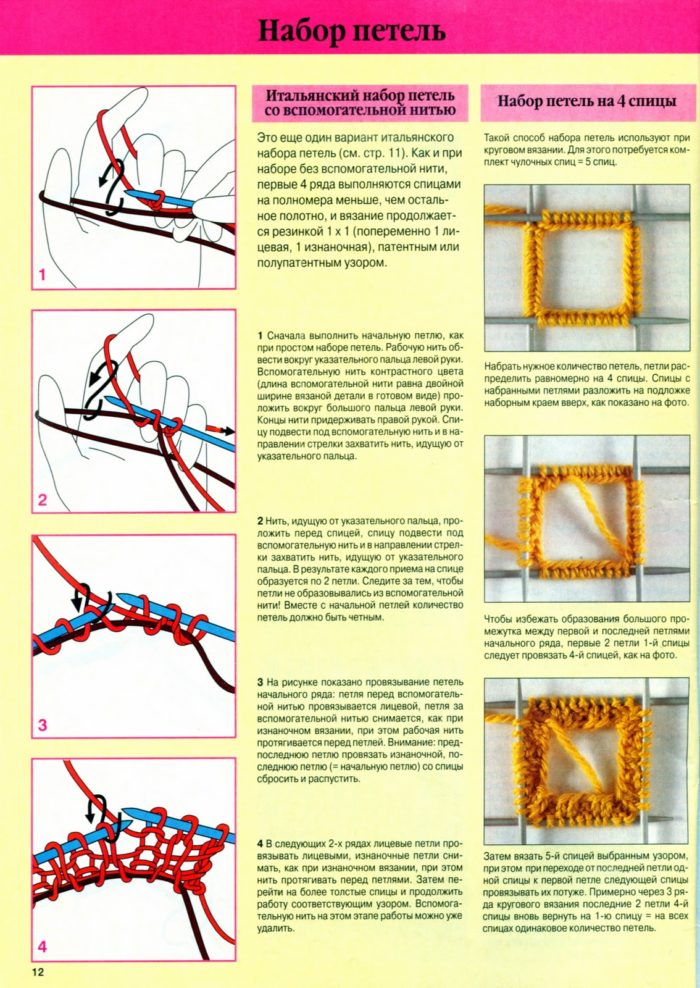
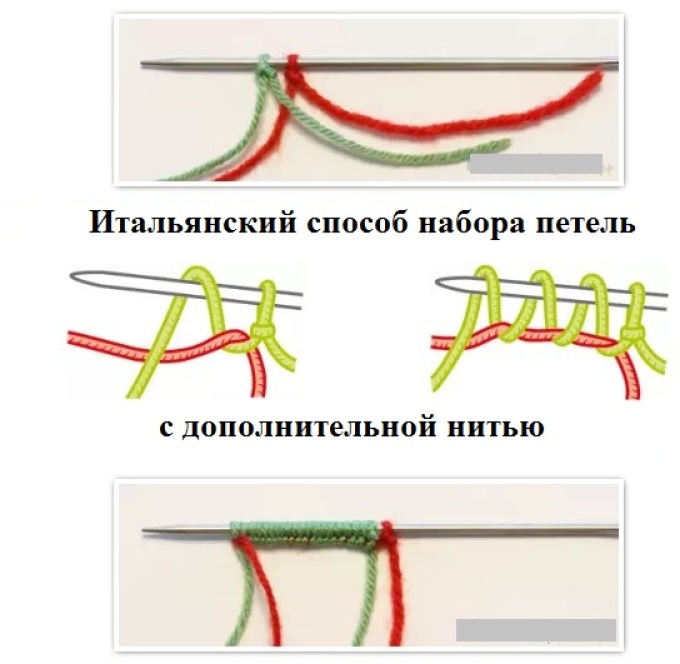
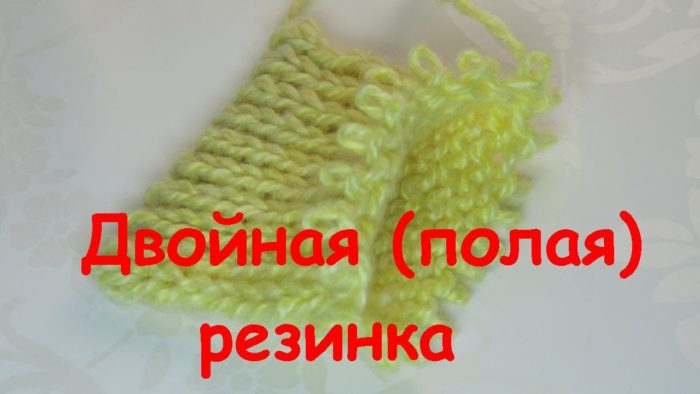
Features of the execution of the Italian method of set of loops on knitting needles with an additional thread and without it. Knitting is hollow, English gum, 1x1, 2x2.
The content of the article
- How to type loops on the knitting needles in an Italian way without an additional thread: scheme, description for beginners, video, photo
- Video: a set of loops for knitting needles for Beginners in an Italian way without an auxiliary thread
- How to type loops on the knitting needles with an italian way with an additional thread: diagram, description for beginners, video, photo
- Video: Italian method of typing loops with auxiliary thread
- Italian method of knitting in a circle, hats: scheme, description
- Italian method of knitting English elastic bands: diagram, description
- Italian method of knitting elastic bands 1x1, 2x2: diagram, description
- Italian method of knitting double gum: diagram, description
- Italian method of knitting with imitation of the bend: scheme, description
- Italian method of knitting with an elastic edge: scheme, description
- Italian method of knitting - closing loops: diagram, description
- Video: Italian method. How to close the loops? Knitting
The beauty and convenience of knitted things is determined not only by a combination of patterns and flowers of yarn, but also by the techniques of set of loops and closing them. The more elastic, the longer they are able to hold the original shape of the product, the longer it will last its owner.
Continuing the theme of knitting with knitting needles of different things, we will dwell in more detail on such a set of the first row as the Italian method.
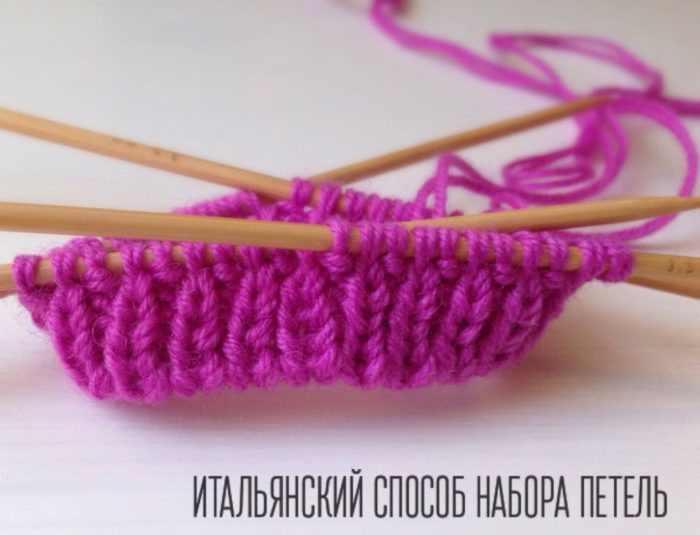
How to type loops on the knitting needles in an Italian way without an additional thread: scheme, description for beginners, video, photo
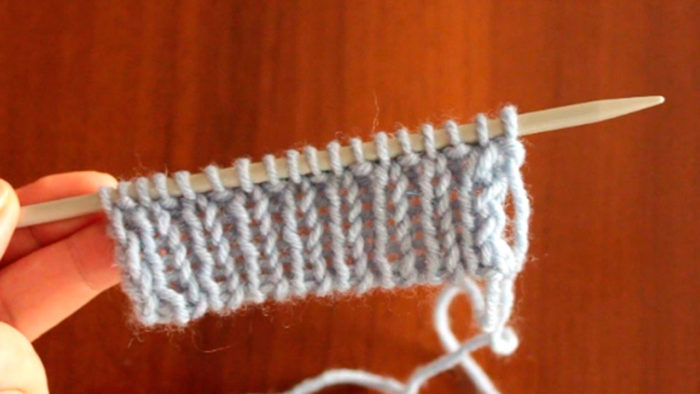
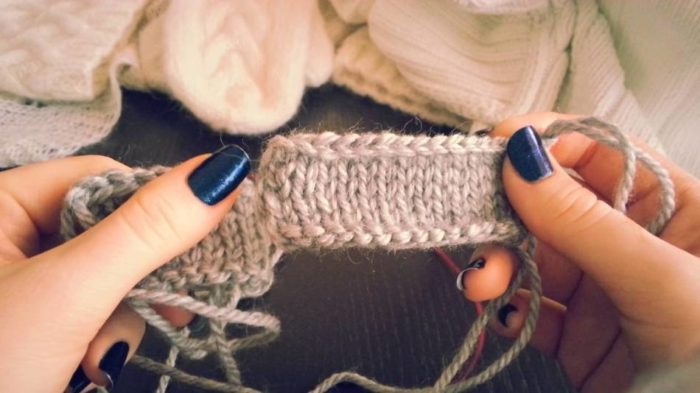
a fragment of a product connected by knitting needles with the first row in the Italian method on the main thread of yarn
- Take a thin knitting needle. Its diameter should be 0.5-1 size less than the thickness of the thread for knitting.
- Measure the required length of the end of the thread. If you perform a set of loops with the Italian method for the first time, be prepared to dissolve the typed row several times.
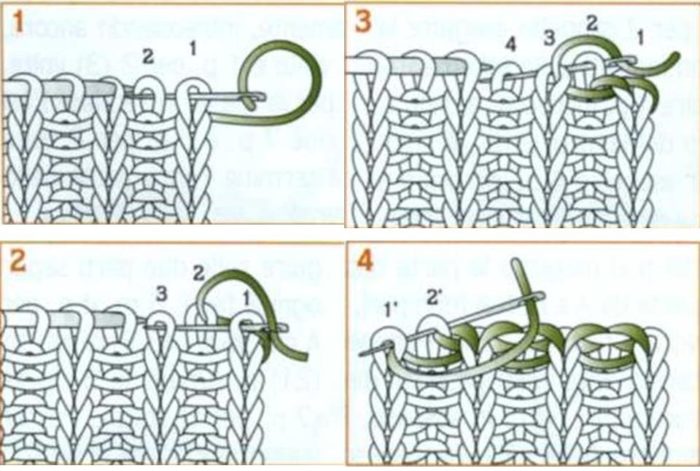
- Первую петлю выполните обычным образом.
- Then decide on the total number of loops, given that the extreme loop in the row should be facing. Work on a canvas with an even amount requires the next loop in the facial version, odd - as the wrong one.
- Form the next loop as a front. Determine the numbering of threads for yourself. Let the first be the one that stretches from the thumb to the spoke, and the second - from the index.
- Get the knitting needle under the thread number one and grab the number two. Pull the resulting loop and fix it on the knitting needle.
- After it, tie the wrong side. Get the knitting needle from top to bottom number two and grab the number one in the same way.
Look more in the pictures below.

a consistent set of set of loops with knitting needles with the Italian method using the main thread
- Continue to form and fix the loops on the knitting needle until you reach the necessary number.
- Knit the first row in this way - the front grandmother’s way, the wrong side is tolerated without knitting, a thread in front of it.
- Knit the second row how the drawing will demand.
Read more the technique of the set on the video.
Video: a set of loops for knitting needles for Beginners in an Italian way without an auxiliary thread
How to type loops on the knitting needles with an italian way with an additional thread: diagram, description for beginners, video, photo
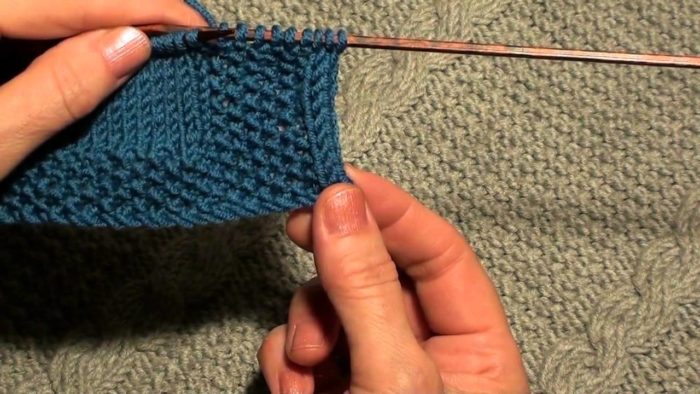
in the hands of the girl a fragment connected by knitting, the first row of which is made by the Italian method
- Fasten the working and auxiliary thread on the knitting needle, completing the loop with the method that is more familiar to you. Meet the second in advance the desired length, add up to 30 cm and cut. Then in the process of work your threads can be easier to separate.
- The order of the threads - the auxiliary goes after the main one.
- Move the main one so that it wrapping up temporary in front back.
- At the back, perform a cloak on the knitting needle and string it like a loop.
- Repeat the actions while reaching the necessary rapport of the product.
- Perform the extreme loop in the usual way.
- The second row is the alternation of the front and the loop removed, in which the working thread lies in front of it.
- Repeat the third row as the previous one. The only difference is that the removed loops will become facial, and the front from the last row - removed.
- Gently remove the temporary thread.
- Continue knitting by drawing.
Below the scheme of the set of loops considered above.
description and schematic drawings of the Italian set of loops on knitting needles using a temporary thread
a set of loops for knitting needles with the Italian method using a temporary thread
Alternative way:
- Take a temporary thread with a number of loops 2 times less than necessary.
- Go to the main thread. Tie the first row with it, consisting of an alternation of the front loop and crochet.
- The second row is a facial combination and removed, similar to the wrong side.
- Repeat the third as the second.
- Take out a temporary thread and continue working on the product.
To deal with the features of set of loops with a similar method, the video below will help you below.
Video: Italian method of typing loops with auxiliary thread
Italian method of knitting in a circle, hats: scheme, description
a fragment of circular knitting with loops with the Italian method
This method of set of loops is convenient in that the product retains elasticity along the edge in the process of socks. Without a similar property, the cap would be uncomfortable.
The second point is to fix the edge of the hat even stronger, use the coil elastic as an additional thread. Just do not take it out, but fix the ends so that the product acquires the desired elasticity.
- After set of the first row of loops plus 1, carefully distribute them on 4 knitting needles. Make sure that they do not twist, otherwise you need to repeat the set again.
- Combine the edges using an additional loop.
- Expand the knitting so that the next row start with the last loop after the set. Take this step only now.
- Knit the loops as the drawing asks. Remember that the wrong ones should be removed, that is, transferred to the working knitting needle. Place the thread in front of the loop.
- The second row is the other way around - knit the wrong ones as usual, remove the front ones. Leave the working thread behind the transferred loops.
- Then continue according to the pattern of the drawing.
Italian method of knitting English elastic bands: diagram, description
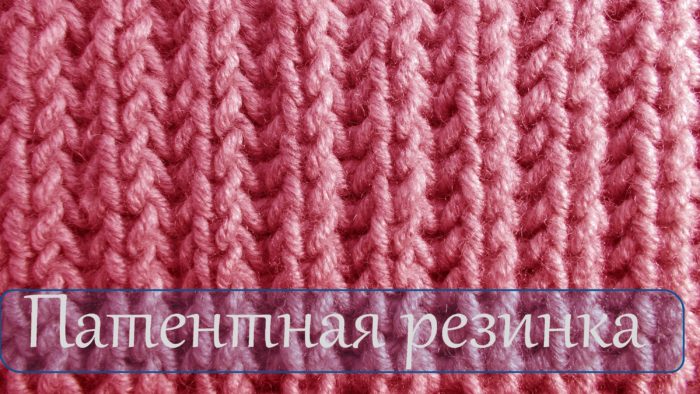
knitting fragment of English elastic bands
Since the English gum adds the product to the product, but does not hold the elasticity of the edge well, it is perfectly combined with the Italian method of setting loops. The latter is easy to execute and provides elasticity to the product and the preservation of its original form.
- Complete the set along one of the above schemes - with or without an additional thread.
- Свяжите 4 ряда из петель, выполняя попеременно лицевую и снятую изнаночную.
- Переходите на вязание основными спицами узора английской резинки. В качестве примера воспользуйтесь схемой и описанием работы ниже.
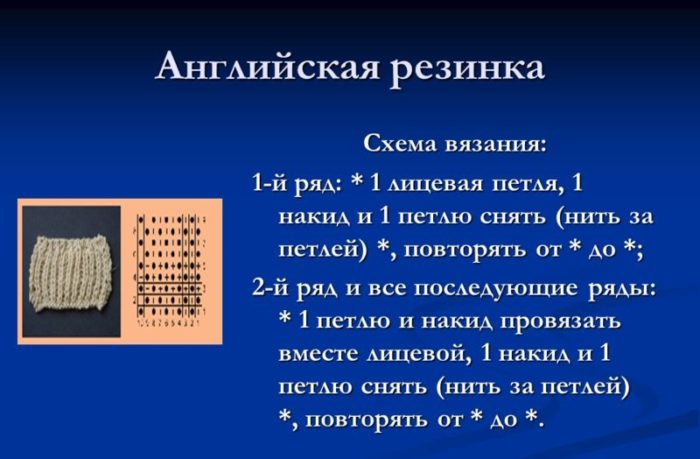
английская резинка спицами — схема и описание
Итальянский способ вязания спицами резинки 1х1, 2х2: схема, описание
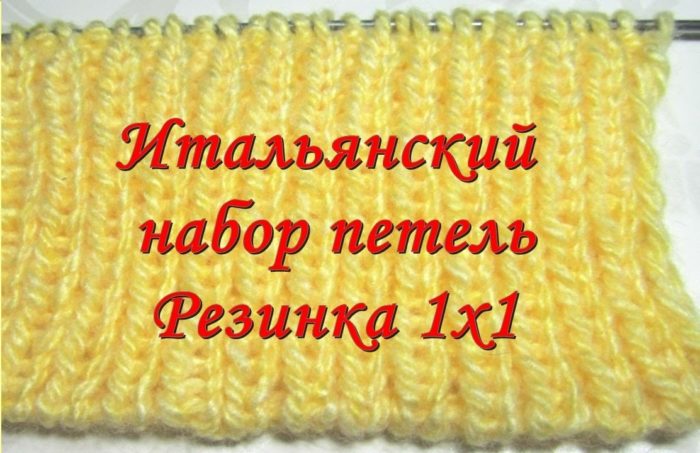
связанный спицам фрагмент резинки 1х1
- Выполните набор петель методом без временной нити.
- Knit the first and second row like this: the front for the front share, remove the wrong side with the thread in front of it.
- С третьего ряда переходите на выполнение рисунка резинки 1х1 или 2х2.
- In the first case, the overall picture of the canvas retains harmony, since the facial faces go over the faces, and the wrong ones are on the wrong ones.
- Во втором случае останется слегка заметный переход. Since the number of facial and wrong in the elastic band 2x2 is more.
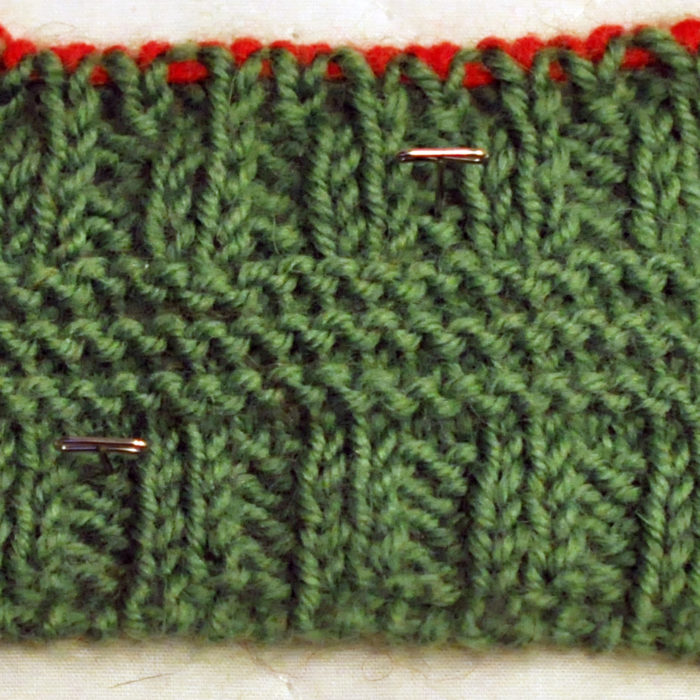
Итальянский способ вязания спицами двойной резинки: схема, описание
связанный спицами фрагмент двойной резинки
- A fairly simple double elastic band, made on loops gained by the Italian method.
- Form the first row as it is convenient - without a temporary thread or with it.
- Perform the next row with the alternation of the front loop and removed, with the location of the thread in front of it.
- Knit the next row similarly to the previous one - the front and removed as the wrong loops.
- Repeat the circuit to the desired height of the canvas.
- If the loops are removed from the knitting needles, then you will see 2 canvases between which there is a cavity. It is often used to extend the elastic band and give the edge of the product additional stiffness.
Italian method of knitting with imitation of the bend: scheme, description

the girl performs the edge of the knitted product with a slope
- The bed of the edge is the connected loops of the parallel row at a certain height from the beginning of knitting. The Italian method of recruitment helps to distribute the loops in such a way as to perform circular knitting on them.
- Dial the loops at once on 2 knitting needles connected by fishing line, or only one, but 2 times more.
- Complete the first row knitting only by facial, if you work with 2 knitting needles, or alternating the front and removed wrong loops.
- Repeat the previous row to the required height.
- Remove the crum loop. Transfer the next to the working knitting needle, knit the next and stretch it through the transferred.
- Repeat the previous action to the end of the row.
- Continue knitting by drawing. Your edge will be neat, with a bend.
Italian method of knitting with an elastic edge: scheme, description
fragment of the elastic edge of the product connected by knitting
- The Italian method of setting loops is ideal for the formation of an elastic edge on a hat, cuffs and a bottom of a sweater, sweater, sleeves.
- Any method considered in sections above - with or without auxiliary thread will suit you.
- Since the elastic edge is not needed by a high hollow elastic band, it is enough to connect it in the first two rows.
- Next, go to the usual 1x1 or 2x2.
Italian method of knitting - closing loops: diagram, description
closed loops with the Italian method on a fragment connected by knitting needles
This method of closing loops involves the use of a needle and thread.
- Enter it into the first and second loops. Return to the first, stretch through it the third loop.
- Pull a little. Return to the second loop, take the needle through it and the fourth loop.
- Repeat the actions to the end of the row.
- Fasten the thread so that it does not blossom.
Below the figure is a step -by -step instruction.
step -by -step instructions for the closure of the loops by Italian method
So, we examined the nuances of knitting the first set -bearing in Italian in an Italian way. We learned how to carry out transitions to elastic bands 1x1, 2x2, English, half. Revealed features of work in a circle.
Practice the knowledge gained, develop a positive knitting experience. Let your products please their owners!
Smooth loops to you!