Mom will be very nice if the child will make her a postcard for March 8. This will be done.
The content of the article
- Coloring card in the form of harmonica by March 8
- Postcard with birds for March 8
- Postcard for mom by March 8, which can stand
- Volume card with flowers inside by March 8
- Chamomile postcard for March 8
- Postcard for March 8 with Pomponami
- Postcard 8 mat with original embroidery
- Work with the smallest to the holiday on March 8
- Video: Gift card mom by March 8
March 8 is a very exciting and gentle holiday. He reminds women and mothers that they have fragile shoulders, and gives you the opportunity at least a day to reset all the homework and enjoy life. Moms on the eve of this holiday are transformed, becoming more fun and happy. A family loving their family will have to be difficult to delight his favorite mom all day. It is necessary to prepare gifts, postcards, think about how interesting and fun to spend this day with mom.
Each of us at least once in childhood did a postcard for his mother with his own hands. This pleasant and incredibly warm tradition is still transmitted from generation to generation. We suggest you continue this trembling tradition by making a modern and bright postcard with your own hands.
Of course, the abilities of children strongly depend on their age. In our selection you will find postcards that will be able to even the most tiny family members - and the more pleasant one congratulations will be for Mom.
Coloring card in the form of harmonica by March 8
If the kids in your family are already able to paint, but they still cannot draw a drawing for your mother - this card for you. Lovers draw pencils will be delighted with the process of creating this postcard. In order to implement this idea, you must first find and print the word "mother" or separate beautiful letters that can be painted.
What do you need?
- 2 sheets of duplex colored paper pink
- 1 Glue Pencil
- scissors
- 1 packaging of color pencils
- 1 beautiful helium handle to sign a postcard
- 1 Packaging of Decorative Scotch

Mamule
What do we have to do?
- Take a leaf of colored paper, place it on the table in the album orientation and cut it in half. Repeat the same with a second sheet of colored paper.
- Fold one of the halves of colored paper in half. Do the same with other halves. Close the halves alternately with tape so that the accordion is obtained.
- Now let's get down to our letters. They must be cut so that they correspond to the size of the resulting parts of the accordion.
- Let the letters be painted with your crumbs.
- Glue the letters with glue.
Postcard with birds by March 8
This cute postcard with a mother-attic embracing its chick is a hint of family warmth and tender relations of relatives. And the applique technique in which it is performed is very fond of children.
What do you need?
- 1 sheet of bilateral color cardboard blue
- one sheet of colored paper of gray and yellow colors
- 2 sheets of white dense paper for drawing
- 1 Glue Pencil
- scissors
- 1 black marker
- printed templates of birds and chicks from the Internet
- 1 packaging of color pencils
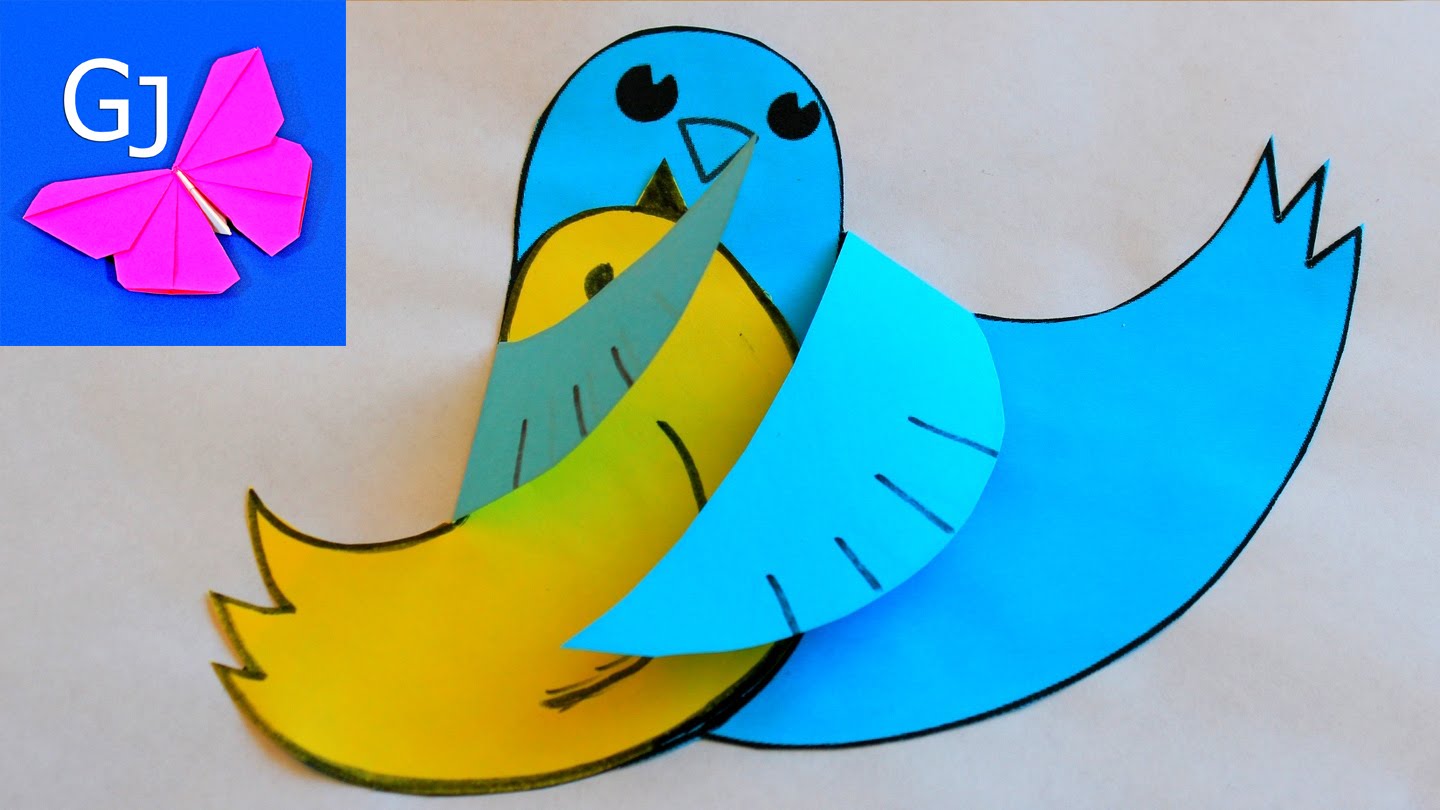
Touching
What do we have to do?
- Fold the cardboard in half. This is the basis of our postcard.
- Cut the birds from the paper according to the template.
- First, stick the mother's mother so that the wings remain not entirely glued.
- Stick the baby knit so that part of it lay in the arms of the mother.
- Take a black marker, draw your legs and eyes to the birds. Also draw a circle around the sun and rays.
- Bend the wings of mom-top so that she hugs the baby.
- Sign the postcard.
If you make a mother and a baby from paper in different colors in such a postcard, it will look more interesting. You can also draw birds on the wings to birds and add other decorations to their liking.
Postcard for mom by March 8, which can stand
Your mother will be able to put this card on her desktop at work or on a toilet table so that she constantly reminds her of you.
What do you need?
- 3 sheets of bilateral color cardboard of yellow, blue and orange colors
- 1 sheet of decorative paper depicting colors
- 2 sheets of A4 Office paper for template
- 1 tube of PVA glue
- 1 brush for glue
- scissors
- 1 gel handle of golden color
- 5 stiffs with sparkles for decorating postcards to your taste
- ruler
- simple pencil
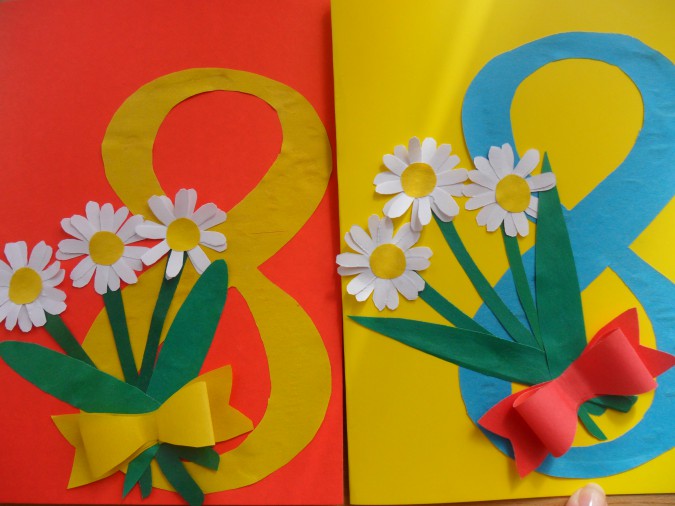
By March 8
What do we have to do?
- Take colored paper and cut a rectangle from it 10 centimeters high and 20 centimeters wide. This is the basis of the future postcard.
- Using the ruler, make a markup on the rectangle. Divide the rectangle on the strips width 2, 7, 7, and 4 cm. Apply a ruler to the labels and make smooth bends, do not paint the pencil over the postcard - the place where you will wipe the pencil eraser will be visible. We must have a triangle that can be put on the table.
- Shill the base postcard.
- Draw on office paper eight pattern. If you are not strong in drawing, you can find templates on the Internet and pre-print.
- Attach patterns to color paper, circle them with a pencil and cut out.
- Eight shift on one of the sheets of color cardboard and cut down too.
- Stick to the postcard first eight.
- Decorate the postcard with stickers from homemade colors.
- Sign up a postcard so that your mother was nice.
Volume card with flowers inside by March 8
This postcard is for you, if your older child, since the creation of this postcard requires patience, and the kids do not differ. With it, you can not only please mom, but also to learn several basic actions to create a bulk card. The process will definitely seem fascinating to the child, and for such a principle, he will be able to make postcards himself to friends or close to any holiday.
What do you need?
- 1 sheet of double-sided color cardboard of any color according to your taste (we will have a gentle-pink) format A4
- 1 sheet of pink dense decorative paper A4
- 1 sheet of colored duplex paper orange
- 1 leaf of duplex colored paper green
- 1 tube of PVA glue
- tassel for glue
- scissors
- 20 cm Satin Ribbon
- lighter
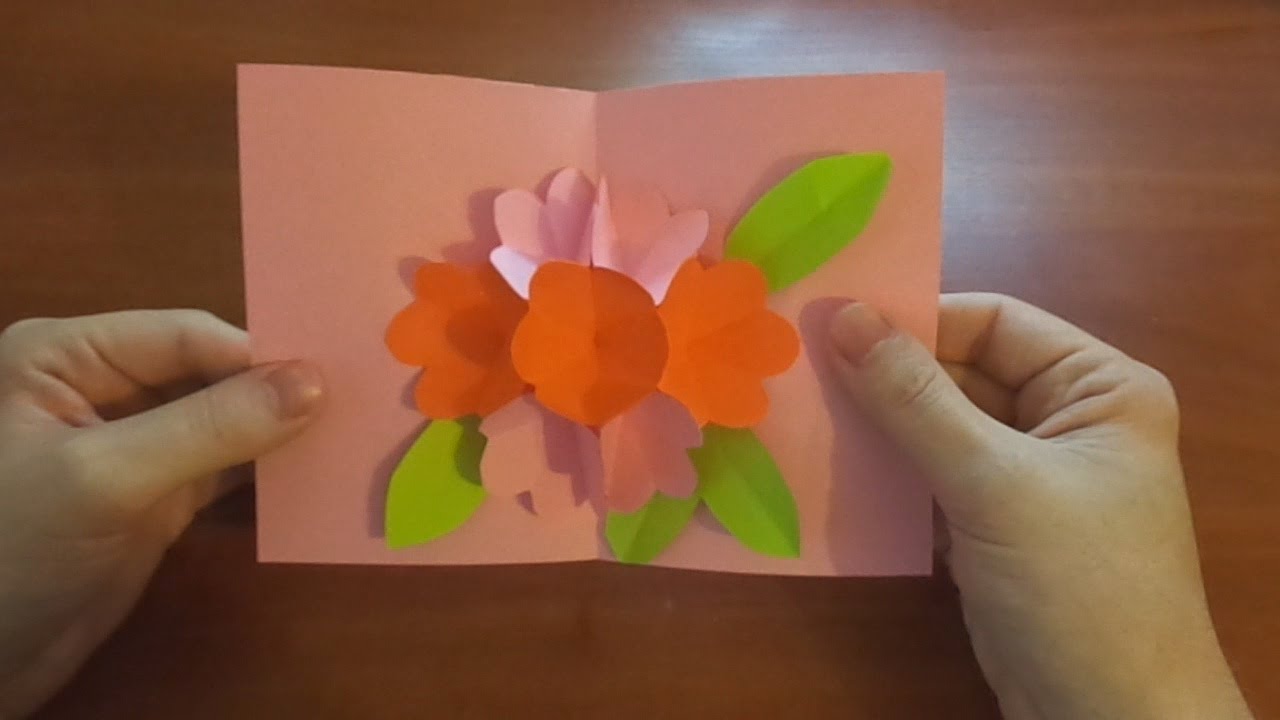
Volume
What do we have to do?
- Fold both leaf of decorative paper in half. One will be outside, and the second inside.
- At an equal distance from the edges of this halm, take suns.
- Bend the wings turned inside the sides inside, and then outward.
- Now shift the wings again inside and open the postcard. Inside you will have steps.
- Once again, fold the postcard just this time leave the external wings inside it.
- In the middle of each of the external wings, make cuts in a depth of half the wing.
- Bend the small wings inside, and then out. Straighten.
- Protect the wings again inside and open the postcard. You must have two rows of steps (three steps on each side, one big and two small).
- On the colored green paper, make an outline of stems and leaves. Cut them.
- On red paper, make an outline of six flowers and cut them out.
- With the help of glue, glue the flowers to the stems. Give them to dry.
- Sign the postcard.
If your mom like chamomile, snowdrops or any other flowers - you can make them.
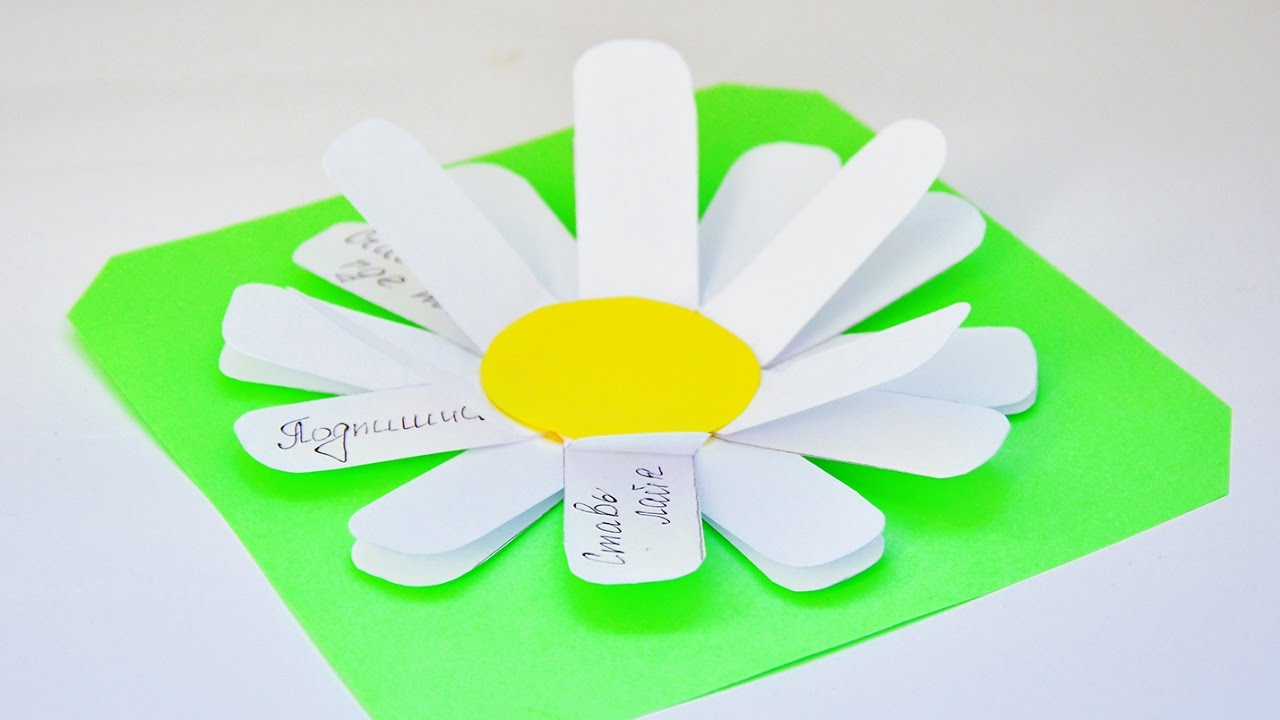
Chamomile postcard for March 8
This cute postcard will remind your mother about how she wondered in childhood on daisies. Only every petal of our daisy will tell her about your love for her. The postcard is simple and to its creation can be attracted to children from four years.
What do you need?
- 1 sheet of double-sided color cardboard of any color according to your taste
- one sheet of colored paper green, yellow and white colors
- 1 tube of PVA glue
- 1 brush for glue
- scissors
- 1 gel black handle
Chamomile
What do we have to do?
- On green paper, make a chamomile petal sketch. Cut them.
- From the yellow paper cut the core of the chamomile and cut it out and her.
- On the core of the chamomile, write "I love you because you ...". On the petals write nice words mom. Reference from the inside edge of the petals by 0.5 cm to leave a place for gluing.
- Now stick to the basis of the postcard (Cardboard List) First, the chamomile stem, then the petals so that the words are inside. Start the core on top of the petals.
Postcard for March 8 with Pomponami
Pompons - very fertile material for postcards and other crafts. They are especially popular lately. Such a postcard will give a good mood to any person, besides, it is very easy to perform. We offer to make the most popular postcard with pompons - ice cream.
What do you need?
- 1 sheet white
- 1 sheet of colored paper brown
- 3 bright pompon from threads (you can do yourself or buy in needlework)
- 1 tube of PVA glue
- 1 brush for glue
- scissors
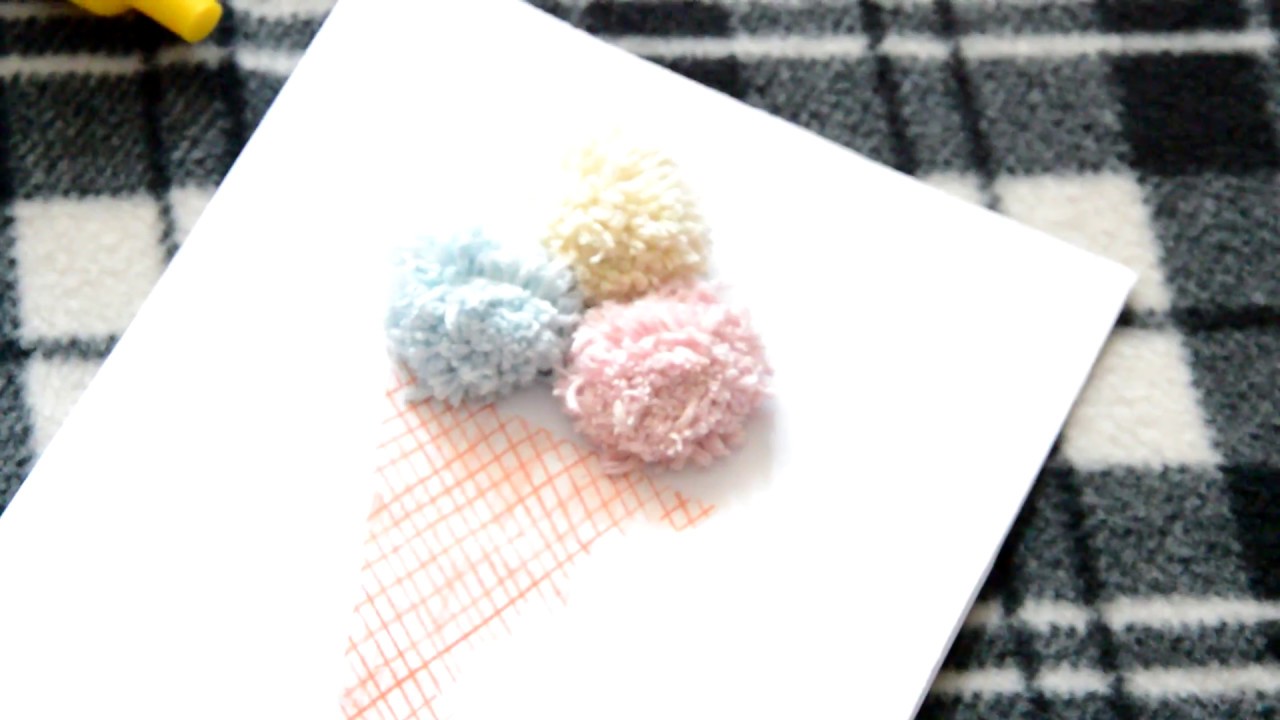
Ice cream
What do we have to do?
- From brown colored paper, we will make a cup for our ice cream. To do this, it is enough to cut a triangle and stick it in the center of our postcard, draw a strip.
- Stick the pumps slightly over the triangle so that they look like ice cream balls.
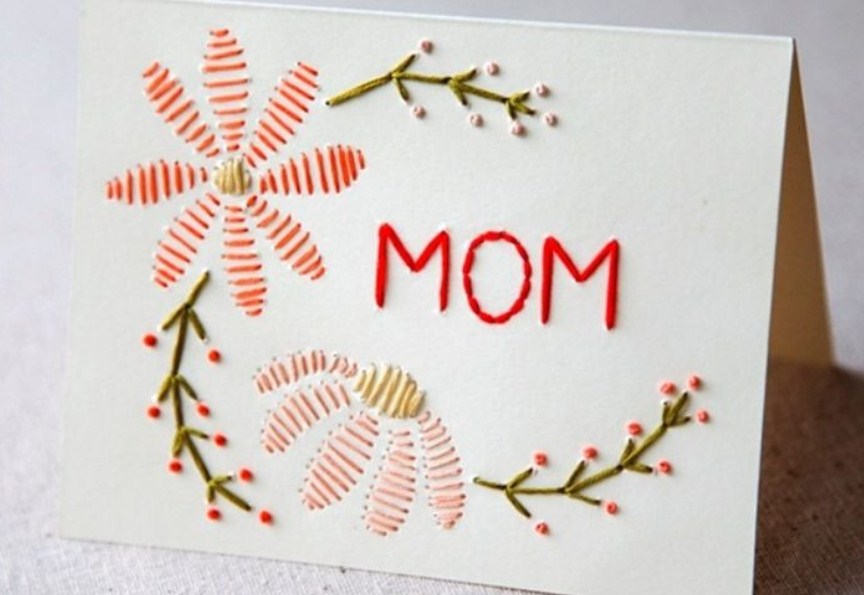
Postcard 8 mat with original embroidery
Disorder embroidery - the trend of recent years. It is used to decorate clothing, accessories, and, of course, to create original postcards. We offer to embroider on paper heart.
What do you need?
- 1 sheet of double-sided color cardboard cream-white
- 1 Superclay tube
- scissors
- 1 hole punch
- 1 Skok Moulin Pink Color
- 1 needle
- 1 germ handle red
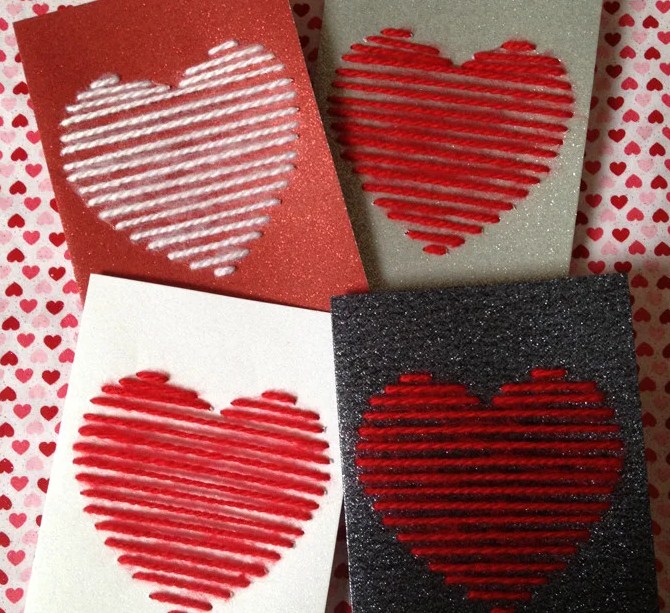
Hearts
What do we have to do?
- Fold a sheet of cardboard in half. This is the basis of our postcard.
- On the front side of the postcard draw heart.
- On the contour of the heart at an equal distance from each other, make holes with a hole panel. Choose the smallest diameter of holes.
- Throw thread into the needle and make random stitches through holes made by a hole panel. In one hole, stretch the thread several times until it turns out a beautiful dense heart. Of course, if you like it more, the heart can consist of a minimum number of stitches. Ends of the thread very carefully fasten with a superclone.
- Sign the postcard.
Work with the smallest to the holiday on March 8
Kids are insanely love to draw with finger paints. Connect a pleasant with useful, creating a small masterpiece for mom along with them for the 8th of March.
Postcard with dandelions
This postcard can be tried to do with children from two years. It does not need many materials and time for it, but it will bring no less joy than the most complex crafts.
What do you need?
- 1 sheet of double-sided color cardboard of soft blue
- 1 Tube white finger paint
- 1 tube of any green paint
- tassel for paint
- 1 marker to sign a postcard
- white proofer
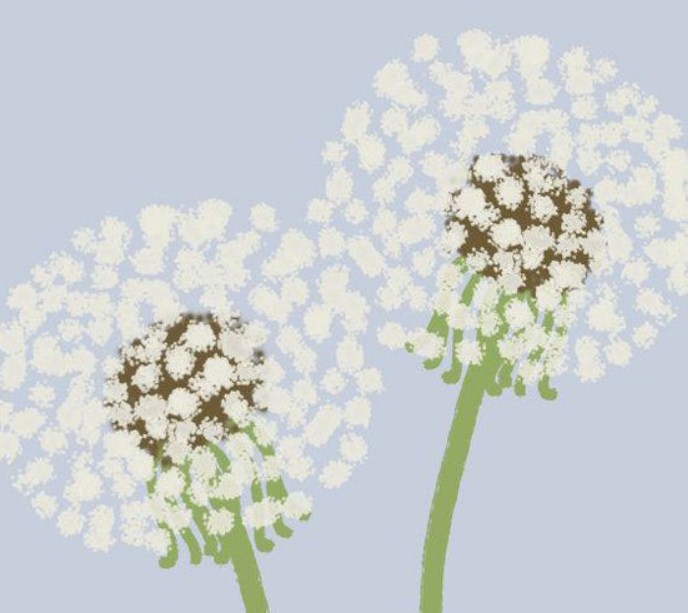
Dandelions
What do we have to do?
- Fold in half the color cardboard.
- On the front side, make the points with a white corrector, noting the place where the dandelions mushrooms should be.
- Take the brush and draw the stems of dandelions. Wait until the stems are dried.
- Fool your finger into white paint and put the first gun. Give children the opportunity to repeat yours. Make a pair of flock over the stems.
- Let the drawing dry and sign the postcard.
Therefore, you can draw any flowers. The main thing is desire and fantasy.
Postcard with tulips
To create this postcard, we use small palms. On our festive canvas there will be enough space for everyone. This postcard will also be a find for those whose Choo is still quite a crumb. After all, there is nothing easier than putting an imprint of your favorite palm on a postcard.
What do you need?
- 1 sheet of decorative paper white
- 1 red finger paint tube
- saucer
- 1 tube of any green paint
- tassel for paint
- 1 marker to sign a postcard
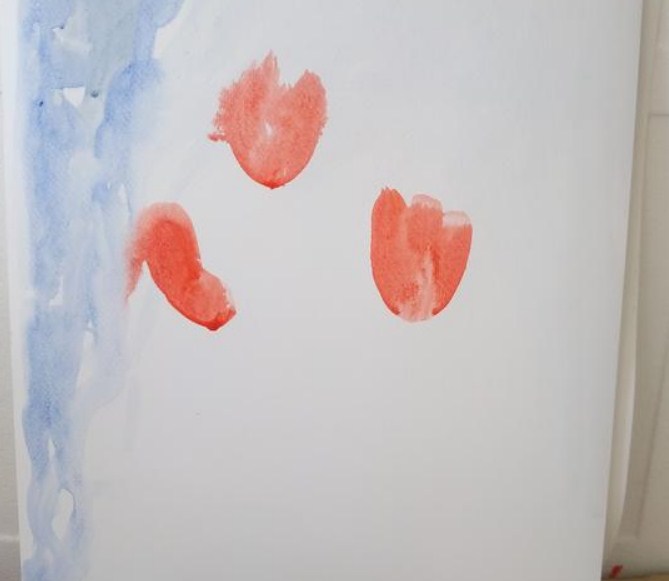
Draw tulips
What do we have to do
- Pour red paint on a saucer.
- Dry the handle in the paint, shook the extra paint, and put the imprint where the flower will be.
- Lower the brush in the green paint and draw the stalks.
- The postcard is ready, it remains only to write the wishes of your beloved mother.
Postcard with kapecake
Another pretty use of the cute children's palm in peaceful purposes is a postcard on March 8 with a kapecake.
What do you need?
- 1 sheet of decorative cardboard white
- 1 sheet of paper for drawing
- 1 sheet of colored paper purple
- 1 Tube pink finger paint
- saucer
- 1 tube of PVA glue
- 1 brush for glue
- scissors
- 1 gel handle suitable color in order to sign a postcard
- 1 red gel stick with glitter for cupcake decor
- 20 cm thin decorative purple tape
- 1 Sticker-rhinestone in the form of a red heart
What do we have to do?
- Pour the paint in the saucer and dip a child's handle into it. Place the print on paper for drawing and put aside to the drawing of the back.
- On the purple paper, make an outline of a paper cupcake and cut it out.
- Cut the decorative ribbon in half and stick on the sides of the cupcake paper.
- Cut the drawing with a children's handle and glue it to decorative paper.
- A little on top of this drawing, cover the lilac paper for the cupcake. Tie a bowl of decorative ribbon, glued earlier than a piece of paper.
- Red gel handle with glitter. Put points on the cupcake - it will be our sprinkle.
- Sign the postcard.