The process of knitting the shirt with knitting needles.
The content of the article
- Knitting man
- Calculation of loops with knitting needles for a children's shirt
- Shooting shirts for beginners: description scheme, photo, master class
- Video: Show for beginners: Master class
- How to tie a simple children's shirt with knitting needles on a baby for beginners: a scheme with a description
- How to knit a simple children's shirt with knitting needles for a girl for beginners?
- How to knit a simple children's shirt with knitting needles on a boy for beginners?
- How to tie a simple female shirt on circular knitting needles: a scheme with a description
- How to tie a simple female shirt on 4 knitting needles for beginners: a scheme with a description
- How to tie a simple female shirt on 5 knitting needles for beginners: a scheme with a description
- How to tie a simple male shirt on 2 knitting needles for beginners: a scheme with a description
- How to finish knitting a shirt with knitting needles?
- Video: Stylish shirt with knitting needles
In this article, you will learn about a variety of ways to crochet a shirt. It will be very interesting.
Knitting man
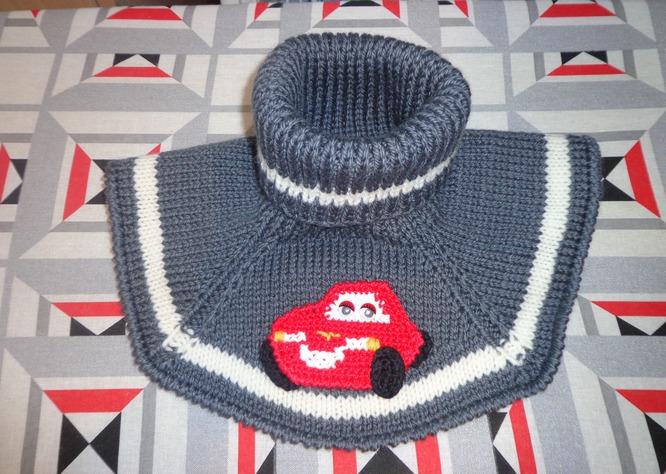
The shirt is a scarf, the popularity of which is becoming more and more every year. Many, for sure, remember the time when everyone was exclusively worn by scarves, outwardly very similar to the top of the sweater.
This element of clothing is quite convenient during wearing - there is no need to tie the usual and uncomfortable scarves. The shirt is easily dressed, even the peanut can cope with this.

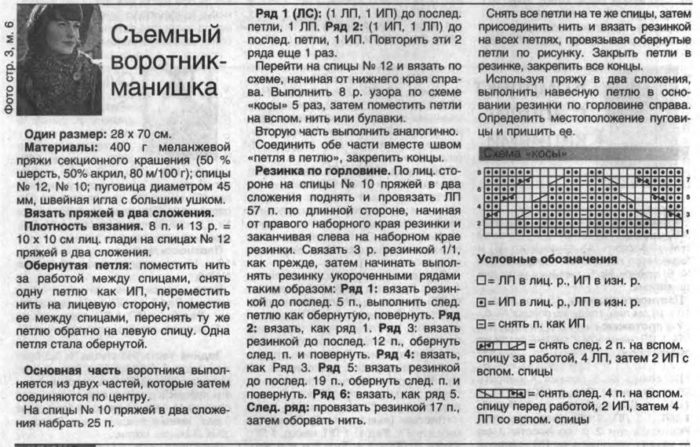
Manishka
Choose correctly threads for the shirt:
- If you want to bind the product for the offseason, then you will not be very thick and warm threads, since it will be very hot in such a shirt, but you can’t always remove it.
- Choose cotton threads or a mixture of cotton yarn and acrylic for the warm season. Also, for such models, thin woolen or mohair threads are suitable for you.
- For frosty winter, Angora, Meris threads are ideal.
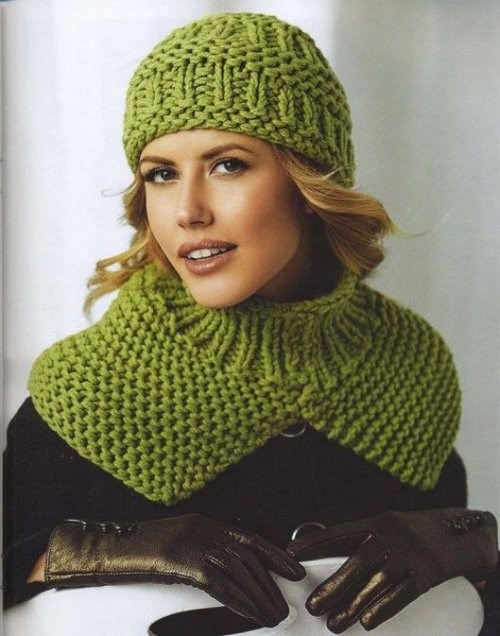
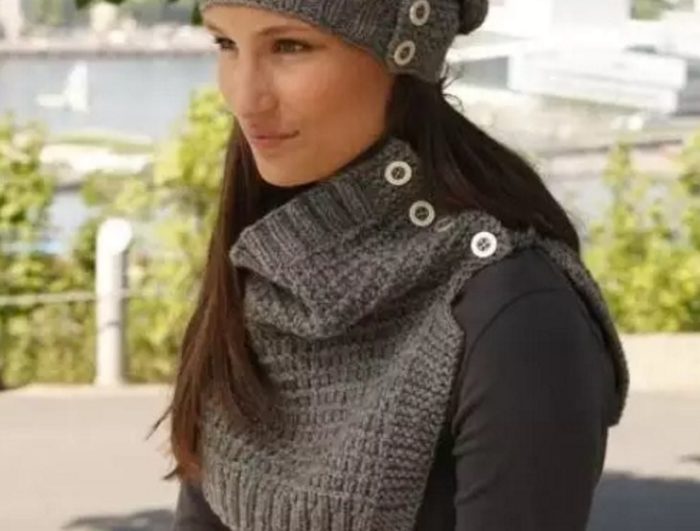
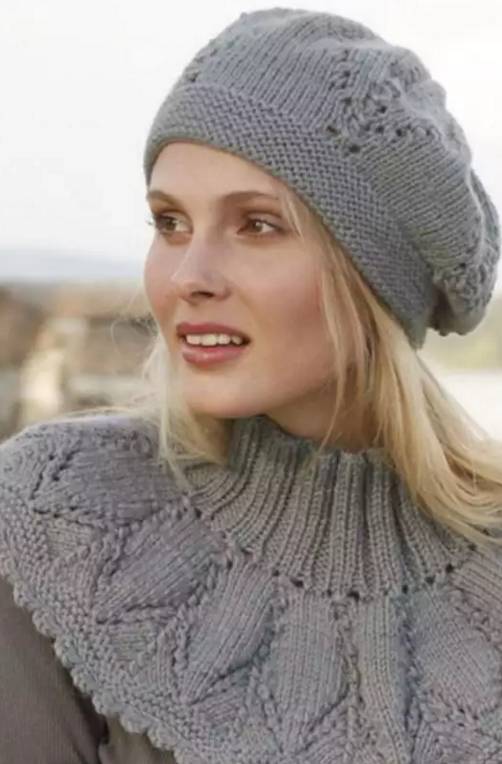
A stylish shirt can be tied with a hat
Choose correctly design for the shirt:
There are several options for the style of the shirt. Such an element can allow you to decorate an everyday image or an evening toilet.
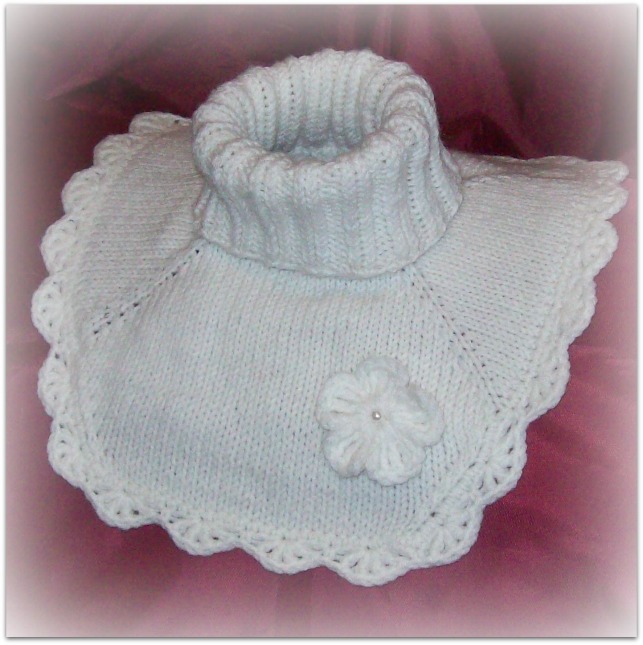
- If you want to make a shirt for the release of "light", then tie it out of the light, weightless threads of a beautiful shade, using an openwork pattern.
- If you want to get a “Grand” product, then tie a shirt from a thick yarn, using a large embossed knitting.
- You can tie the product without seams in the form of raglane using circular and hitchfuls.
- You can make a product with fasteners: buttons, hooks, ribbons. In this case, you will have to knit with two straight knitting needles.
- If you want to make not just a regular product, but a warm enough that will warm you in severe frosts, then for work you will have to use knitting needles less. Then the shirt of the shirt will come out dense and not blown.
Calculation of loops with knitting needles for a children's shirt
If you are just starting to knit, then to complete the shirt, you first need to calculate the number of loops. To do this, follow the following actions:
- Knit a sample of the selected pattern using those threads from which you will knit the shirt.
- Measure this sample in the most stretched and in the usual non -stretched state.
- Divide the second number by the first. So you will get the coefficient of how the sample is stretched.
- Measure the circumference of the children's head.
- Multiply the resulting number by the coefficient that you received at the 3rd stage.
- Add to the resulting number of 3 cm - you will get a number that is the necessary circle of the shirt.
- Now calculate the number of loops in one centimeter at multiply it by the number of 6 points.
- As a result, you will get exactly the number of loops that you need to knit a children's shirt.
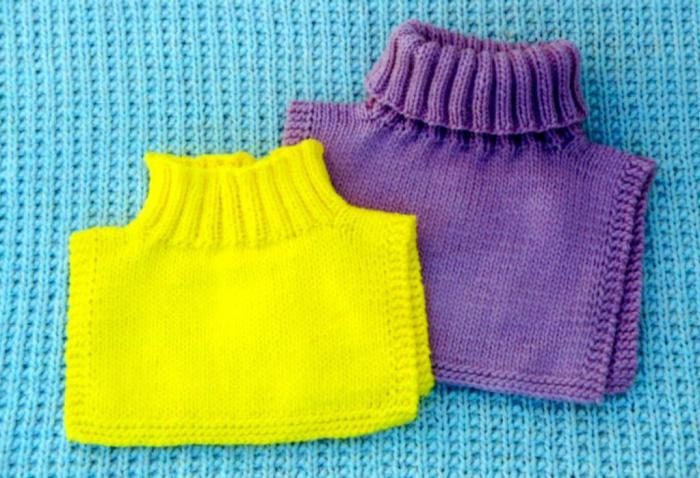
Children's shirt
Designations:
- P is the loop.
- VP - air loop.
- P is a row.
- PR - addition.
- LR - the front row.
- KP - crumener loop.
- IR is the wrong row.
- U - decrease.
- LP - front loop.
- IP - the wrong loop.
- PM - the front side.
- IS - the wrong side.
- SBN - a crochet column.
- PS - semi -column.
- RP is a regional loop.
- N - cloak.
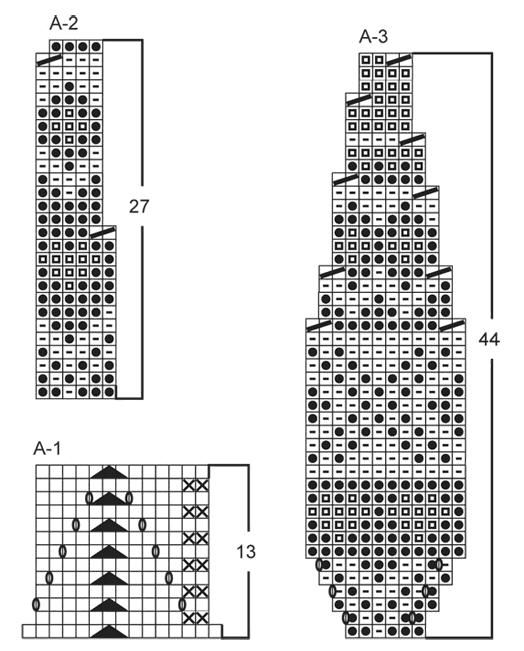
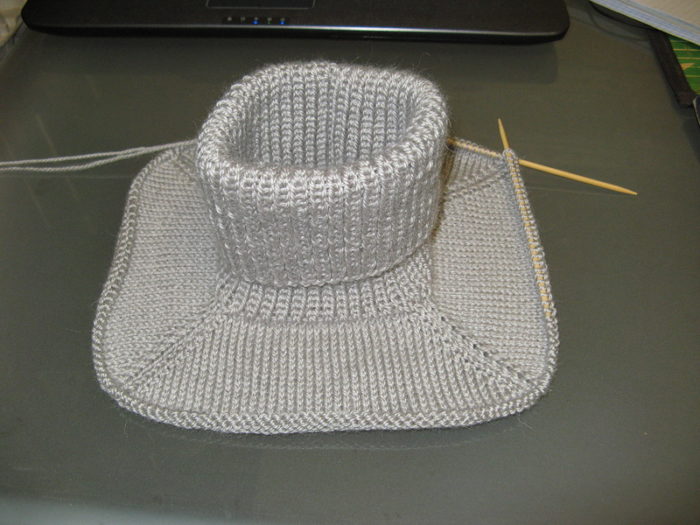
Shooting shirts for beginners: description scheme, photo, master class
As a rule, newcomers begin to knit with a plate pattern. We offer you to experience your strength and tie this simple, but at the same time beautiful shirt. To perform this shirt, you need to stock up:
- Circular knitting needles No. 4
- Simple straight knitting needles No. 4
- Yarn of any shade
Scheme and photo of the finished shirt
Execution process:
- Take ordinary knitting needles for starters. Dial 14 p.
- Stitch with knitting needles 14 p, while you need to increase the number of P in each personal P by 2 P. You should get only 7 pr and 28 P.
- Knit the resulting 28 p so that you get a canvas 9 cm high.
- In LR, tie 10 P. Then close 8 p, and again tie 10 p.
- Knit the canvases like this: knit 1 r, turn your work, remove the KP, knit 2 p together, knit IR, turn the work, do more reduction - at the end of the work you will get 8 p.
- Work with these loops. Stitch them 3 cm high. At the same time, add - when you get 10 p, cut the thread, but leave a long tip.
- Return to those 10 p. Perform a symmetrical decrease and symmetrical addition.
- Then connect the two parts. After adding the part that is located on the right, knit the LR in the following sequence: knit 10 p with a plate pattern, dial 8 p. Then knit 10 p of the part that is on the left.
- Continue to knit with such a method - knit 6 cm with a plate pattern, perform 7 U in 14 r. When you get 14 p, close the P.
- In the end, you will get a rhombus that has a hole in the center - a neck.
- Take circular knitting needles. Now dial the wugs and knit the product with a patch pattern of 15 cm high. You can replace the shaped pattern with an ordinary elastic band.
- Close P.
At the very end, wash the resulting shirt in a slightly heated water, and then dry with a towel.
Video: Show for beginners: Master class
How to tie a simple children's shirt with knitting needles on a baby for beginners: a scheme with a description
This shirt is suitable for a child under 1.5 years old. To fulfill it, you need to stock up:
- Circular knitting needles - No. 3.5
- Yarn
- Cord to the color of the yarn
Scheme
The process of the transmission:
- Type 60 P on knitting needles so that there is a product of the same width as the back of the child.
- In order for the product to look beautiful at the edges, 4 p is knitted with LP (at the same time, do not count the KP).
- In the center, make a strip of 8 LP.
- Perform such a pattern: 1 kp, 4 lp, 23 IP, 8 lp, 23 IP, 4 lp, 1 kp.
- Stitch the canvas about 30 cm, you can a little more.
The process of execution of the neck:
- 4 P on one and the other side and 2 kp, leave without changing, knit the LP on drugs, and IP on IP.
- From the center of the product, fulfill the decrease: first close 8 p strips.
- Reduce the sides individually, that is, in LR, close 4 p.
- Type 56 VP from the opposite side of the neck.
- Stitch your back so that it turns out to be 9 cm longer.
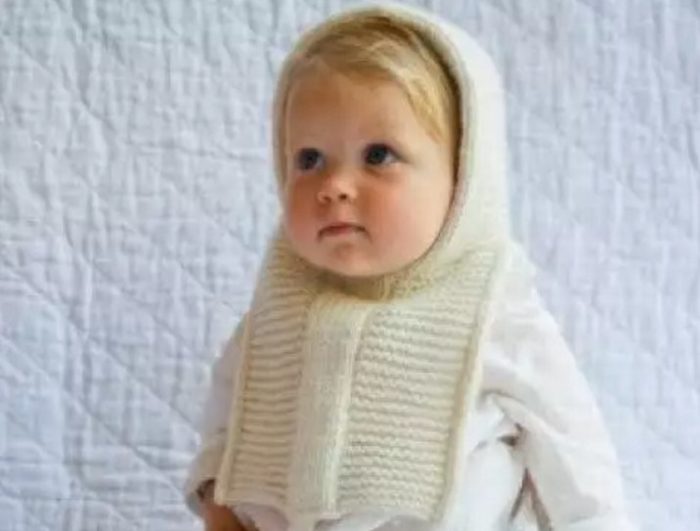
Children's shirt
The process of fulfillment of the Capraul:
- Tie another part of the product, close the back.
- Collect all the wugs using circular knitting needles.
- The front planes that you knitted with the LP, leave free.
- 4 P, located at the edges of the product, knitting.
- Stitch the kapor. Determine the height of the product, given the baby's head.
Assembly of the product:
- Sew the top of the product.
- Bend the edges, insert the lace.
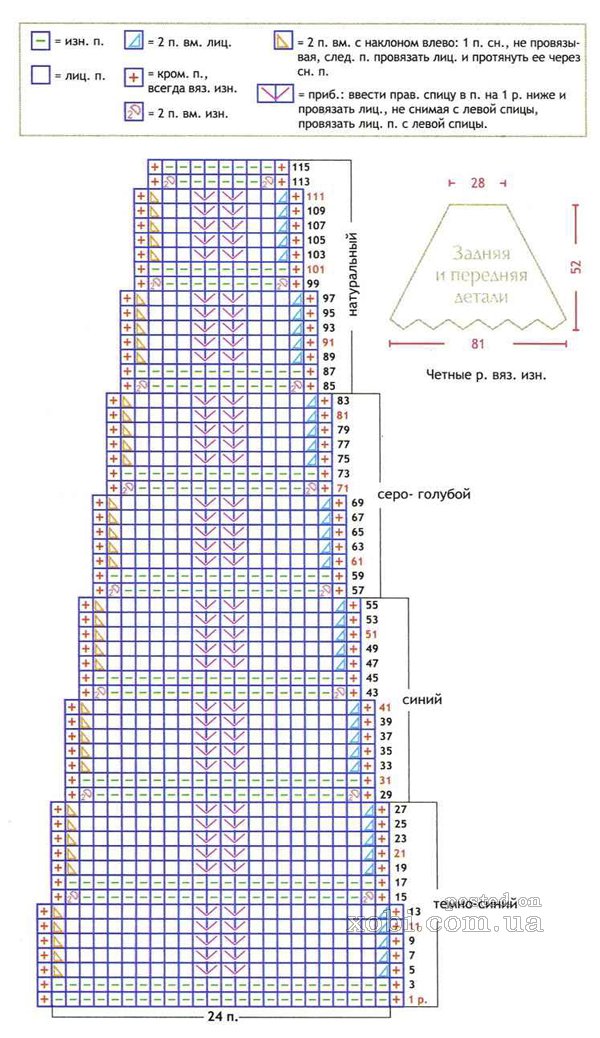
How to knit a simple children's shirt with knitting needles for a girl for beginners?
Please your young princess with a warm shirt with an interesting pattern. Stock up for its execution:
- Crochet
- Hollow knitting needles
- Acrylic yarn
Scheme
The process of performing the shirt:
- Type 80 p for knitting needles.
- Distribute these P on the hitchfuls.
- Then knit an elastic band 3x3.
- Continue to knit so that you have a fabric of 16 cm - this is the neck of the shirt.
- Add the P that you will need for the manufacture of breasts and shoulders. Do this: take 1 building on each side, knit them 2 IP. Knit them from the IP of the past R.
- Also make each 3rd r. As a result, you will get 12 IP in each interval. Distribute these gaps from the elastic bands of the shirt.
- Close P, decorate the edges of the product.
Tender shirt for a girl
The processing process of the shirt:
- Take the hook.
- Enter the hook in the extreme p, pull out the first P.
- Stitch SBN throughout the circle.
- Make 2 r.
- Perform the 3rd R: knit 1 PS, enter the thread through one p.
- Make it from one P 5 SBN. Skip 1 P. again again
- Continue to knit until you run out of R.
How to knit a simple children's shirt with knitting needles on a boy for beginners?
We offer you a simple method for performing a shunt for a boy. Stock up for its manufacture:
- Yarn - 2 skeins.
- Knitting needles.
Scheme
Execution process:
- Dial 94 P (in this case, fold the thread 2 times). Knit an elastic band 2x2. Then continue to work with circular knitting needles and knit an elastic band 20 cm high.
- Mark the RP with special markers.
- Stitch the lp. In each R to the RP and after the RP, make an addition.
- Stitch the LP with additions approximately 5 cm.
- Then knit the prush, close the p shoulders and back.
- Before knitting straight p and reverse R.
- In the LR, make the decrease at the beginning of P and at the end of P: knit at the same time the 2nd P and 3 P, plus the last P and the penultimate p.
- Stitch 6 cm in this way, then close P.
- If desired, tie the product by crochet using SBN.
MANYA for the boy
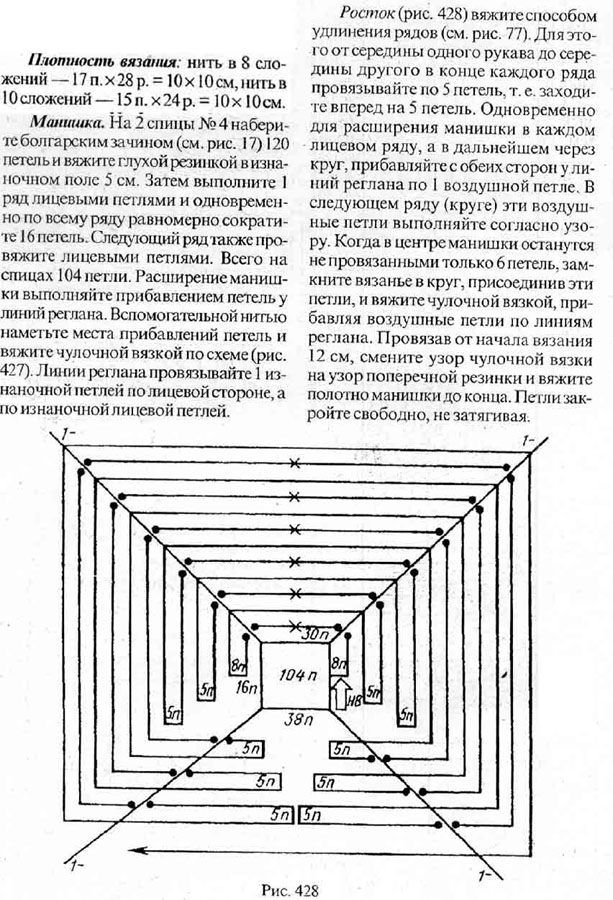
How to tie a simple female shirt on circular knitting needles: a scheme with a description
Tie this simple shirt for yourself or for mom. The basis is quite simple, recalls Ralaglan. Stock up for her:
- Circular knitting needles
- Yarn
Scheme
Execution process:
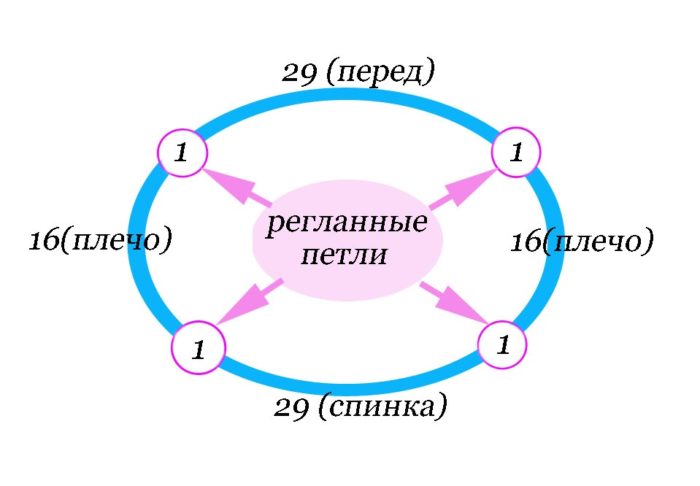
- Type 102 p. Hitch the collar with an elastic band, for example, 2x2 of the desired length.
- Next, mark the back with a marker with front: before - 34 p, back - 30 P. 15 P x 2 for "sleeves". Between these places will be still a couple of P.
- In the future, you will need to add 1 p to expand the product.
- Knit the shirt. In each p of the two sides on the strips of Ralaglan, make n, 2 p between n, knit a lp or IP.
- Continue knit until your product takes the required size.
- Close P, decorate the edges as you wish or sew the decor.
Circular knitting needles
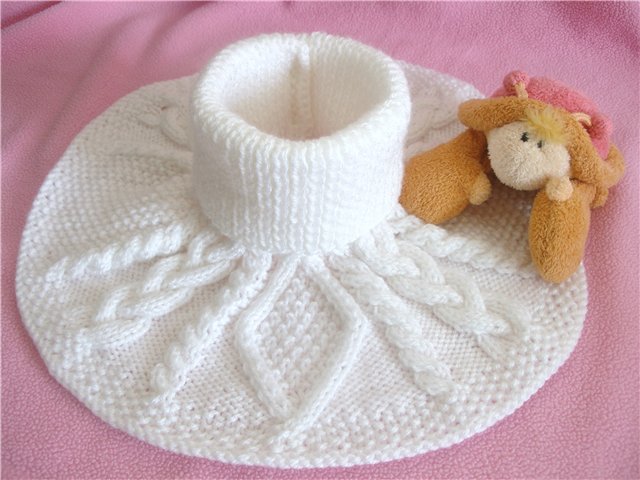
How to tie a simple female shirt on 4 knitting needles for beginners: a scheme with a description
Will we insulate to winter? Then tie this simple shirt. Stock up:
- Yarn - 100 g
- Knitting needles with hut No. 3 - 4 pcs. (one auxiliary)
Knitting the shirt
Execution process:
- Dial 72 P. Distribute the received P to 4 knitting needles (on each spoke there should be 18 p).
- Stitch 2x2 of the required length.
- Next, make an increase: dial additionally P (first add an individual entrepreneur, then add to the lp).
- 1 r: Add to an individual entrepreneur 1 p. You should come out as a result of 28 p on one spoke.
- 2 r: Do not add P.
- 3 r: Add 1 p to the LP, receive 2 knitting needles, on each 31 p, 1 knitting needle - 16 p, 1 knitting needle - 16 p.
- 4 p and 5 r: Do not add.
- 6 r: Add 1 p. You will get it to LP like this: 4 knitting needles, each of which 38 P.
- From 7 p to 11 p: knit 38 p x 4. In the end, 152 p.

Manish woman
The process of breast execution:
- 1 r: On one knitting needle, close the 3rd first P. Then knit the LP 33 P. The next knitting needle is 36 P. Ewable Knitting.
- 2 r: Take the first knitting needle. Close on it the first 3 p, then knit 33 IP. In the second knitting needle, knit 33 IPs.
- 3 r: Take the first knitting needle. Close the first 2 p, then knit the LP. In the second knitting needle, knit 33 LP. Turn the work over.
- 4 r: Take the first knitting needle. Close the first 2 p, then knit 31 IP. In the second knitting needle, knit 31 IP.
- 5 r: Take the first knitting needle. Close one p, then knit 30 lp. In the second knitting needle, knit 31 LP. Turn the work over.
- 6 r: Take the first knitting needle. Close one p, then knit 30 IP. In the second knitting needle, knit 30 IP.
- Next, continue to knit so that 12 p.
- Subsequently, Close 24 p.
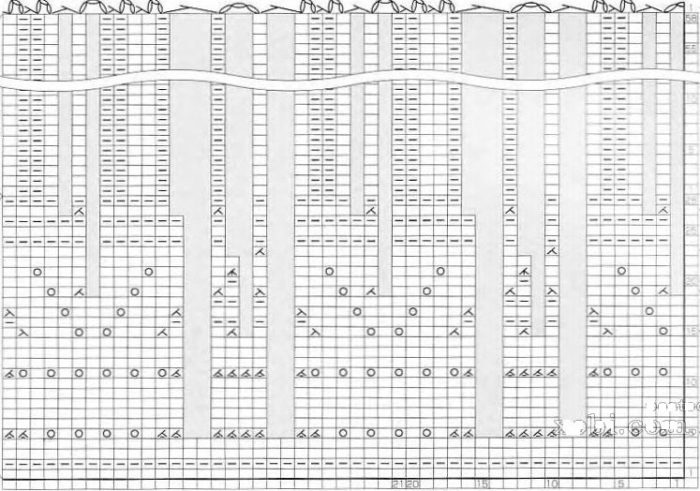
How to tie a simple female shirt on 5 knitting needles for beginners: a scheme with a description
This shirt is suitable for a 5 -year -old child. Stock up for its manufacture:
- Knitting needles No. 3 - 5 pcs
- Yarn.
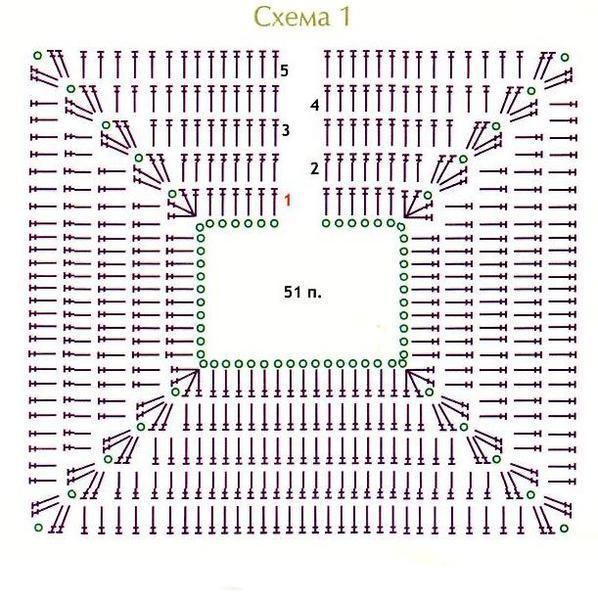
The scheme of the shirt
Execution process:
- Type 96 p.
- Distribute the received P on 4 knitting needles.
- Stitch the gate of the shirt with an elastic band, for example, 1x1 (that is, 1 lp, 1 IP, 1 LP and so on.
- Stitch the required length.
- Then knit the product by applying 4 RP.
- Divide P into such a proportion: 30 p x 32 p x 30 p.
- Stitch LP 30 p of the front of the shirt. Mark the RP.
- Then knit 16 LP, again mark the RP, 16 LP, RP.
- Stitch the following P Thus: 30 P, 1 N, 1 RP, 1 N, 16 P, 1 N, 1 RP, 1 N, 30 P, 1 N, 1 RP, 1 N, 16 P, 1 N, 1 RP , 1 N.
- Knit so 9 cm. Make it in every 2nd r circle.
- Stitch the shirt in a circle, close the np IP shoulders.
- Knit in front of the product as follows: 2 IP together, 1 IP, LP, 1 IP, 2 IP together. On the wrong side, knit 2 lp IP, 2 lp.
- Stitch the product of the required length. Close P.
- In the same way, knit the back of the shirt.
Women's shirt
How to tie a simple male shirt on 2 knitting needles for beginners: a scheme with a description
This option is considered ideal for beginner needlewomen. Try you too. In order to tie a shirt for a man, stock up:
- Yarn not very thin
- Knitting needles - 2 pcs. (better circular knitting needles)
A detailed description of knitting
Execution process:
- Dial the amount of P, which is suitable for the circumference of the head of the person to whom you will knit.
- Knit an elastic band 20 cm long. You can knit as follows: 2 lp, 2 IP, 2 lp and so on. While you knit, do not forget to try on the product.
- When tie the neck, start knitting only LP. So the 1st R.
- The subsequent p is knitted like this: 1 p, 1 n, 1 p, 1 N and so on.
- As a result, you will get 2 times more P.
- The next P is knitted so that the NP does not look in the form of holes. Knit until the end of the work of the LP 7 cm.
- Close all n, sew the sides of the shirt.
Stylish set - MAN and takes
How to finish knitting a shirt with knitting needles?
To end the shirt, as a rule, a crochet pattern is used. For work, you will need to stock up on the minimum number of items, namely:
- Crochet
- Threads for the color of the main product
Execution process:
The final stage of the shirt is quite simple:
- *(SBN, 3 VP, 1 C) In the 1st P. Skip approximately 0.5cm or 1 cm. Repeat from *, finish the SS.
- Stitch in this way throughout the circle.
- Wrap the collar of the product by applying this particular pattern.
If you want your shout to your shirt perfectly, then before you wear it, steam her well.