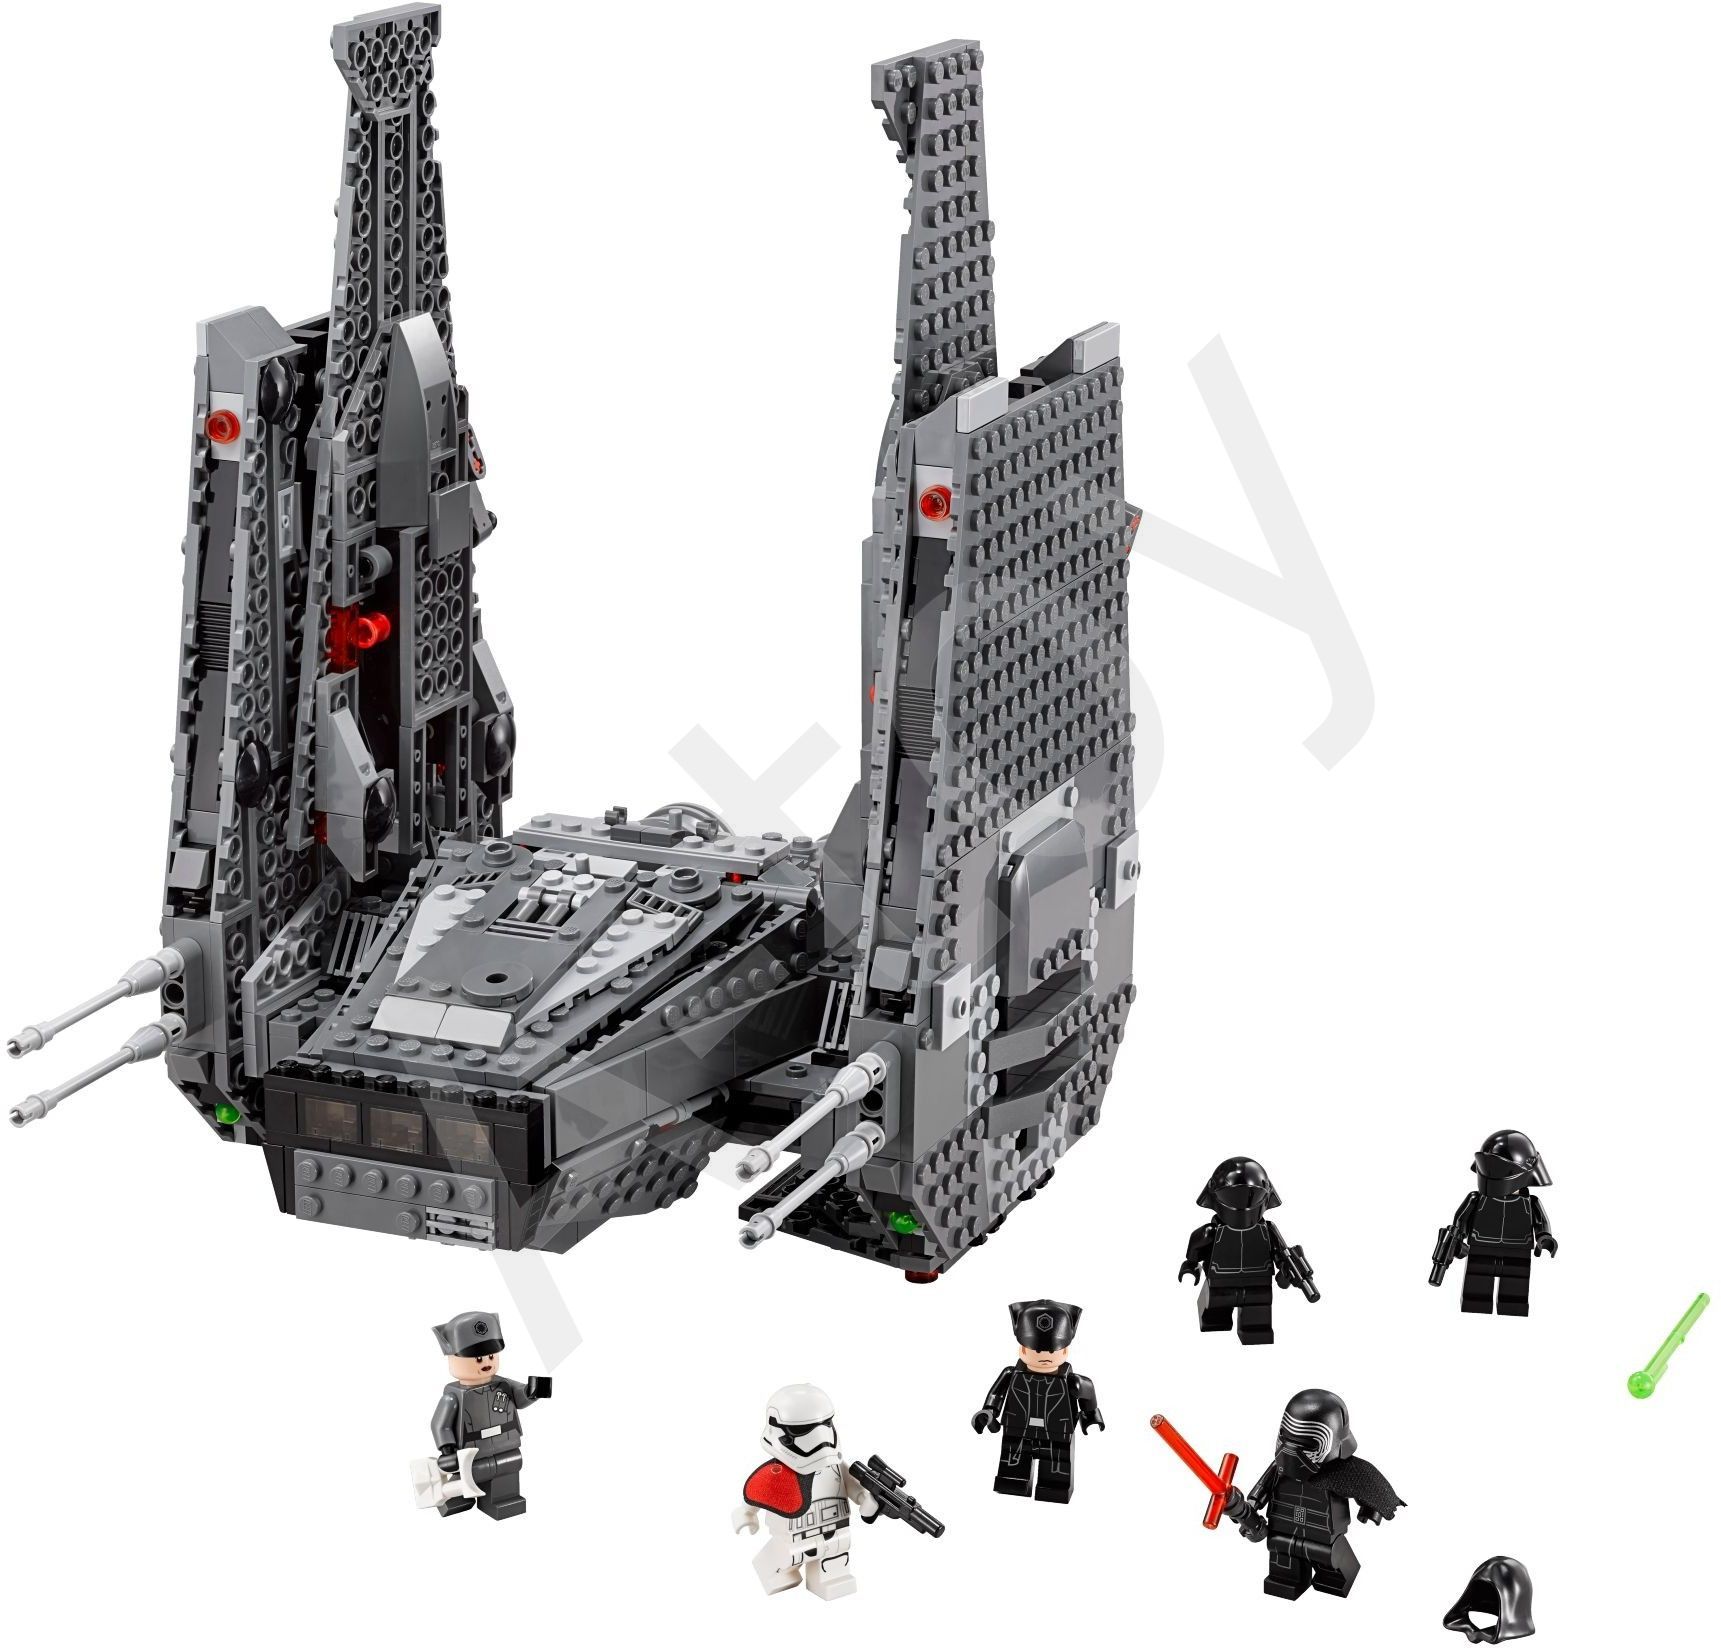
In this article, you will find instructions for the assembly of "Star Wars" of Lego Designer.
The content of the article
- How to make a simple "Star Wars" designer for children and beginners: instructions, scheme, description
- How to make from the designer of Lego Star Fighter General Grievous "Star Wars": Scheme, description, instruction
- Soldiers of the Republic against Sith Warriors: Scheme, Description, Instructions
- Umbari MHC: Scheme, Description, Instructions
- Martial Unit of Navigator Clone: \u200b\u200bScheme, Description, Instructions
- Flash Speed: Scheme, Description, Instructions
- Snow Speed: Scheme, Description, Instructions
- DROID Fighter: Scheme, Description, Instructions
- The best "Star Wars" from Lego do it yourself: photo
- Video: Lego 75049 "Snow Speeder" Overview
If your child is a fan of "Star Wars," he will be interested in to independently assemble one of the heroes or any fighter, a flying destroyer or a ship. In addition, such an occupation is not only interesting, but also useful. With it, you can develop a small motorcycle hand, memory, attention, perfection, fantasy. Below you will find instructions for assembling different items and heroes from the famous children of the film "Star Wars".
How to make a simple "Star Wars" designer for children and beginners: instructions, scheme, description
Lego: Star Wars
If you have no experience in assembling items from the designer Lego, but you want to collect something from the "Star Wars", then start with simple figures. Start for example, with the assembly of such a figure like Shuttle Kaylo Rena.
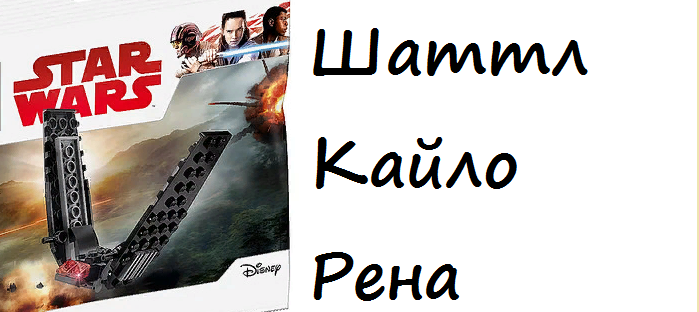
Shuttle Kaylo Rena
To assemble this subject, you will need a little details, and the scheme and instruction are very simple. Below is a description of how to make simple "Star Wars" designer for children and beginners, with step-by-step pictures.
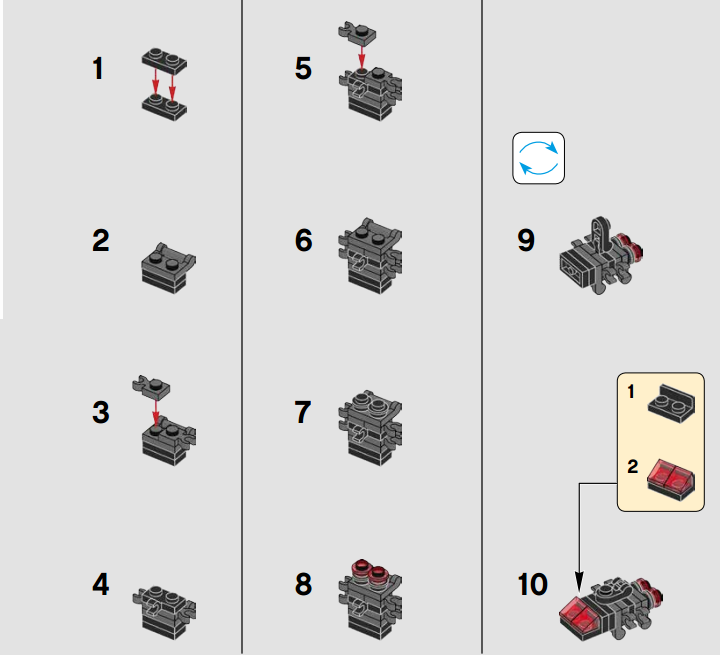
Assembling base
- Connect two blocks 1 to 2.
- Then find such detail as shown in the figure, and attach it from above.
- The next block with a loop and part 1 to 2.
- Again the part from the loop, as in Figure 5.
- We continue to collect the central unit and attach blocks, as shown in Figure 6 and 7.
- Red lanterns - step 8.
- Turn over and attach the item, as in Figure 9.
- Now install the corner block 1 on 2 and the two rear red lamp, as shown in Figure 10.
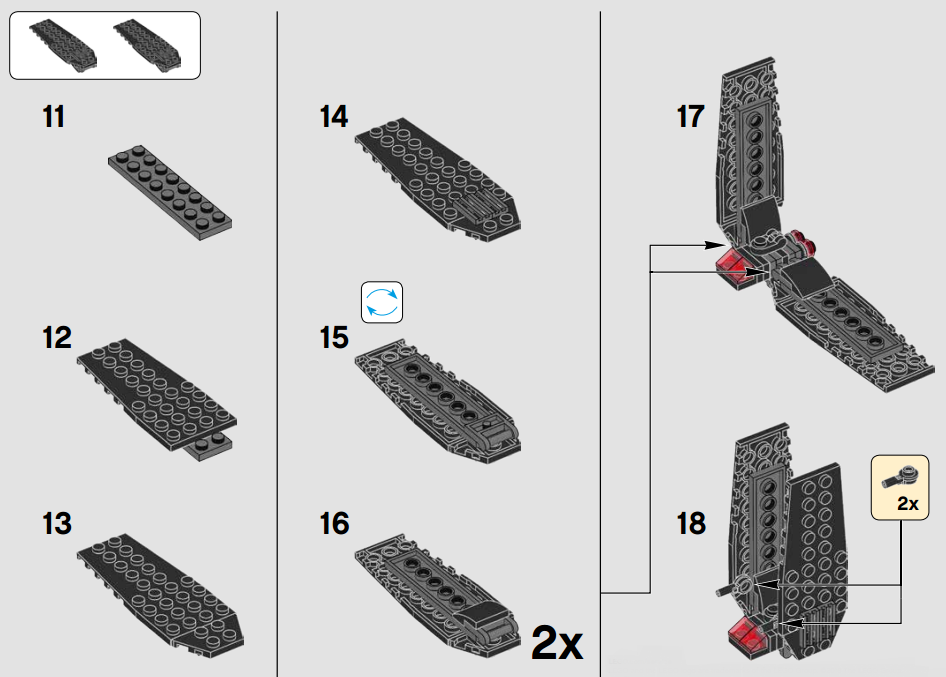
Attach the wings
Now collect wings:
- Take the block 2 to 8 and attach another block on it, as shown in Figure 12.
- Trapezoid detail attach to the base of the wing.
- At the 14th, 15 and 16 step, attach the top of the wing and the part with hinges, which will allow the wing to move.
- Now join the wings to the center.
Shuttle Kylo Rena is ready. Now you can proceed to the assembly of other figures, more complex, but no less interesting.
How to make from the designer of Lego Star Fighter General Grievous "Star Wars": Scheme, description, instruction
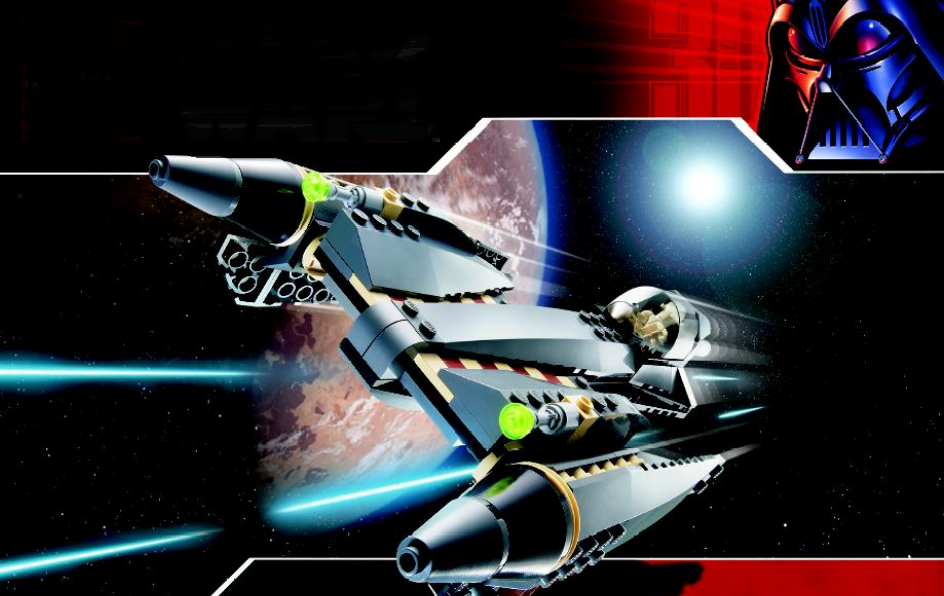
Fighter General Grievus
By the LEGOR Scheme below, you can make your hands the fighter of General Grievous. The streamlined forms of the fighter, impressive firepower. In this model there is a moving cabin, a landing mechanism, a folded tail, holders of laser swords.
First, collect the figurine of General Grievous.
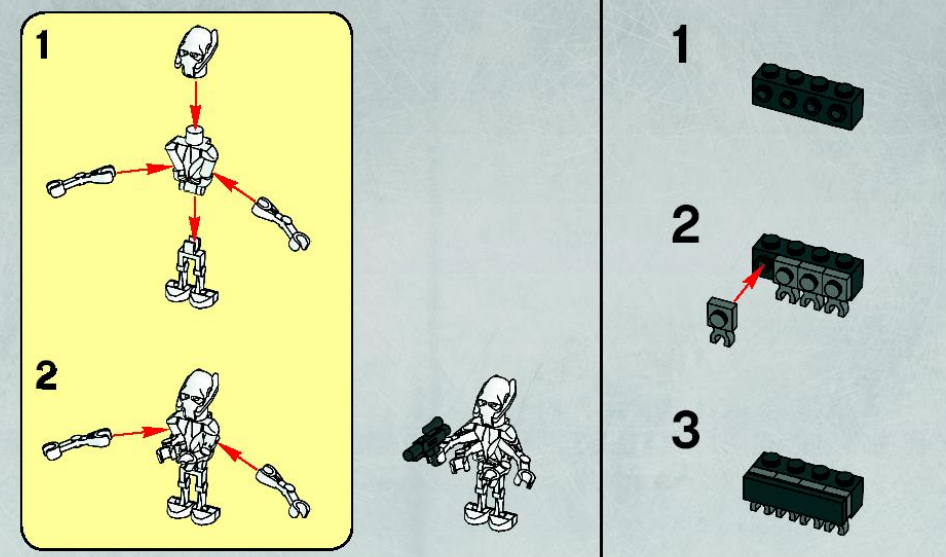
Collect figure
Now start collecting the founding of the fighter. Connect all the details as shown in Figure 1-6.
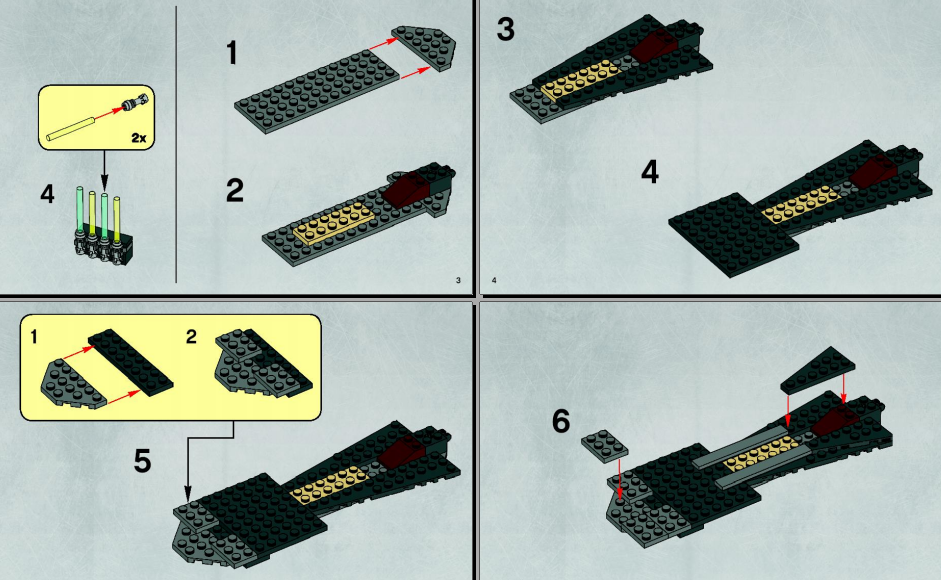
Start collecting the base of the SHIVUS General Fighter
Set the details of the black color, as shown in Figure 7 and 8, and block 1 on 5 red color Attach the base in the middle - Figure 9. Attach the yellow blocks, as in Figure 10.
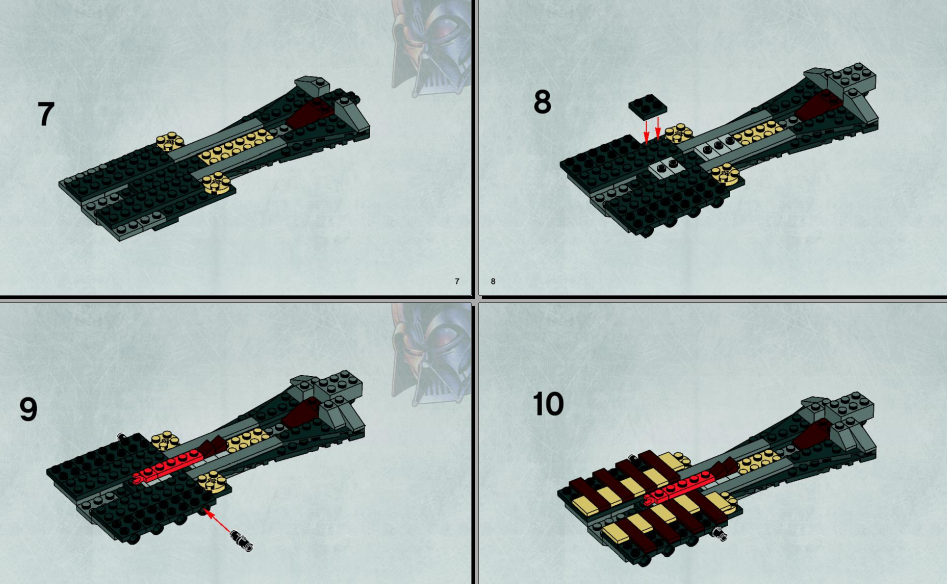
Continued assembly
Set the blocks 1 to 2, as in Figure 11. Attach parts of the wings and part 1 to 4, connecting them together and fastening the plate (Figure 14).
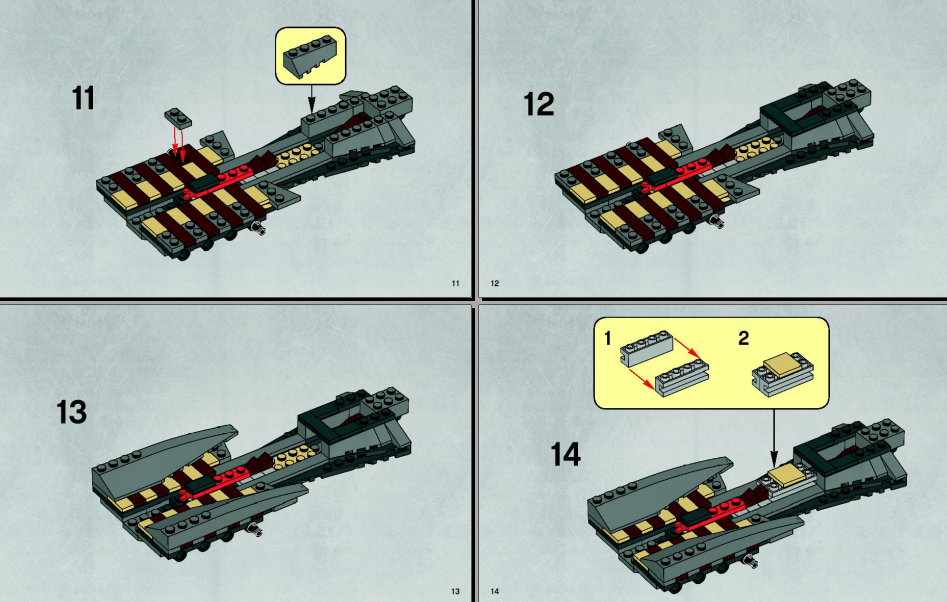
Attach parts of the wings
Collect the fighter center and install it, as shown in Figure 15 and 16.
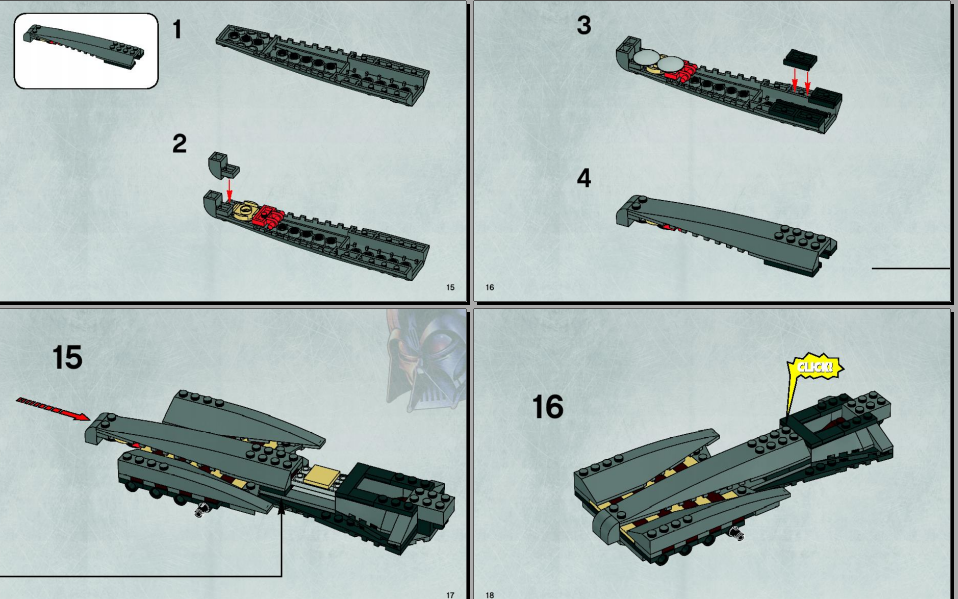
Collect the center
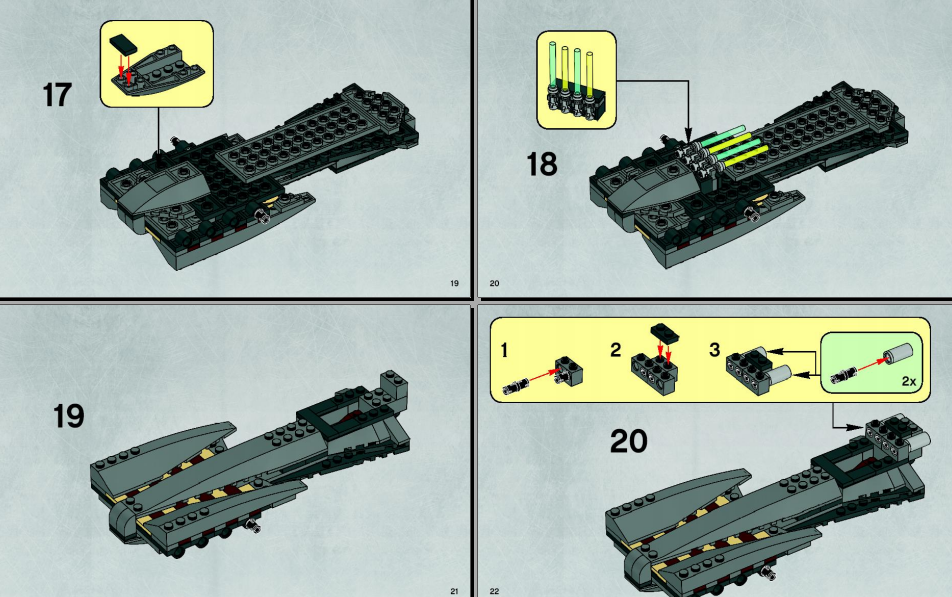
Attach the wings
Attach the cabin and firing swords. Connect the corner, rounded tail parts.
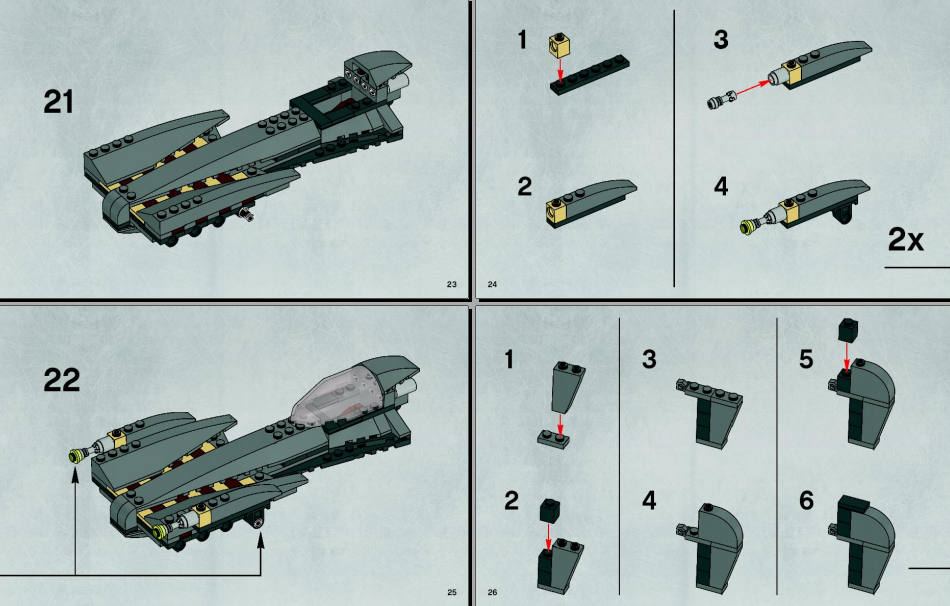
Attach the cockpit and fire swords
Set them as the arrow shows in Figure 23. Now we start collecting laser blarsters. Connect all the small details of Blaster.
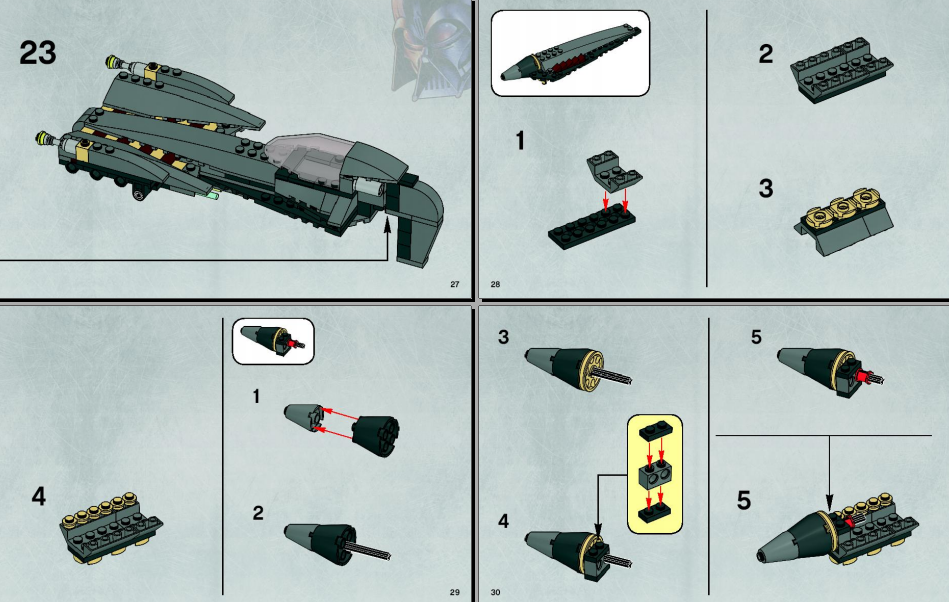
Collect laser blarses
Attach each blaster to the base and attach to the fighter.
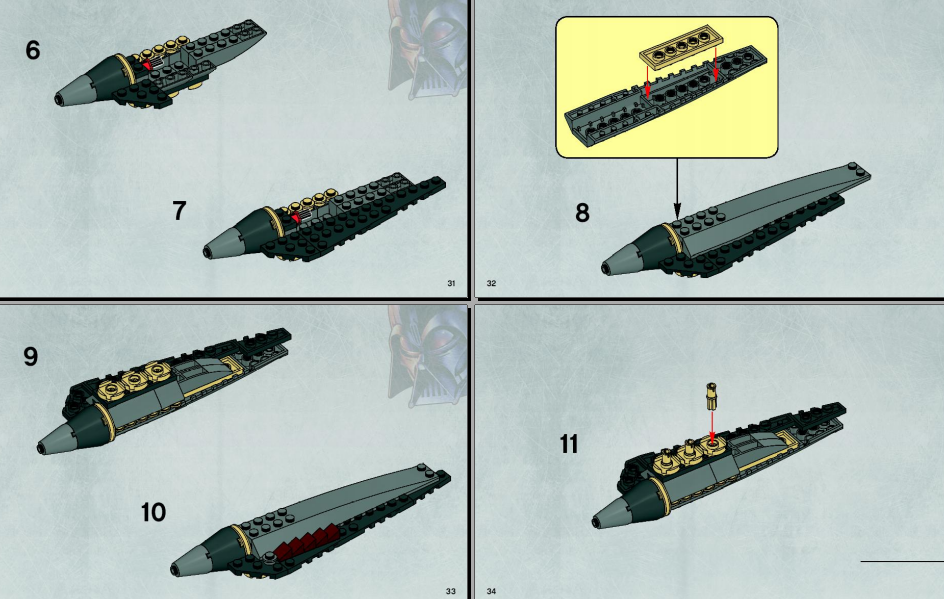
Attach blaster
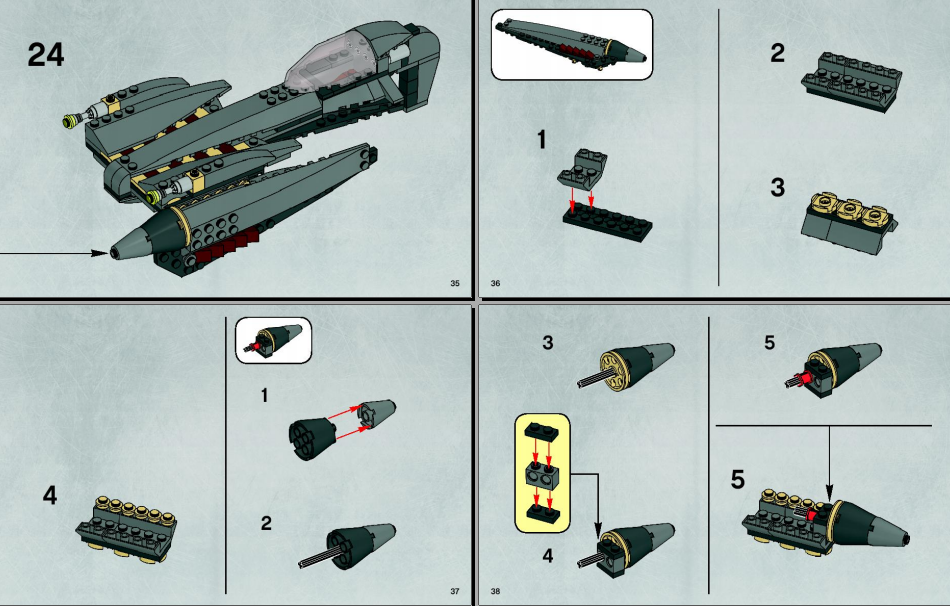
Keep collecting the second blaster
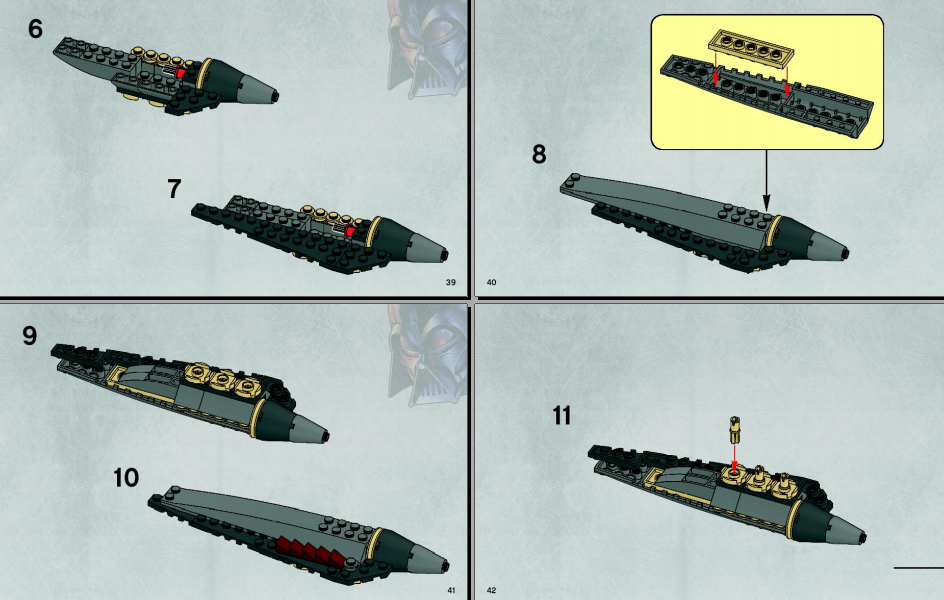
Blusters are ready
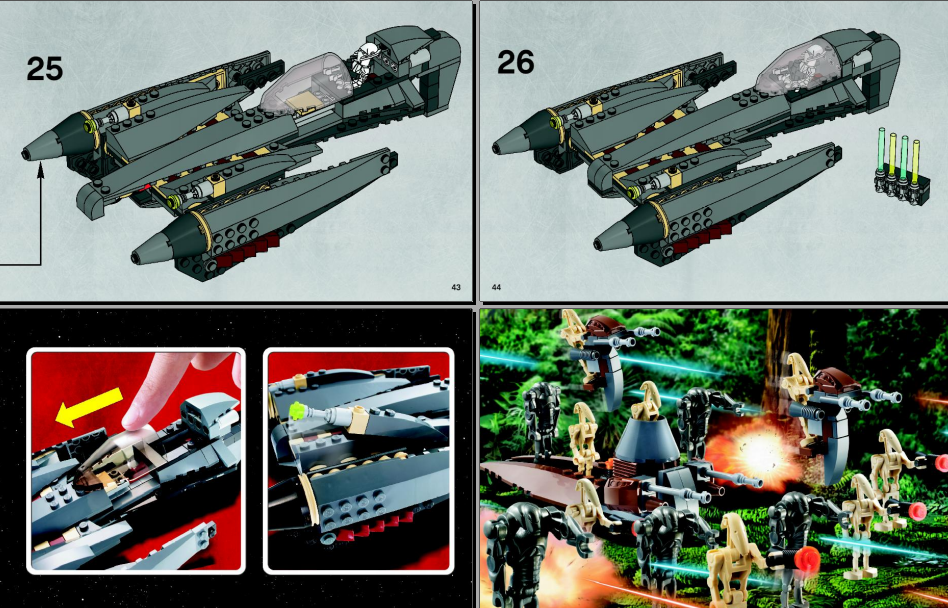
Install all parts in place
The Fighter General Grievus is ready. Please note that the cabin moves, and firing firing swords. The fighter turned out to be almost the same as in the famous movie "Star Wars".
Soldiers of the Republic against Sith Warriors: Scheme, Description, Instructions
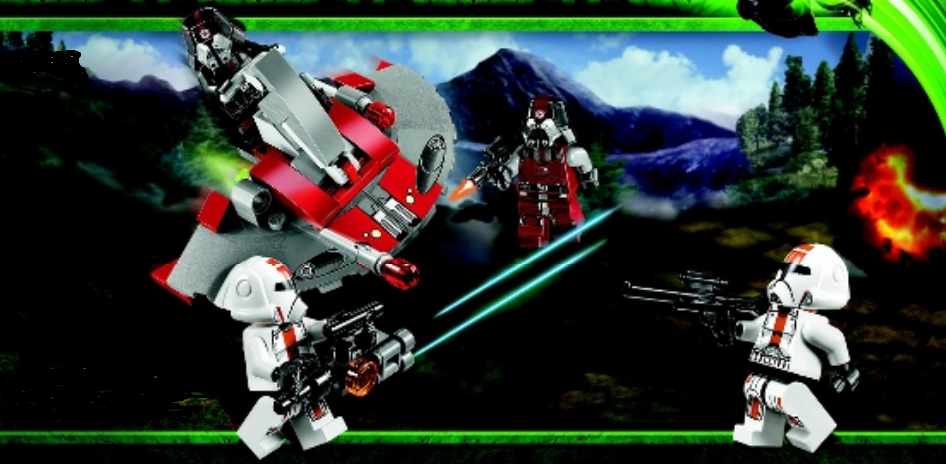
Soldiers of the Republic against the soldiers of Sith
To make your own hands from Lego, the real scene of the battle of the soldiers of the republic with the warriors Sith, in the designer kit must be all the necessary parts for collecting warriors. Such such blocks will be needed:
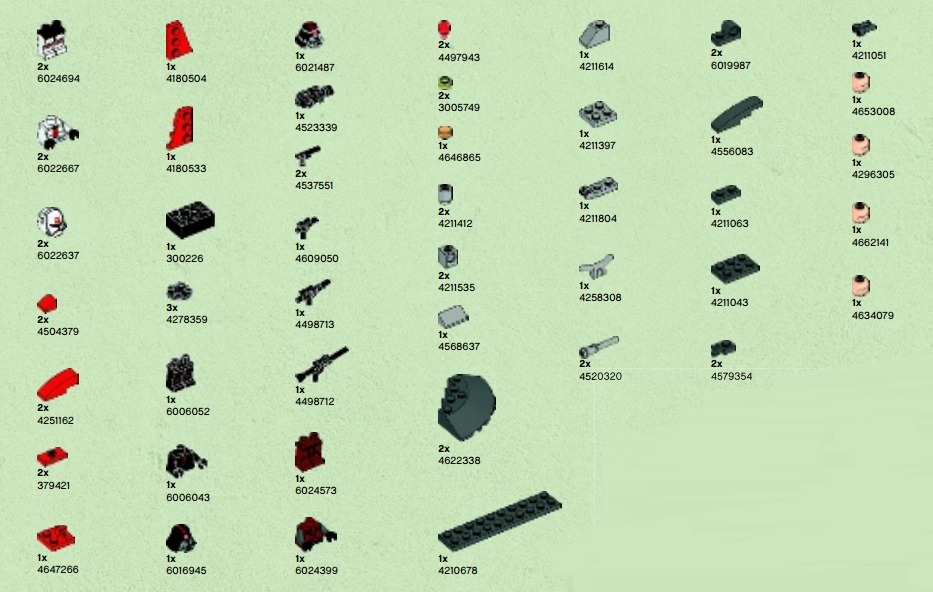
Such details will be needed
If everything is ready, you can start assembling warriors, their weapons and aircraft:
First, collect warriors, connecting all the details as in the picture below.
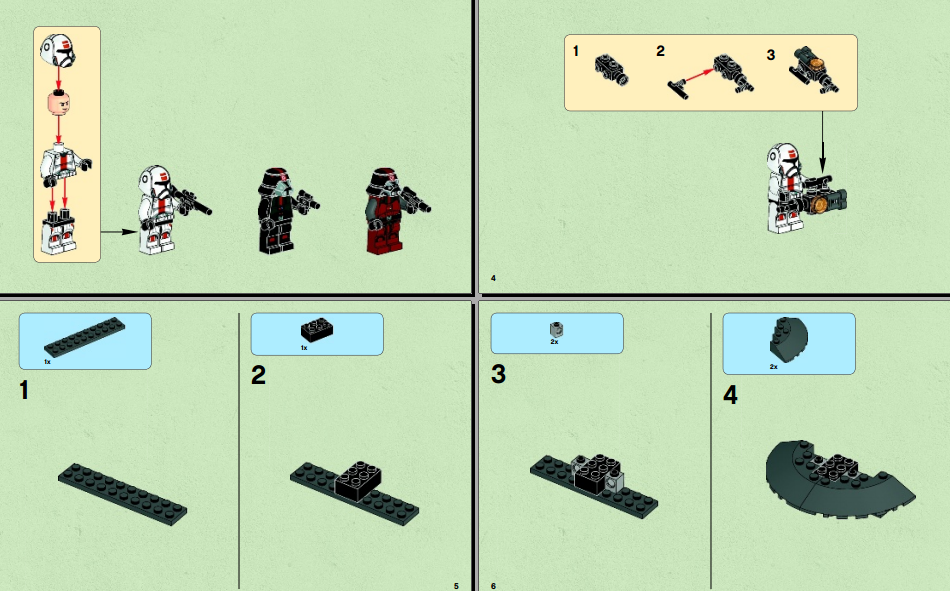
Collect warriors
Now, proceed to the assembly of the aircraft, starting from the assembly of the base and moving on, as shown in Figures 1-11.
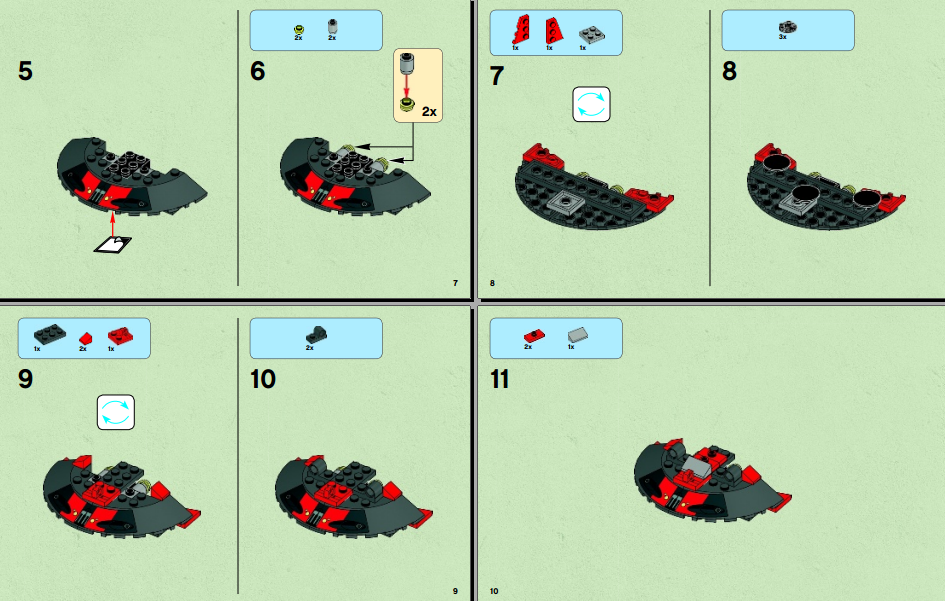
Assembling aircraft
Now install laser swords, steering and platform for warrior. Install the figure.
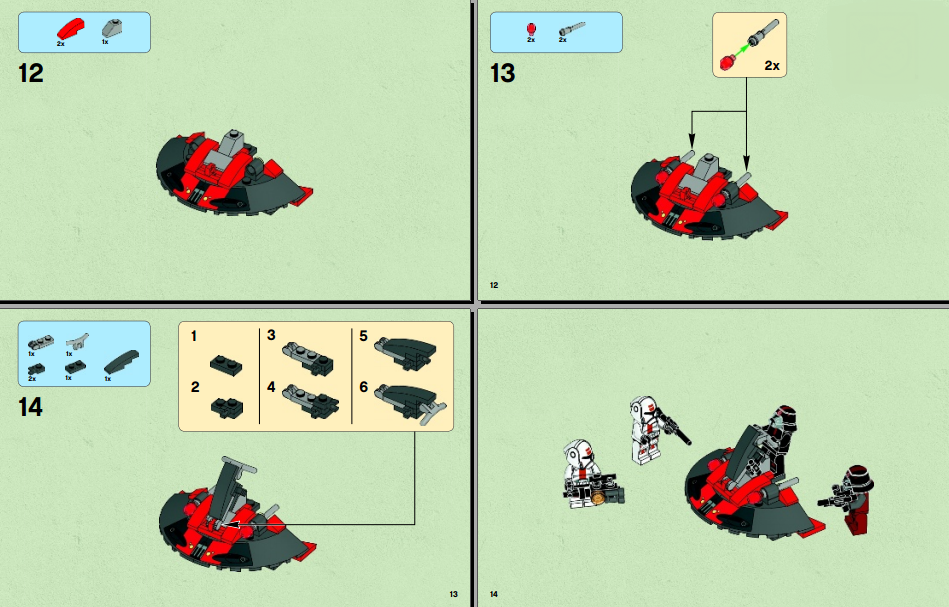
Install laser swords and figurines
Now you can play the scene of the present fight among galactic inhabitants. In such toys, it is much more interesting to play if you know that they are assembled with their favorite designer with their own hands.
Umbari MHC: Scheme, Description, Instructions
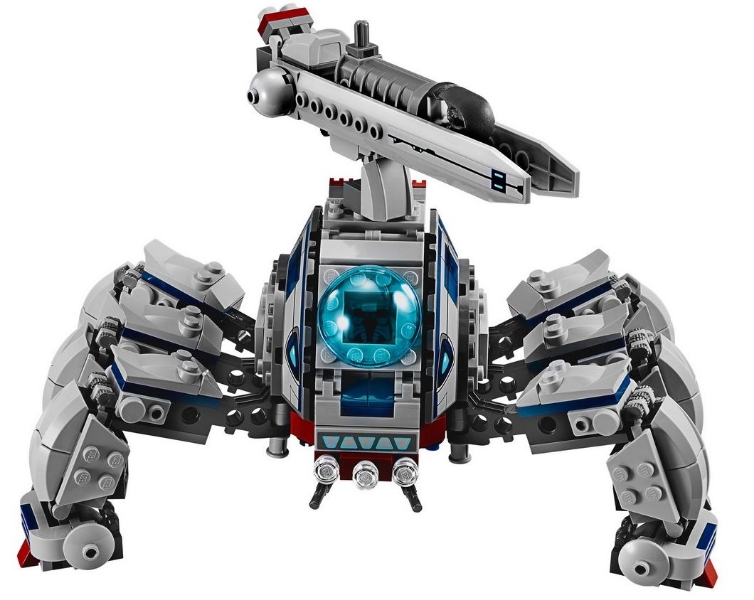
Umbari MHC.
Umbar mobile heavy gun in the "Star Wars" performs a special task: repel the attack with the help of a powerful electromagnetic plasma cannon. It can manage anyone, but in the cockpit only for one pilot. Spotlights illuminate the planet and the path of movement of the gun, and the pilot at that time beat the attack.
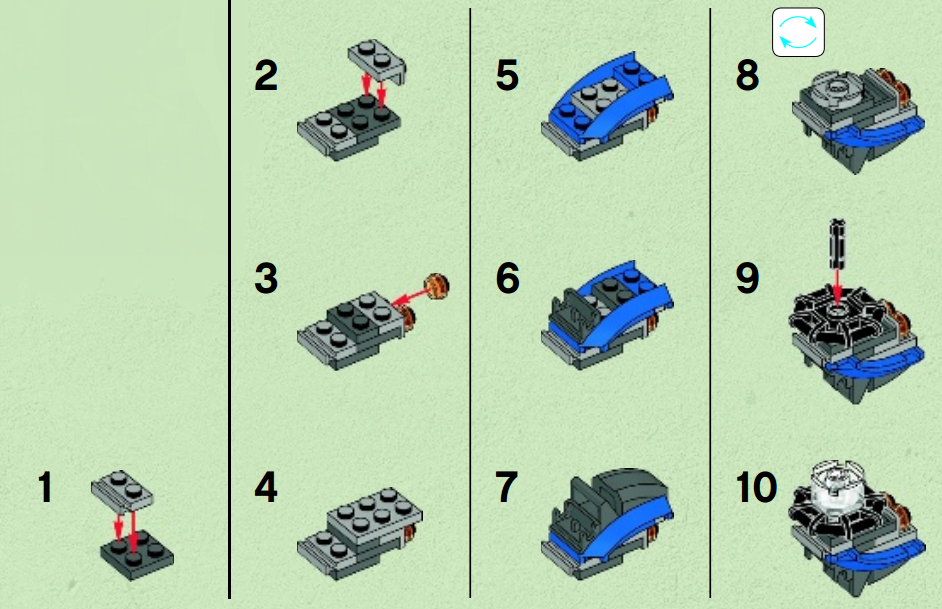
Attach blocks
Collect this plasma gun simply. Attach blocks, as shown in the drawings. First, the center is going: the pilot cabin and other details. Then install the spotlights, the gun. Feet (6 pieces) first collect separately, and then attach them all to the base.
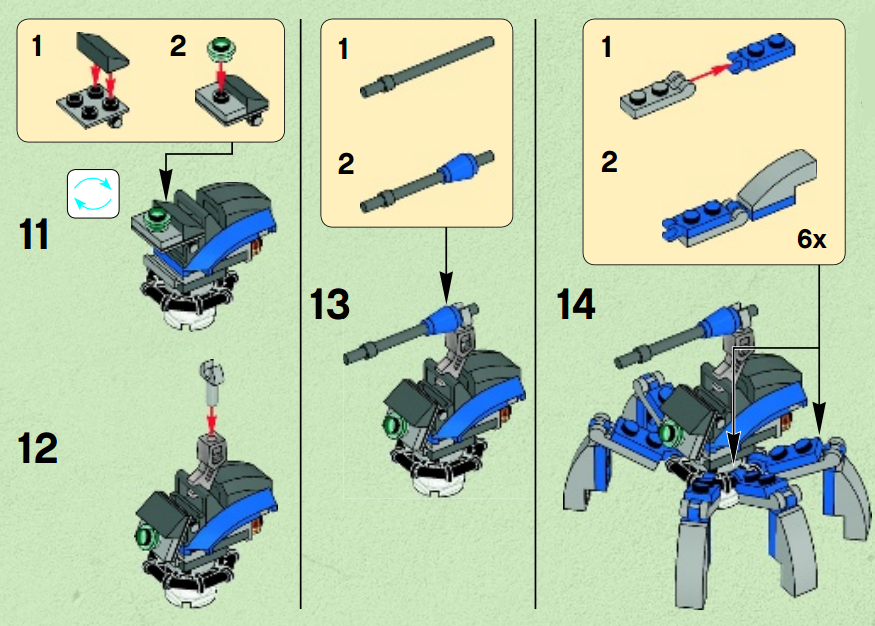
Install spotlights and gun
Now you can protect the air base and umbrancers. Six massive legs are moving simply, but this gun does not develop a greater speed. Because of bulky, she becomes a target in any battle. Therefore, it is worth making other devices or equipment from "Star Wars" to effectively reflect the attack in imaginable battle.
Martial Unit of Navigator Clone: \u200b\u200bScheme, Description, Instructions
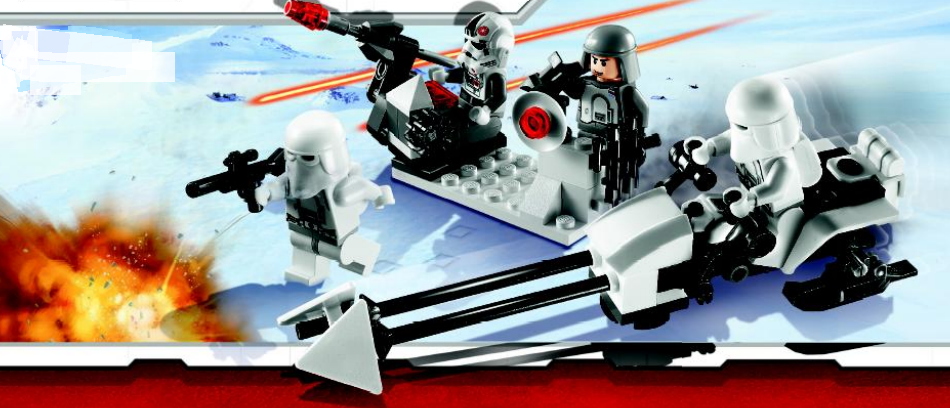
SnowTrooper Battle Pack
Clear and fearless clone attack aircraft will quickly cope with an attack in the galaxy. Their weapons will reflect any fire shelling. Imperial field commander, AT-AT driver and two snow attack aircraft are brave warriors that are perfectly controlled by a rocket installation, locator and command item. Here is the assembly scheme, description and instruction:
First collect clones. Then proceed to the assembly of the base on which the command post will be located.
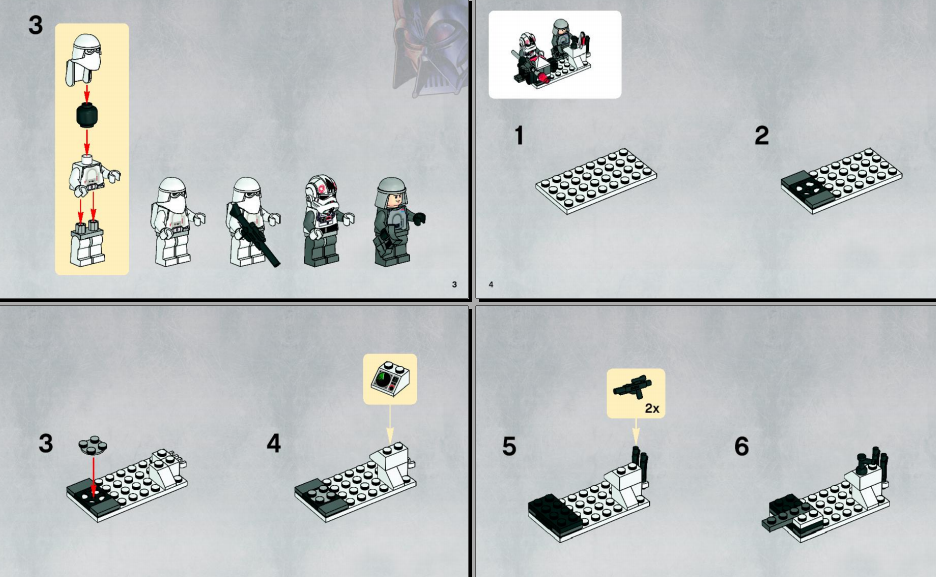
Collect clones
All details attach as shown in the drawings. Carefully work with sharp details so that they accidentally dismissed the eyes.
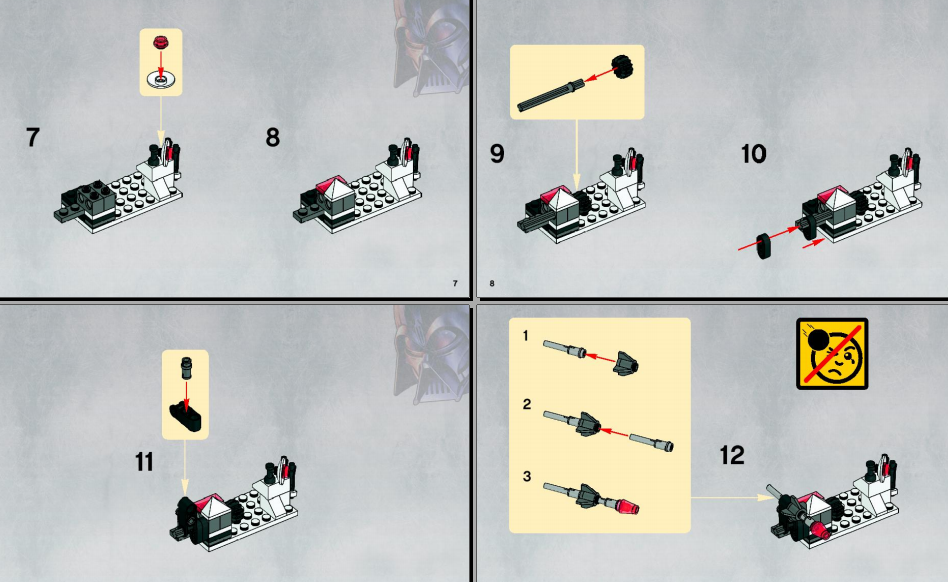
Attach blocks
When the command post and locator are collected, proceed to the assembly of the vehicle. First, attach the details where the clone attack aircraft will sit, and then the remaining details.
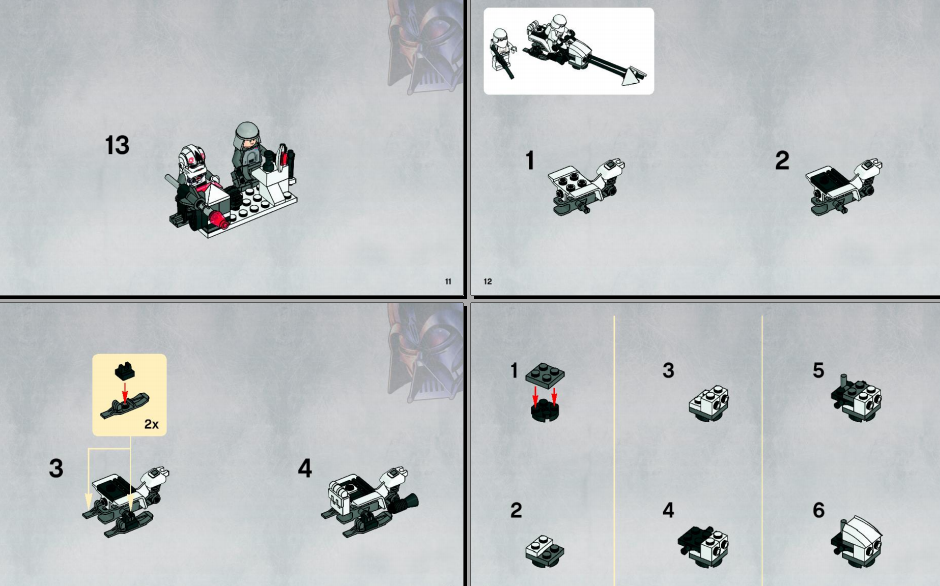
Collect vehicle
It is very convenient that the vehicle is going to a couple of steps. You only need to bind over the existing front and rear blocks and set the steering control.
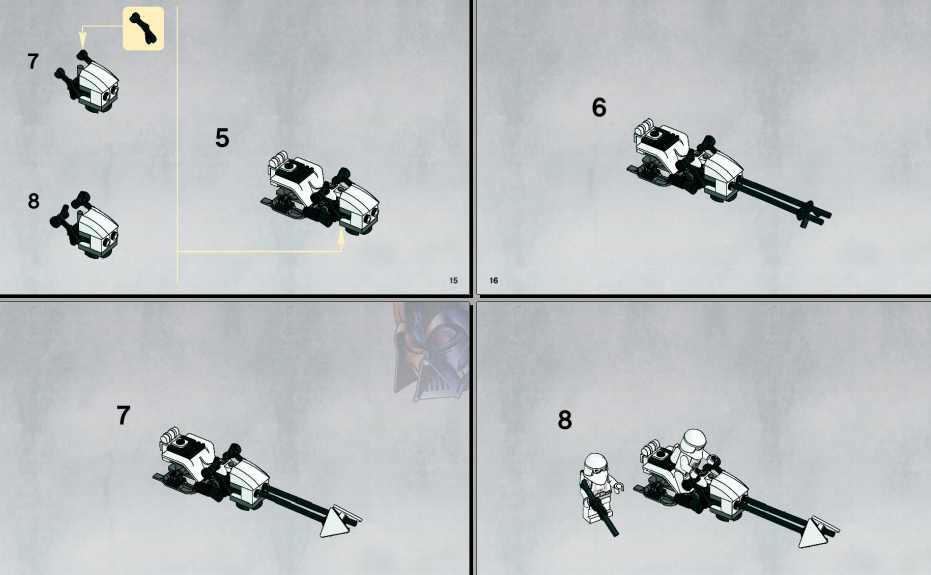
Vehicle is ready
All four warriors are ready together with the command installation, locator and vehicle.
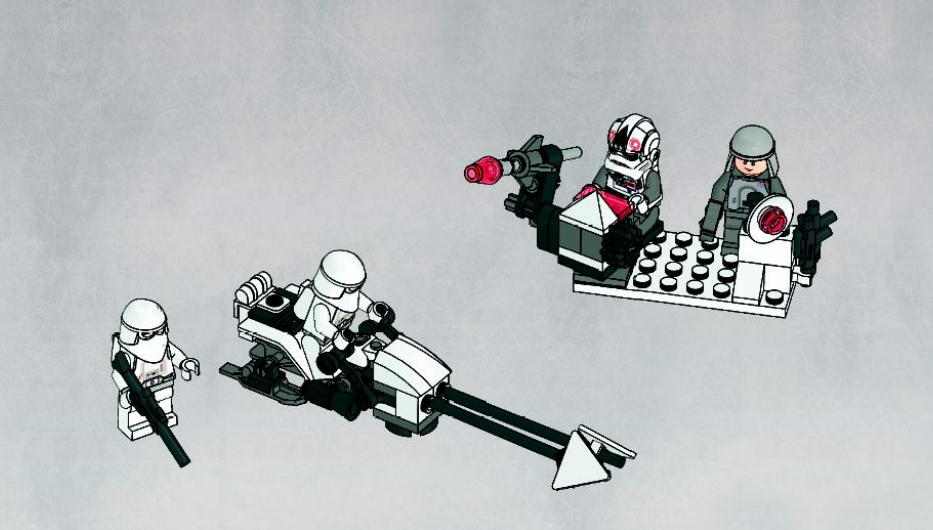
Four Warrings, Locator and Command Installation
It turned out an excellent purse warriors of the Galaxy. These clones have even rockets, blaster and super-modern technique to protect and repel the attack.
Flash Speed: Scheme, Description, Instructions
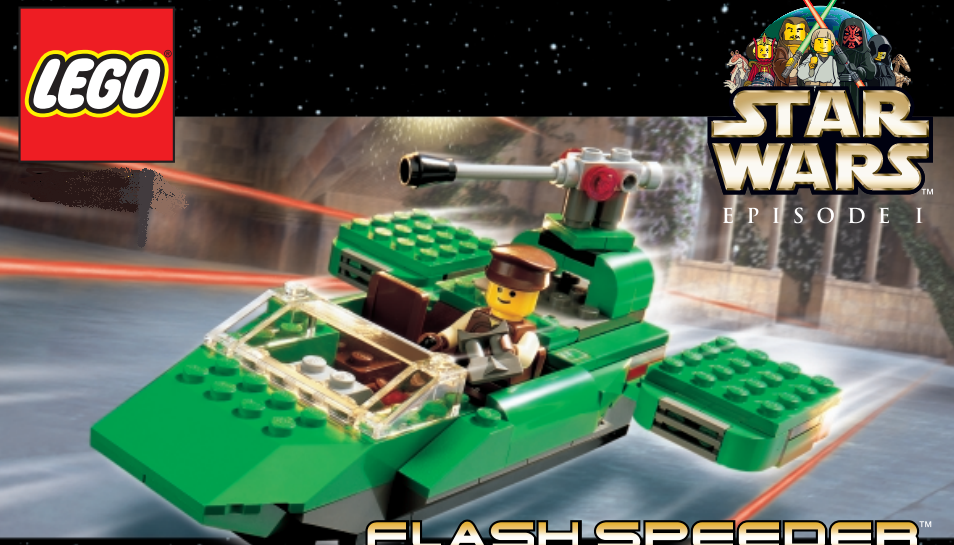
Flash Speeder.
Flash Speed \u200b\u200bbelongs to royal forces. It is used to persecute violators and departures for emergencies. Here is the instruction and description of the assembly process:
First, assemble the figure, and then proceed to assembling the base of the speaker.
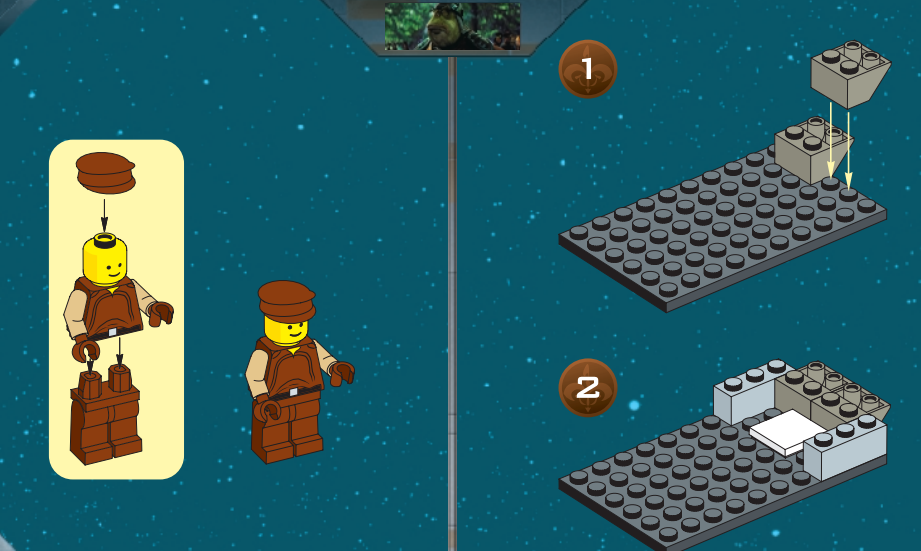
Collect figure
Install the blocks as shown in the pictures. This is a simple fighter assembly scheme from Star Wars.
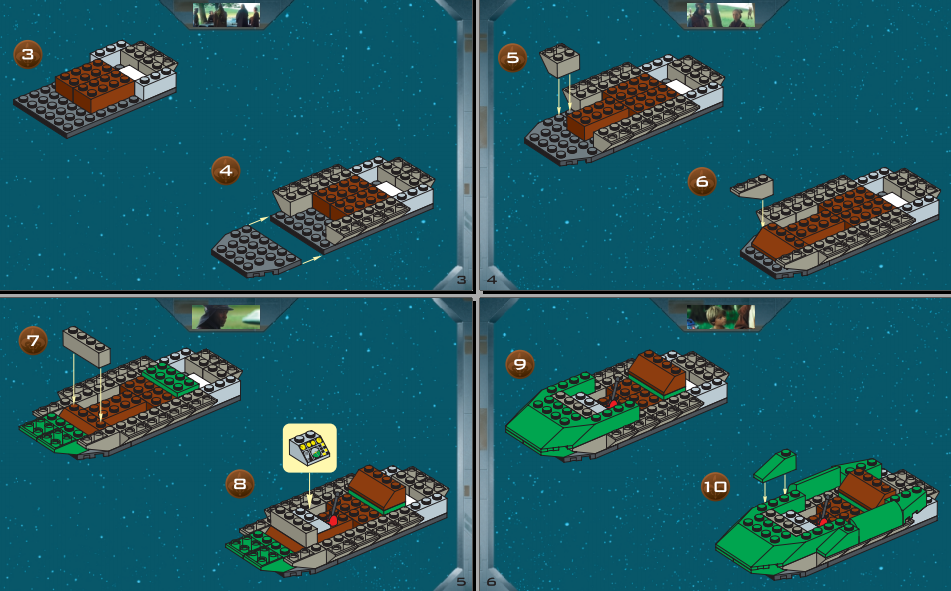
Collect the base of the fighter
After assembling the base, proceed to the creation of wings. At the block 2 on 16, attach two blocks around the edges 2 by 4. Then attach the items as shown in Figures 2-7. At the next stage, connect the wings to the base, as in the image 11 and 12.
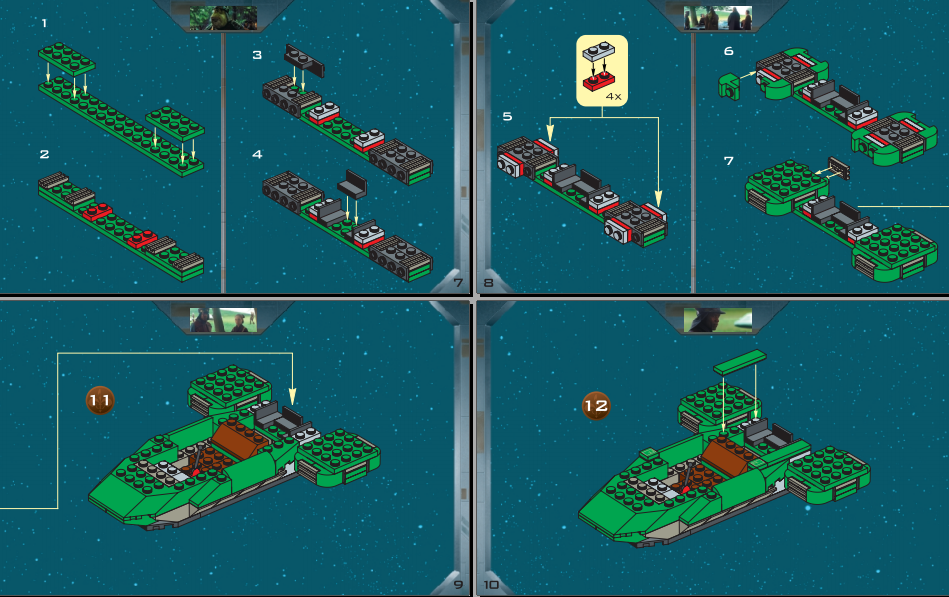
Collect wings
Now build a pilot cockpit, install a gun. Put the windshield.
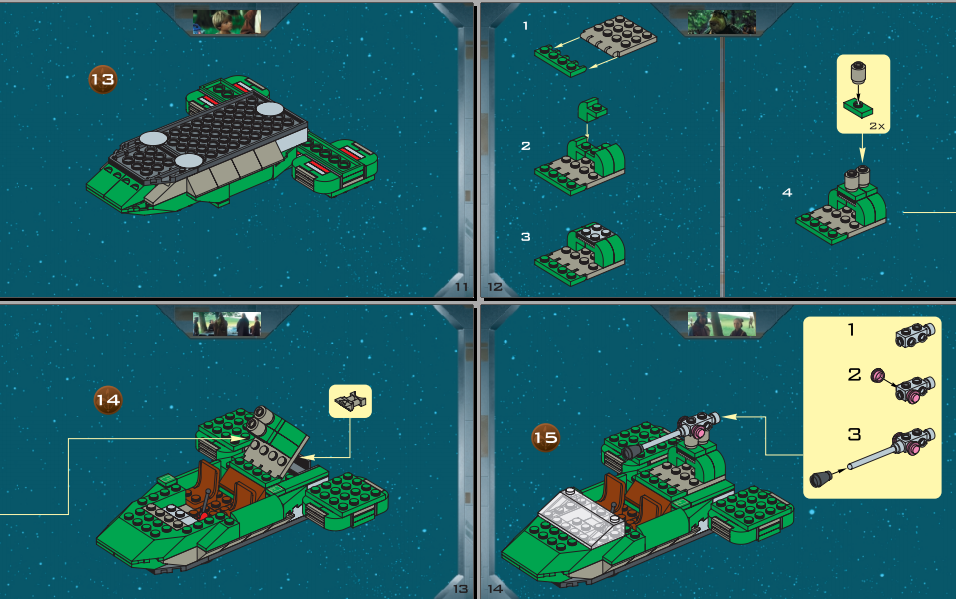
Make the cabin and install the gun
It remains to take a figurine for the control panel - technique is ready.
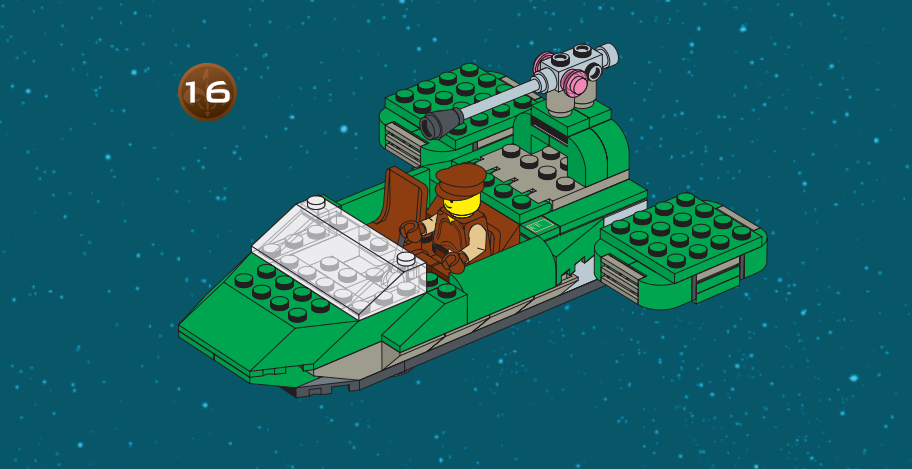
Technique is ready
Snow Speed: Scheme, Description, Instructions
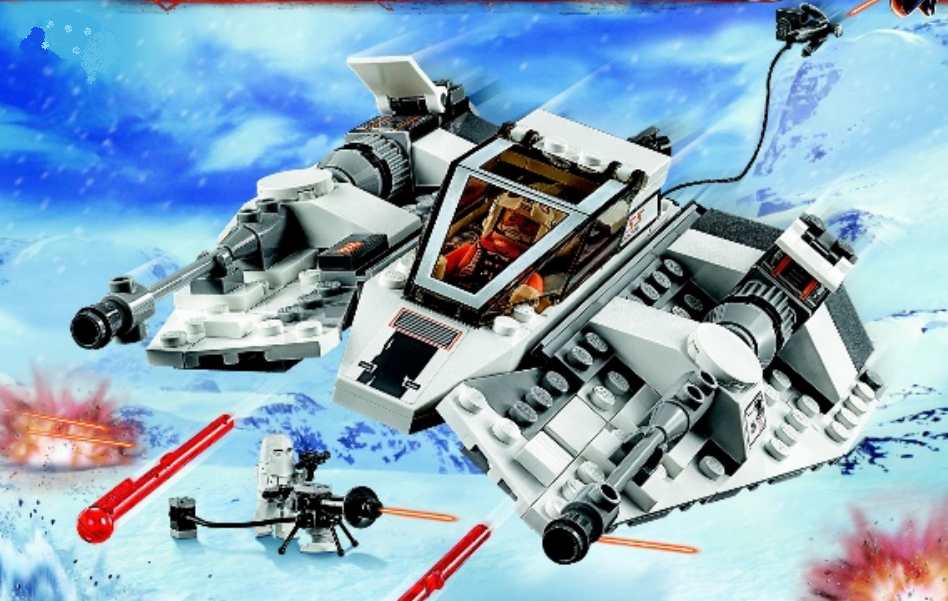
Snowspeeder
The atmospheric fighter of a small size. Equipped with two laser blasters and one harpoon, which flies on a flexible cable. This harpoon is very powerful and even pierces the chassis of the "Floor". Collect this fighter and immerse yourself in the world of galactic wars. Here is a description and instructions:
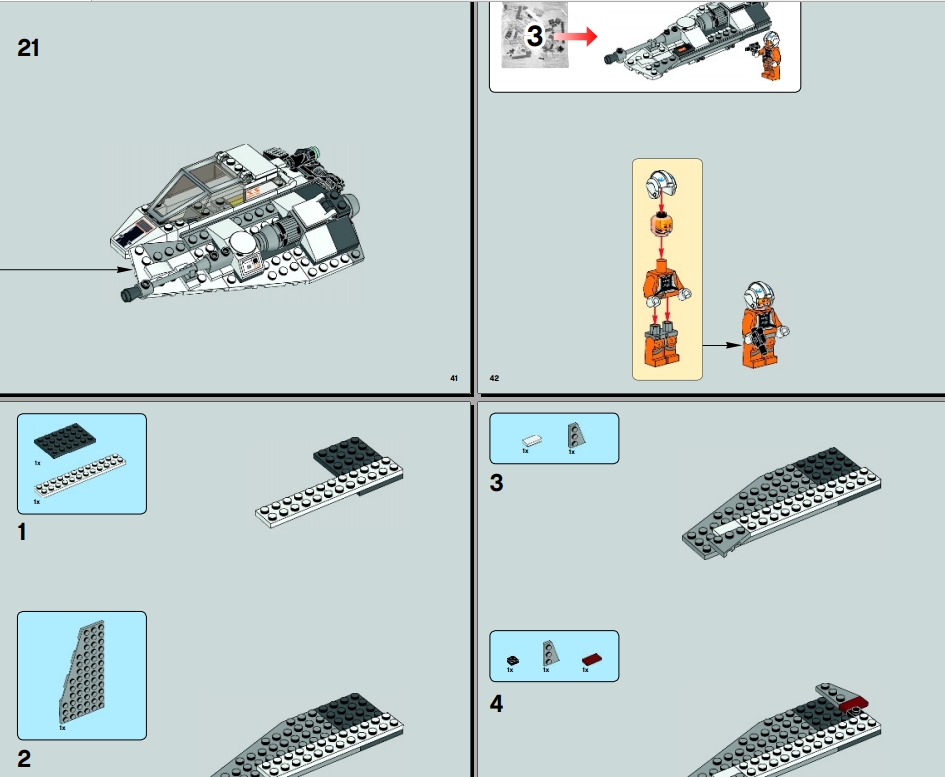
First assemble the figure, and then harpoon with the cable.
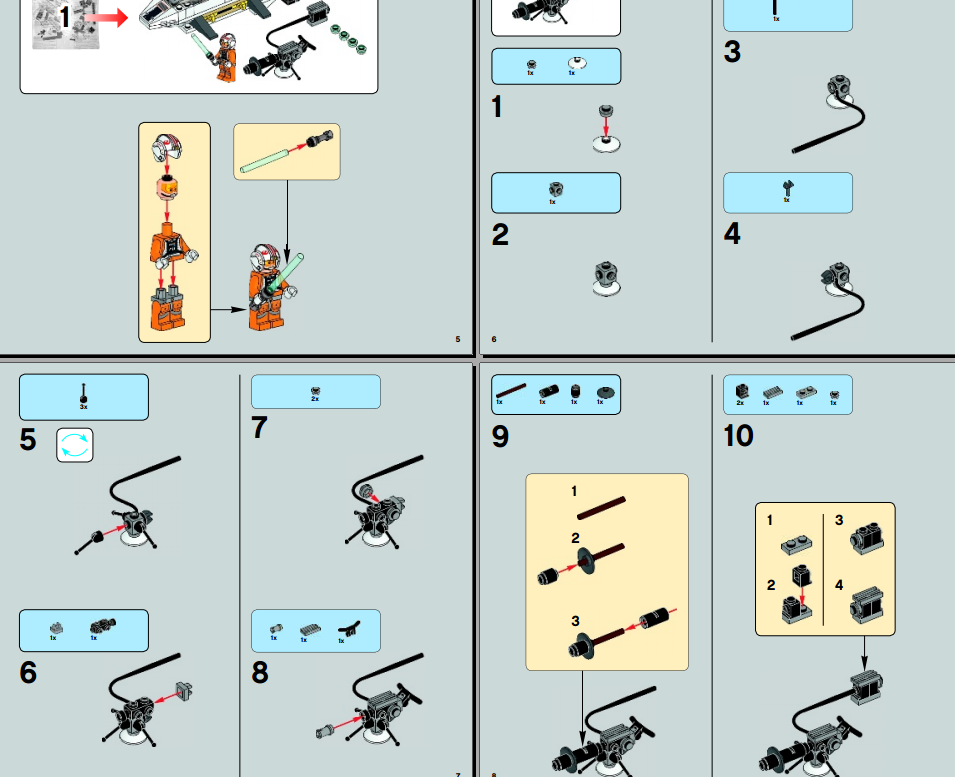
Collect figure and harpoon
Now we collect the foundation. Make all stages step by step, as in the figure below.
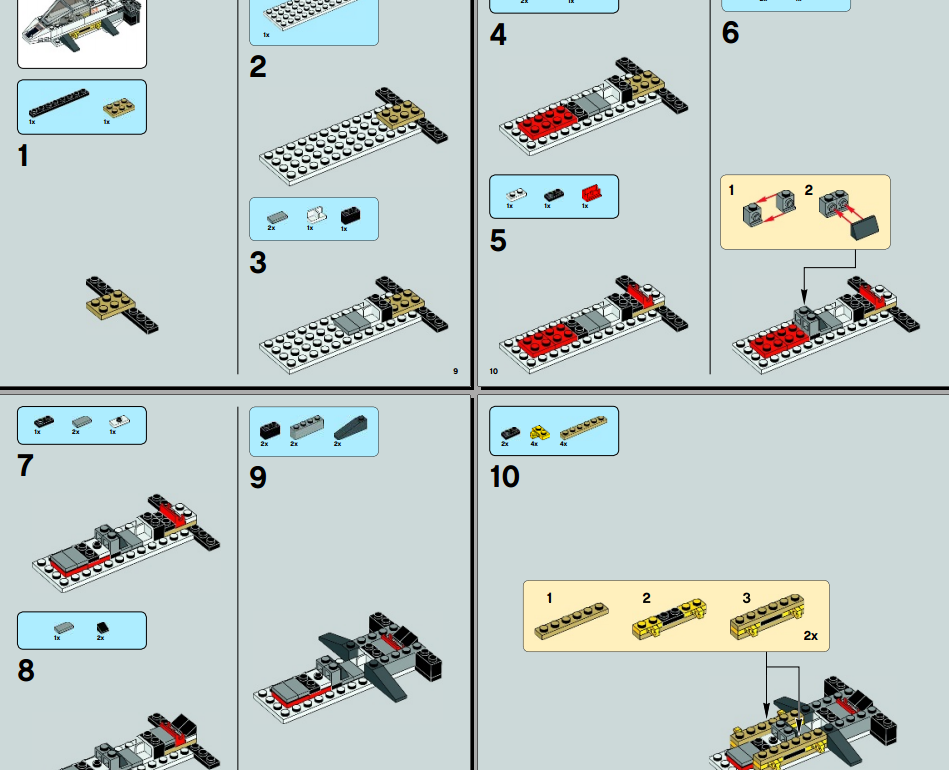
Collect the base
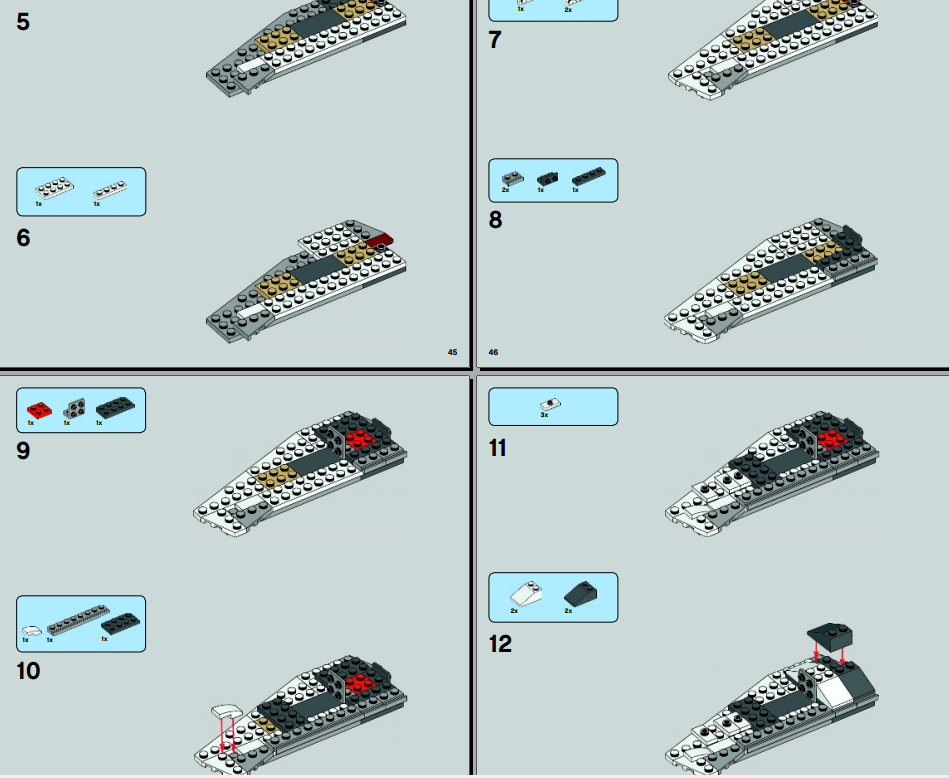
Continue to assemble the fighter body, attaching parts to the place where the arrows indicate.
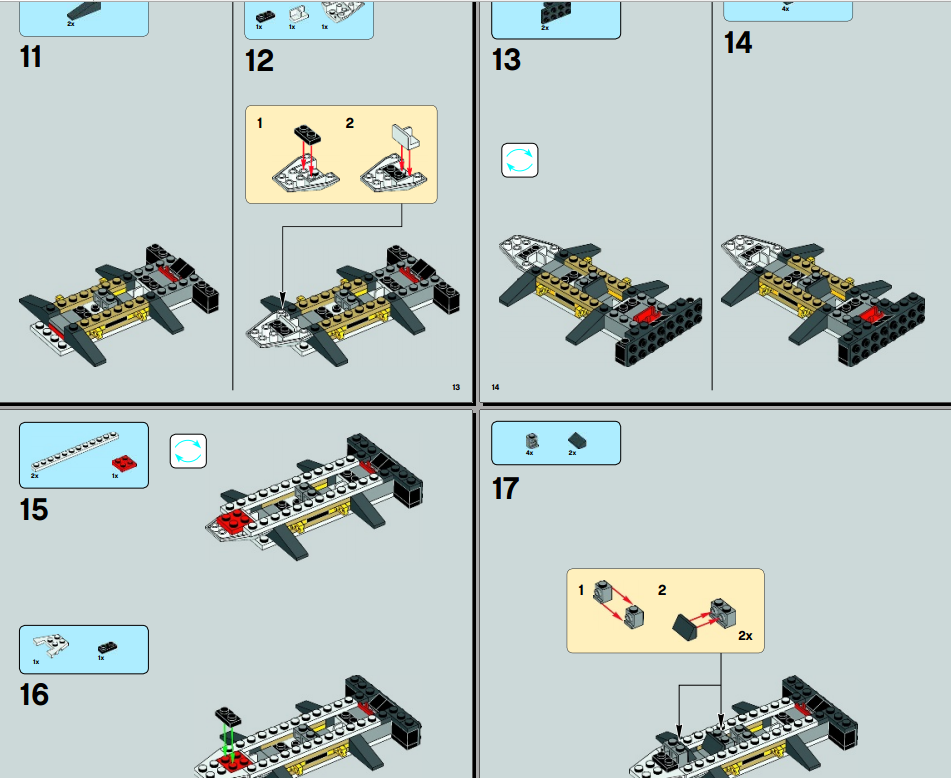
Collect the fighter body
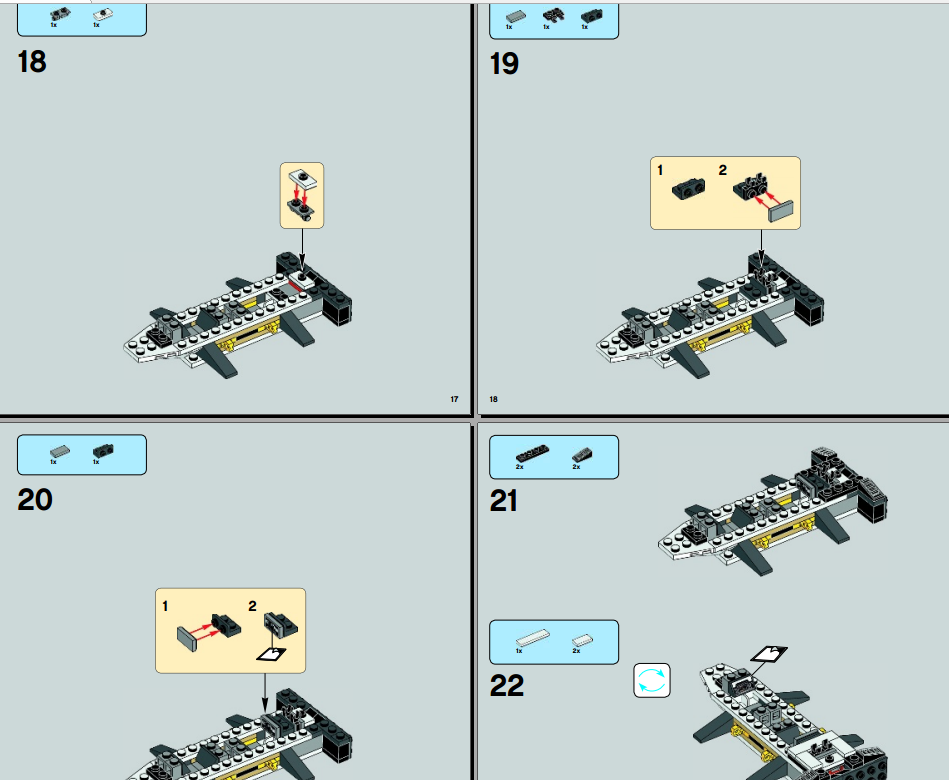
Attach details as shown in the picture
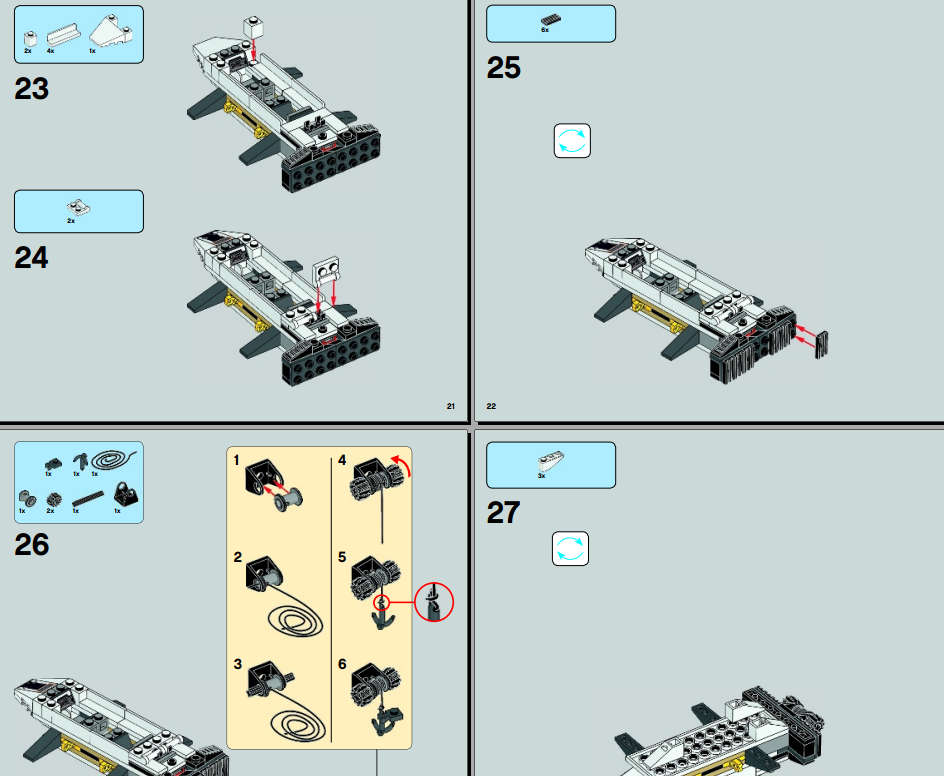
Attach details as shown in the picture
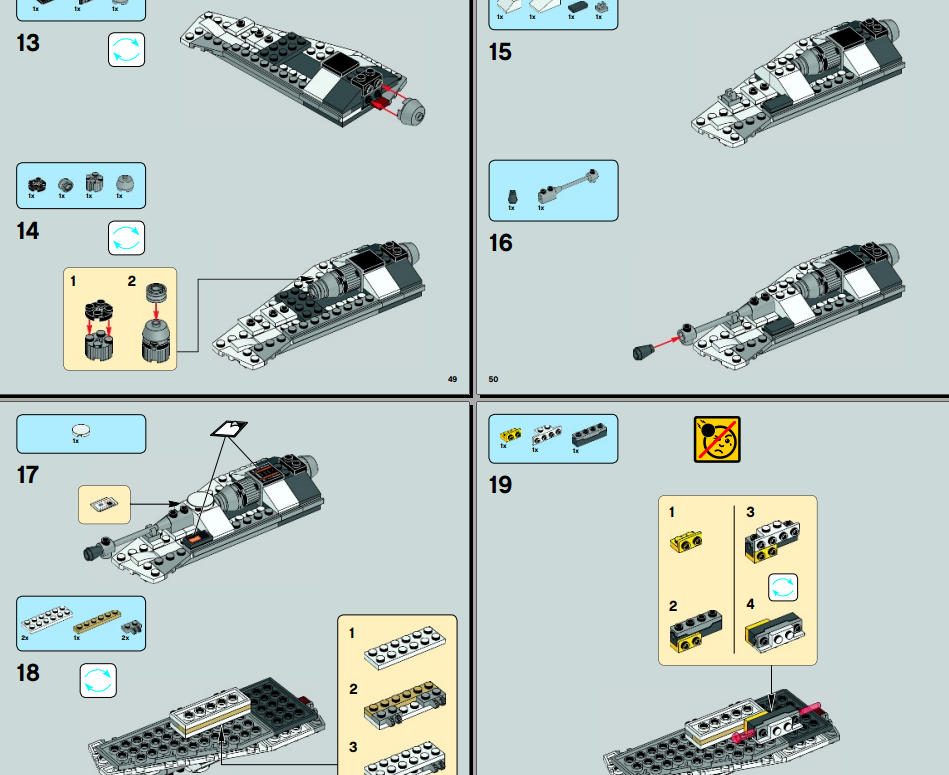
We finish collecting the case: Put the glass and top of the cabin, set the parts in the tail part of the fighter.
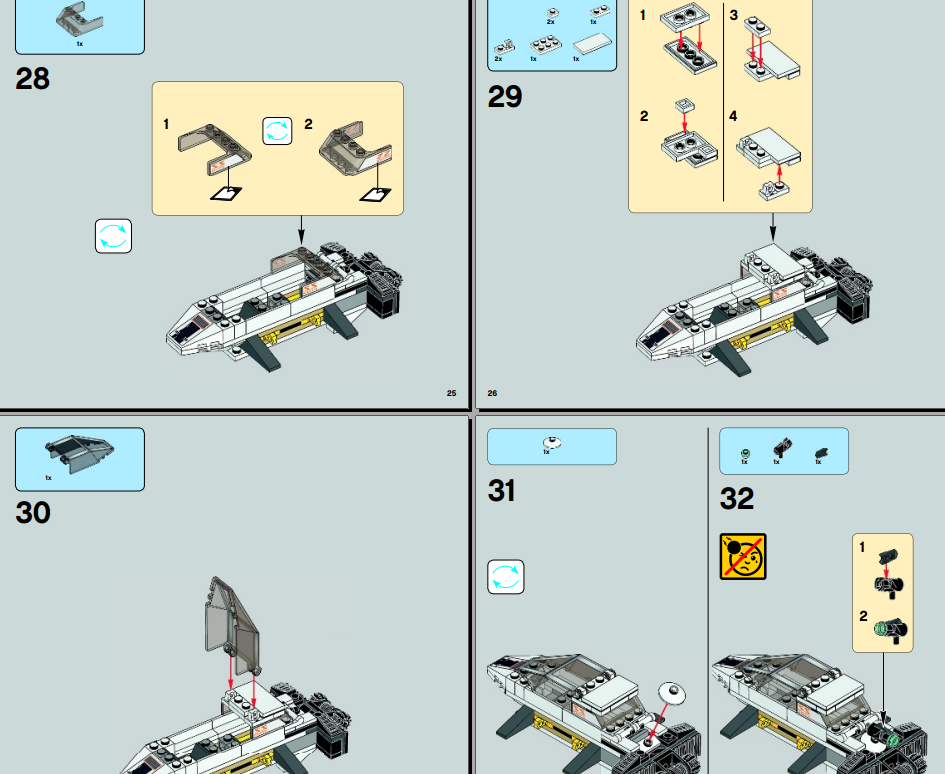
Assembling corps
Now you need to collect wings on which laser blarses will be installed. First assemble the figures, connecting all the elements. Then proceed to assembling the base of the wings.
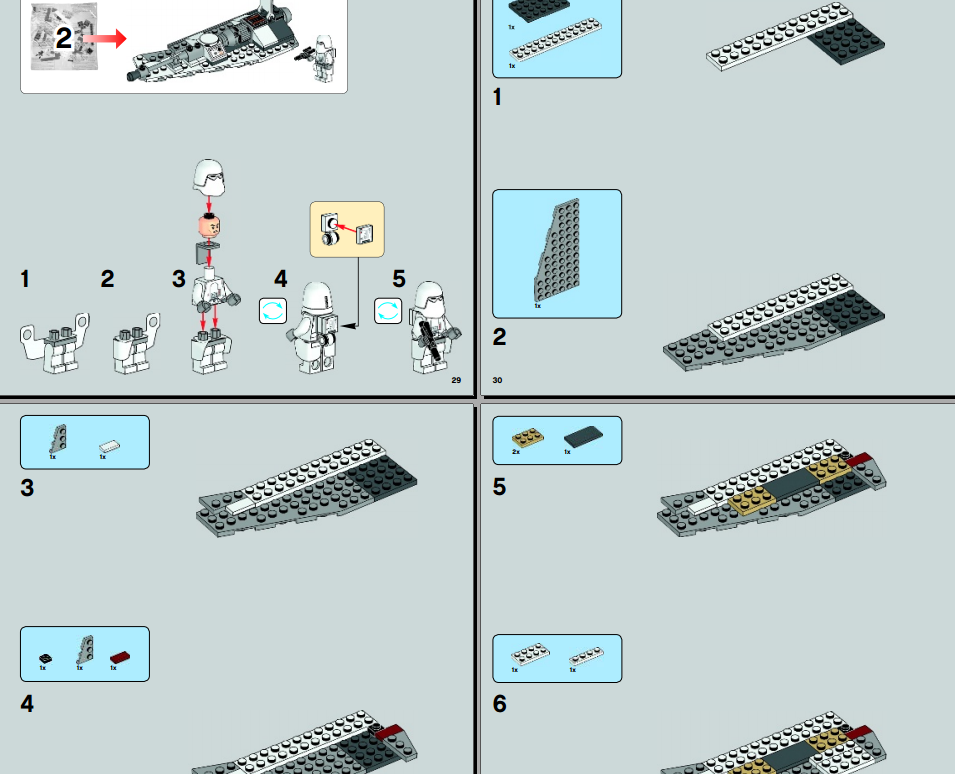
Assembling wings
Install the blocks as shown in the figure below.
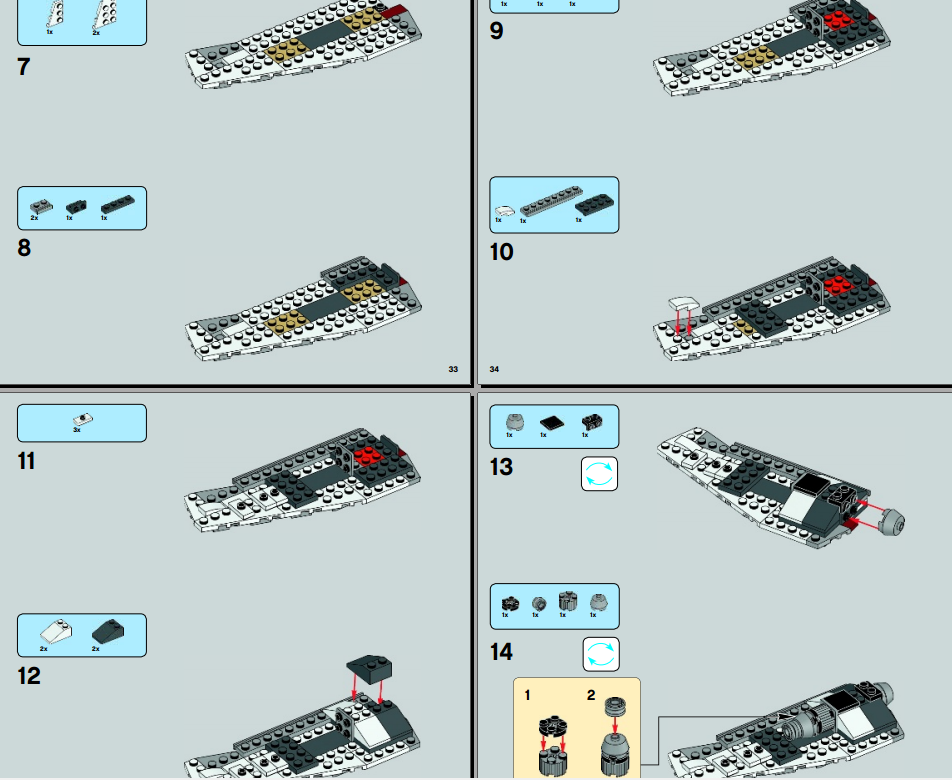
Install blocks
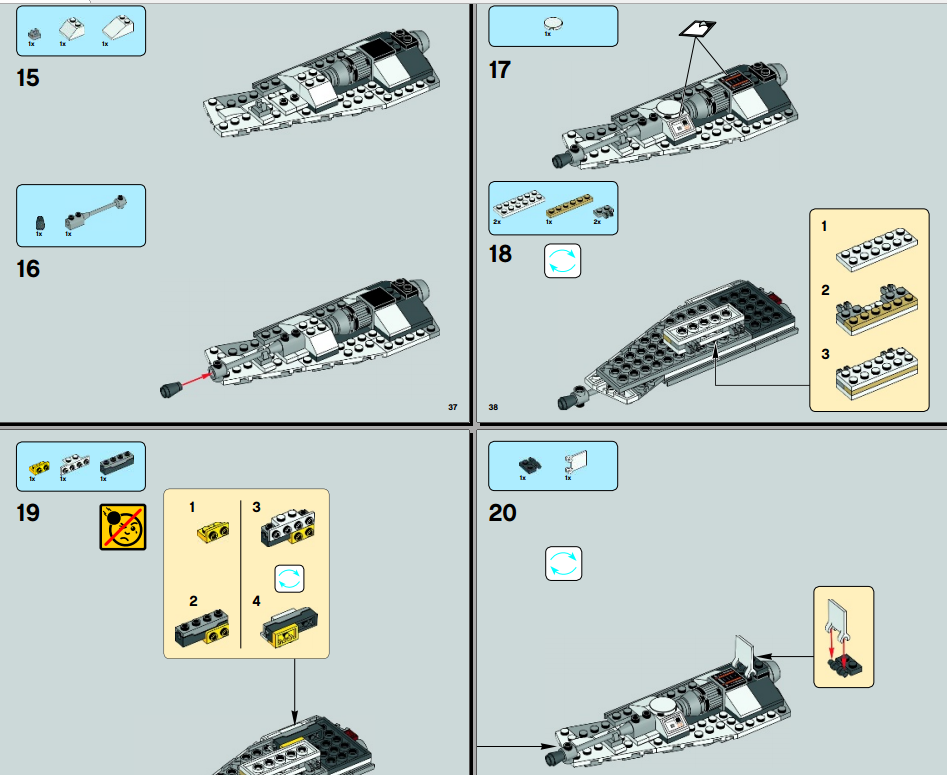
Set the following blocks
Attach the first wing to the center of the fighter.
Attach one wing
Also collect the second wing.
Collect the second wing
Finish the assembly of the second wing
Attach the wing to the center of the fighter. Try how Bluster shoots and harpoon crashes.
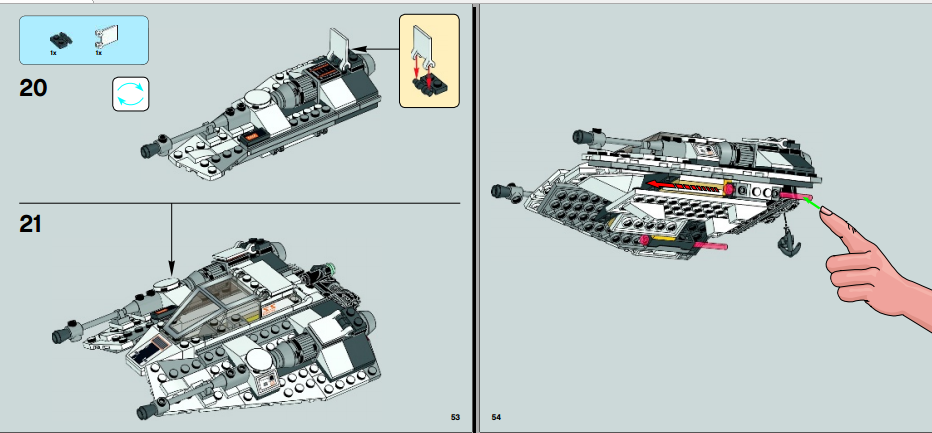
Attach the wing
Take the pilot figurine - the fighter is ready!
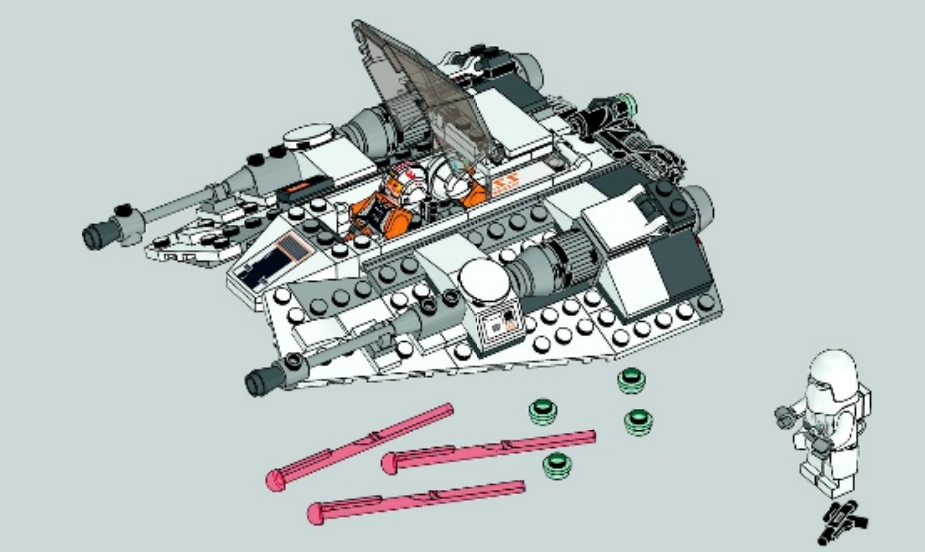
The fighter is ready
DROID Fighter: Scheme, Description, Instructions
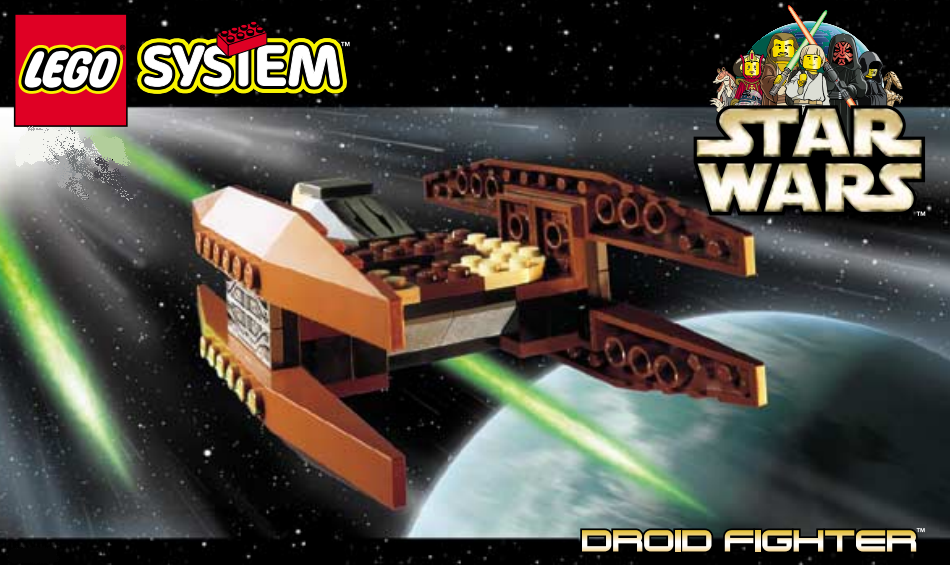
Droid Fighter.
The Droid Fighter functions are similar to the functions of a conventional combat vehicle - beat the attack, protection against attacks and so on. This droid fighter develops good speed. He has excellent acceleration and maneuverability. All this is achieved through a powerful hyperdder. Such a fighter has special shields for protection, armor and weapons. Here is the instruction and description of the assembly process:
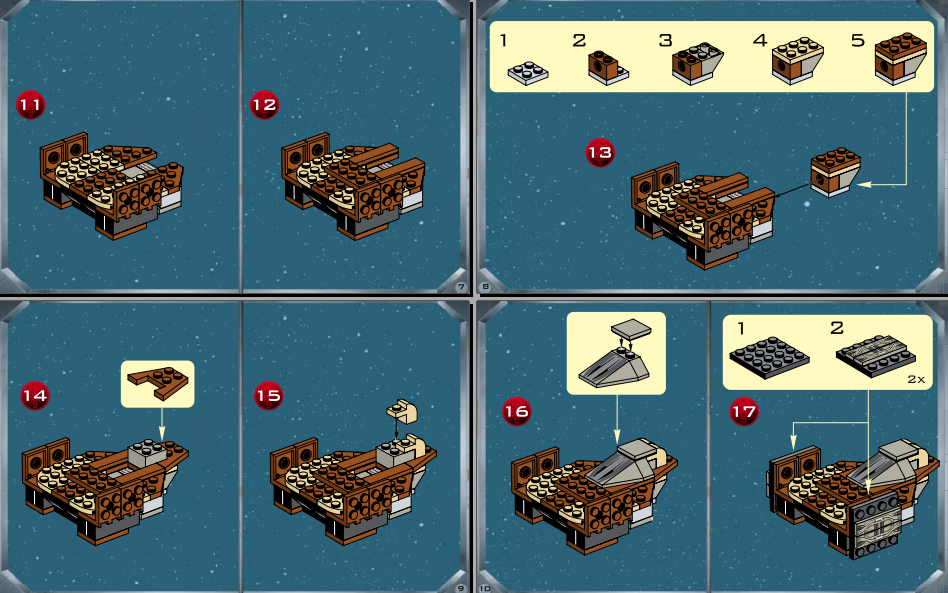
First collect the center of the fighter. On block 2 on 12, put the details as shown in Figure 2-4.
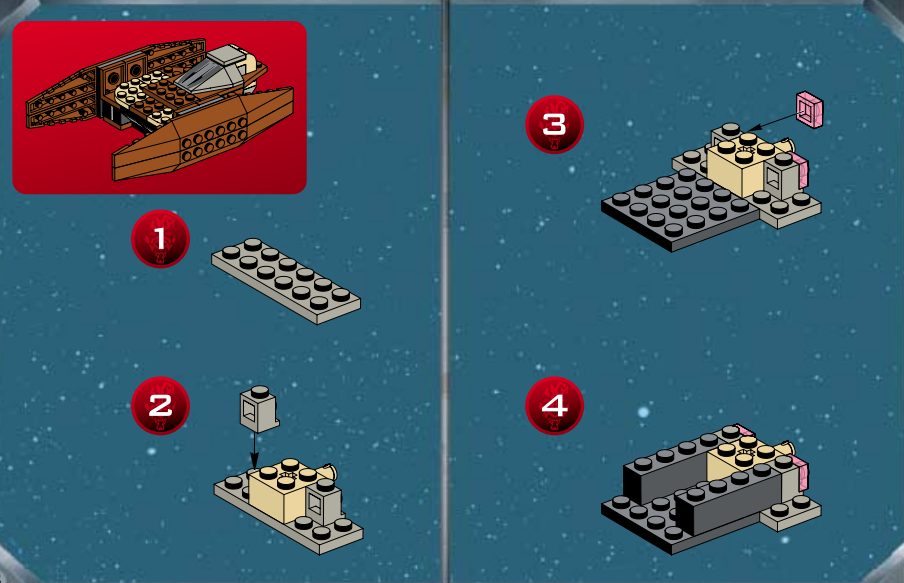
Collect the center
Please note how to collect lateral mount for the attachment of wings. How many blocks to install and where to install them are shown on additional figures below - from 1 to 5.
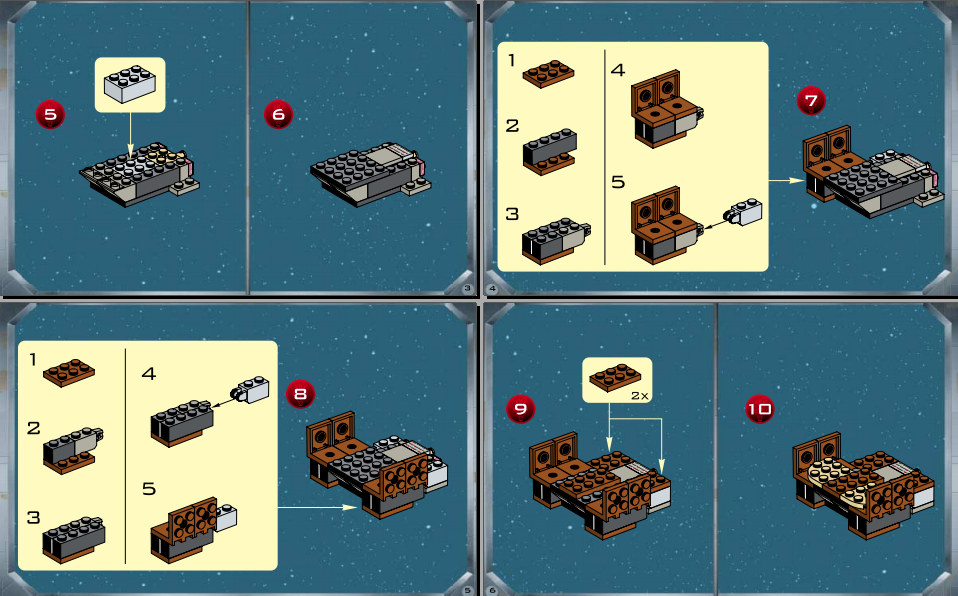
Collect side mount
Continue to collect the fighter center, attach the cab.
Attach the cabin
Attach the side wings - the fighter is ready.
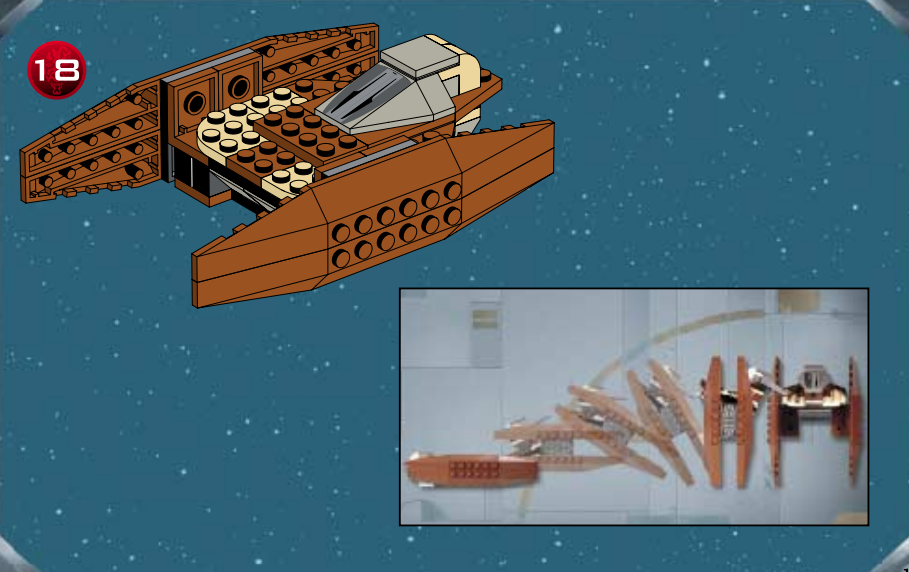
Attach the side wings
The best "Star Wars" from Lego do it yourself: photo
If you already have a lot of experience in assembling models from the Lego Designer, you can start collecting models from "Star Wars". To create a more complex model of a fighter, a phantom, a ship or a stellar destroyer, it will take up to thousands of different parts and blocks. Below you will find the photo of the best "Star Wars" of Lego, created by your own hands. Maybe one of them will inspire you to assemble some famous model from popular saga.
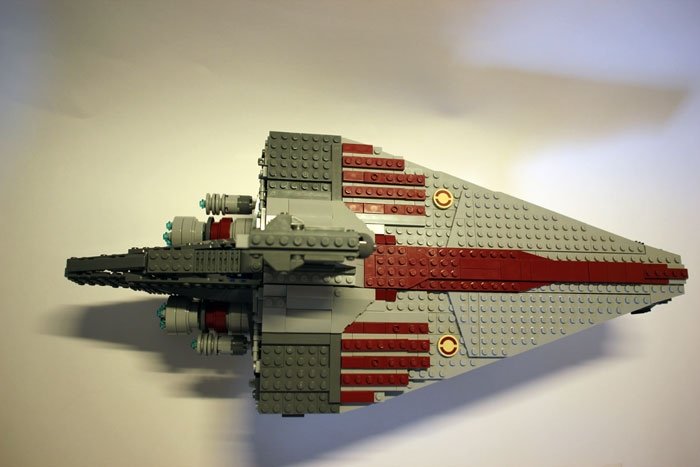
Star destroyer
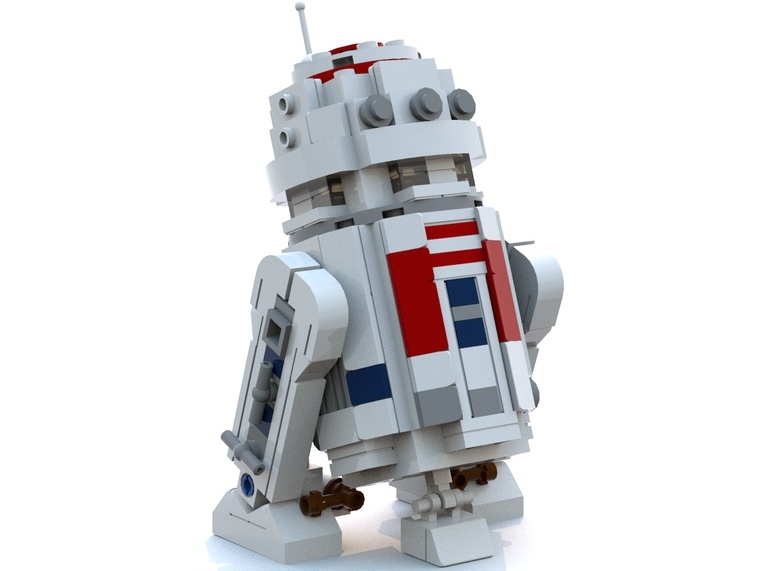
MINI UCS R5-D4
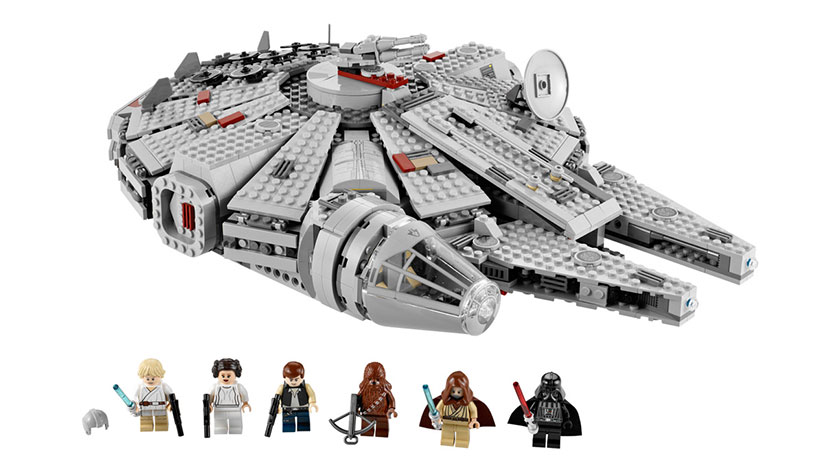
Fighter
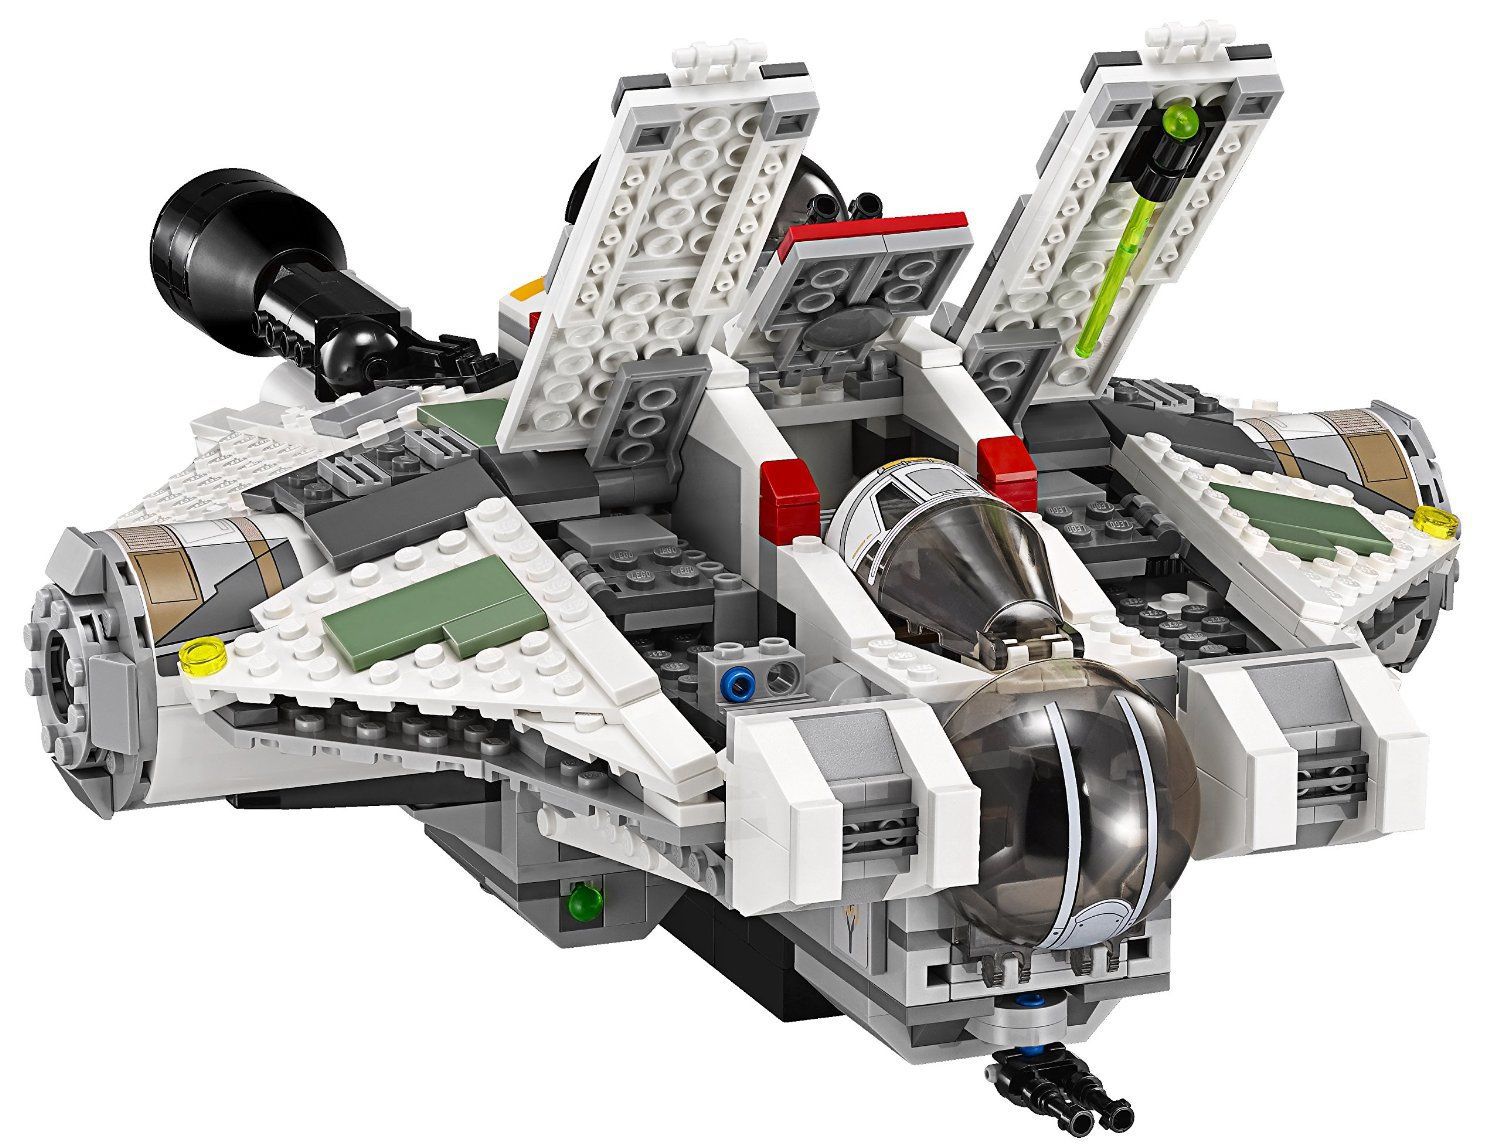
Star ship ghost
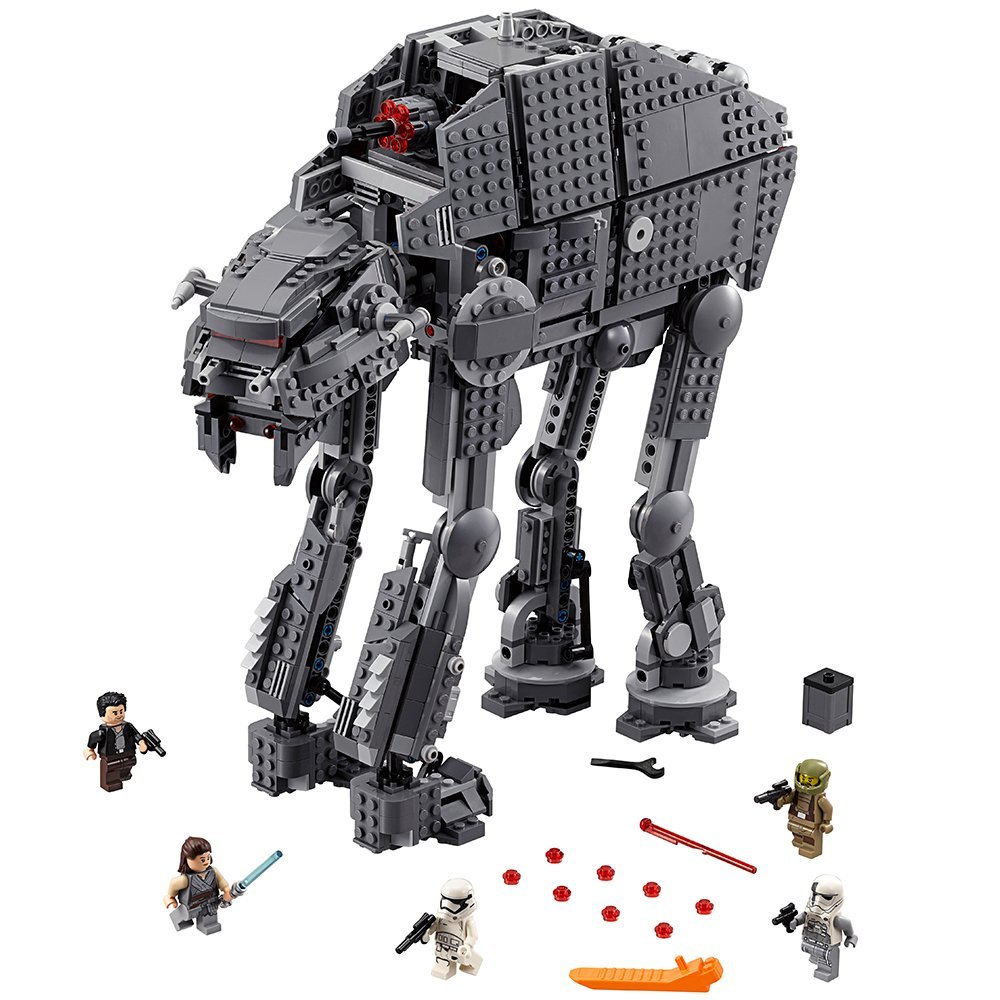
Heavy assault staging
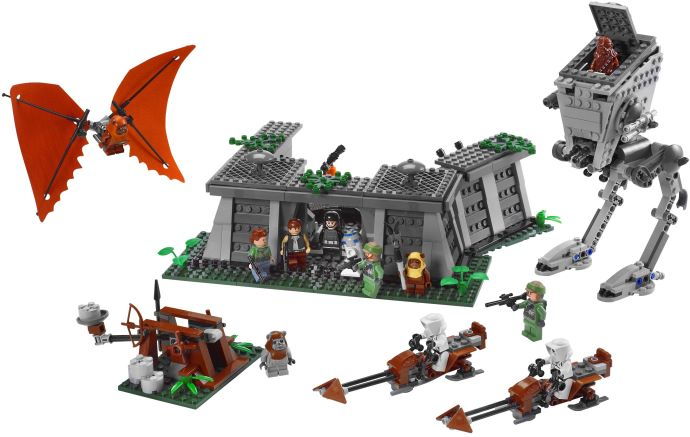
Battle on Endor
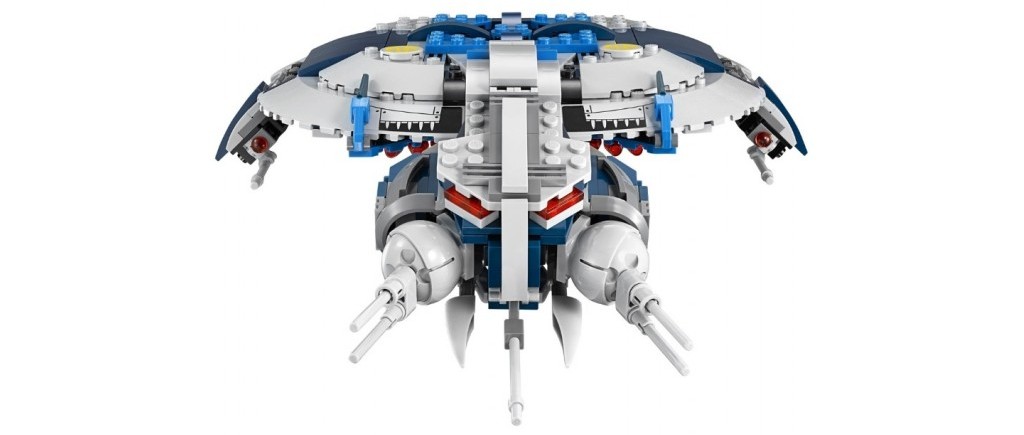
Battle ship droids
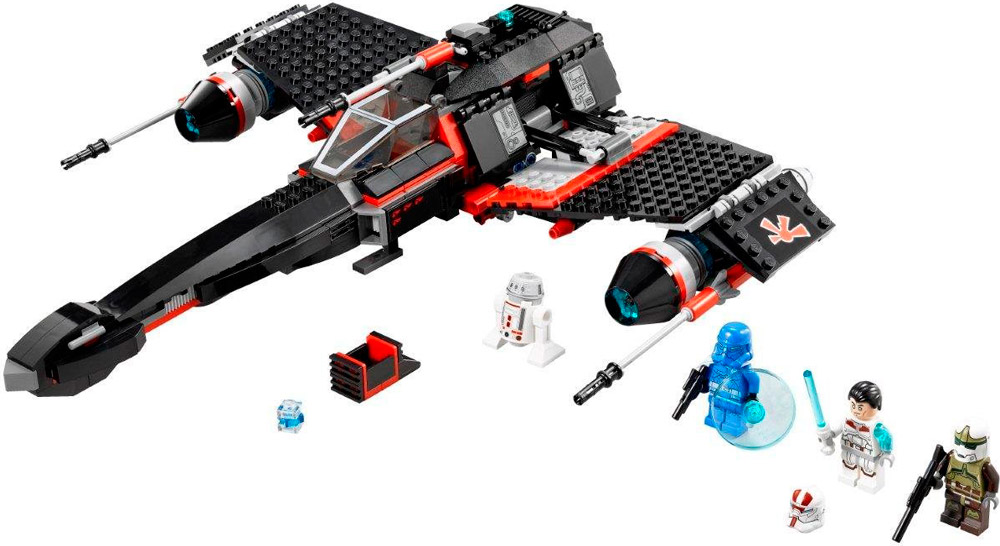
Secret ship warrior JEK-14
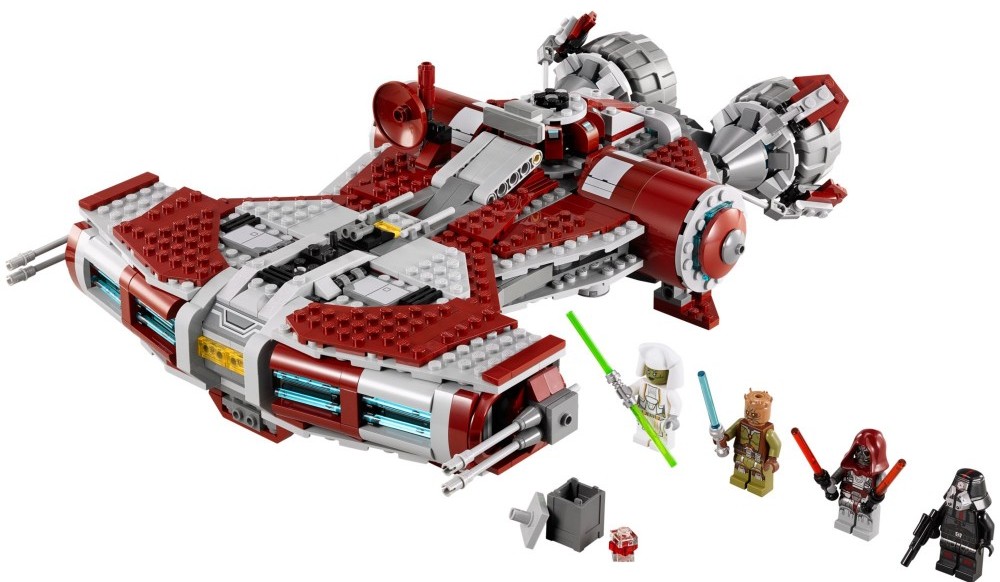
Jedi Defender-Class Cruiser
Look in the video, as you can alone and quickly collect one of the most difficult models "Star Wars".
