Make an unusual postcard with your child by February 23.
The content of the article
- Ideas and postcards templates by February 23 to kindergarten
- Video: Simple postcard for dad for 23 February
- Ideas and postcards templates by February 23 to school
- Video: How to make a postcard a "shirt"?
- How to draw a postcard on February 23 with a pencil and paints with the child?
- How to make a volume card from February 23 with congratulations?
- What postcard by February 23 to make for grandfather and dad?
- What postcard by February 23 to make for a brother?
- Video: Gift for February 23 with your own hands
For each child, his dad is the strongest, courageous and courageous. A real hero, the head of the family. And the defender, even if he did not serve in the army. Therefore, the idea of \u200b\u200bcongratulating dad on February 23, having made an original postcard with your own hands, will be perceived by a preschooler or a younger student with a bang.
Even the easiest drawing drawn by a children's pen touches the heart of the parents. But there are several really interesting and unusual postcards that can be done with the child for the Defender of the Fatherland Day.
Ideas and postcards templates by February 23 to kindergarten
As a rule, by February 23, children in kindergarten are preparing surprises for dads, grandfathers and brothers - congratulatory cards. Their complexity depends on the age of the kids and the creativity of the teacher. For the holiday, kindergartens make:
- drawings
- applications
- crafts made of plasticine, natural material, improvised means
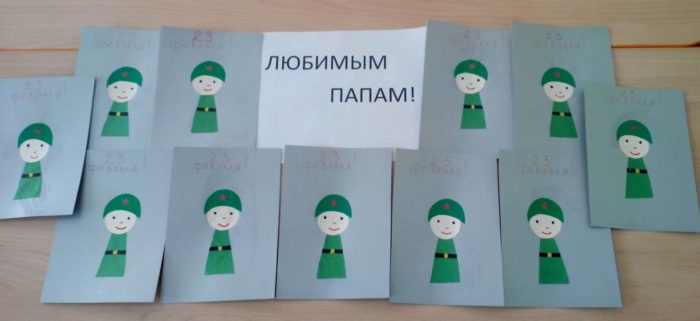
Postcards for dads from children of the younger group of kindergarten.
Important: kids of the nursery and younger groups draw simple cards with two or three colors of gouache paint, make applications on the templates prepared by the teacher. You can also print cards throughout the group and let the children paint them.
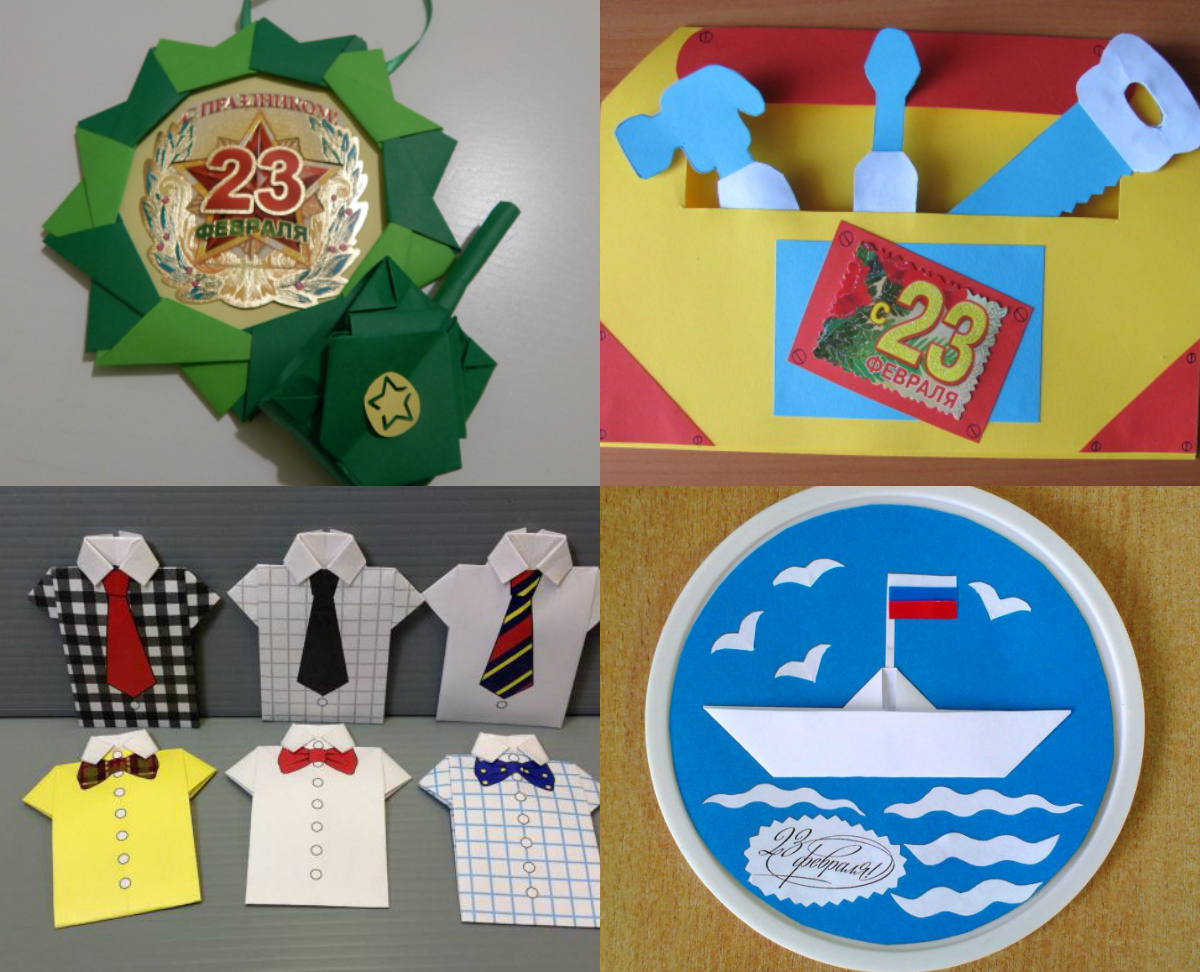
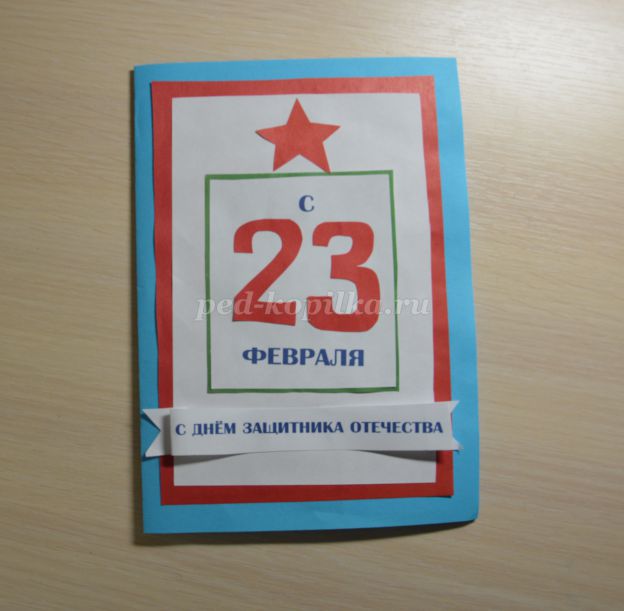
With pupils of medium and preparatory groups, you can make postcards on February 23 in the form of medals.
For the simplest version of the postcard - the medals will be needed:
- sample
- white and colored cardboard (or colored paper)
- ruler
- pencil
- glue
- scissors
- paints, colored pencils
- a satin ribbon
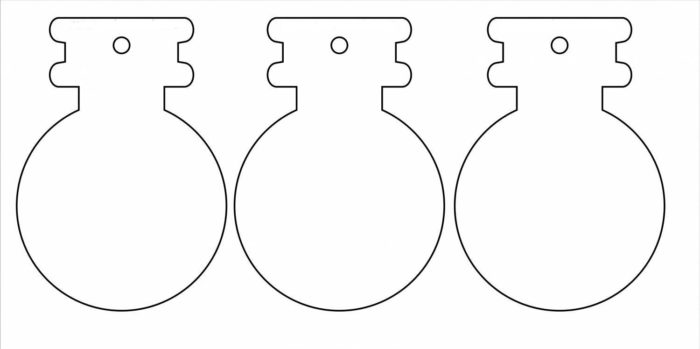
Template for postcards - medals.
Decor for postcards - medals.
- The patterns of medals and jewelry are transferred to cardboard or colored paper and carefully cut out.
- Children glue jewelry to the medal. These jewelry can be very different, from a five -pointed star and the number of “23” to various military equipment, a suitcase with tools or attributes of various male professions.
- You can transfer templates to white paper and ask the kids to paint them.
- From the back side, the satin ribbon folded on the medal is glued to the medal.
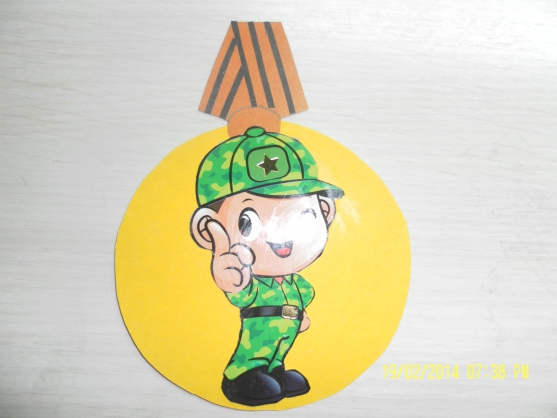
A postcard by February 23 in the form of a coin.
A voluminous medal is very beautiful - a frame for a photo, it is more difficult to make it. But with the help of the teacher, the children will succeed. Children will need:
- color paper 2-3 colors
- cardboard
- pencil
- scissors
- glue
- ruler
- round item, for example, a glass
- ribbon
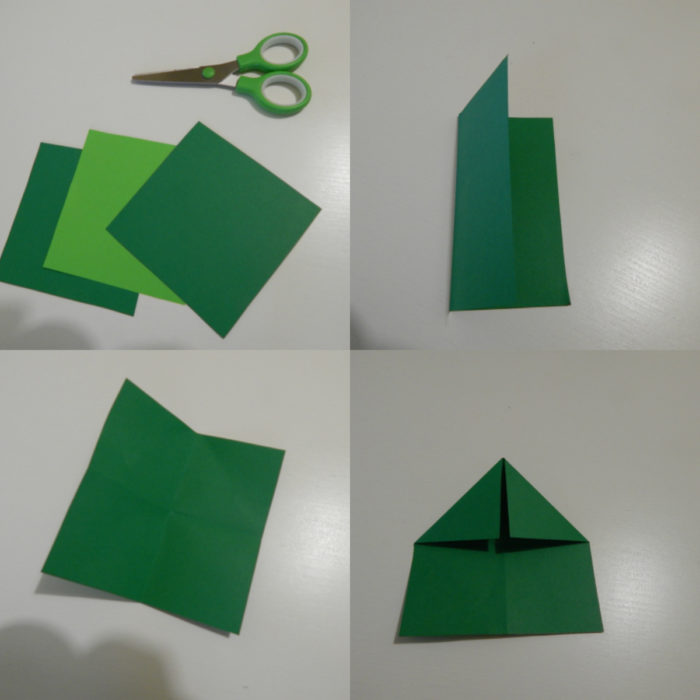
Volumetric postcard - Medal by February 23: The first stage of manufacture.
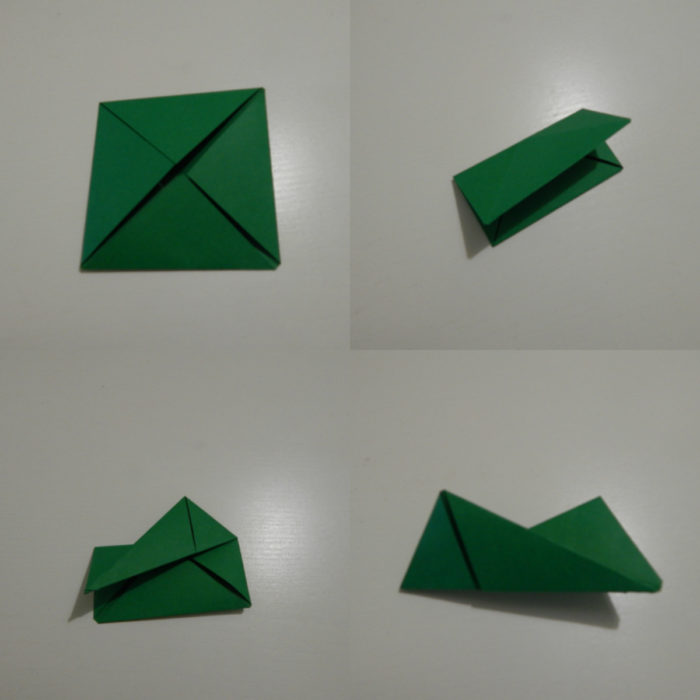
Volumetric postcard - Medal by February 23: The second stage of manufacture.
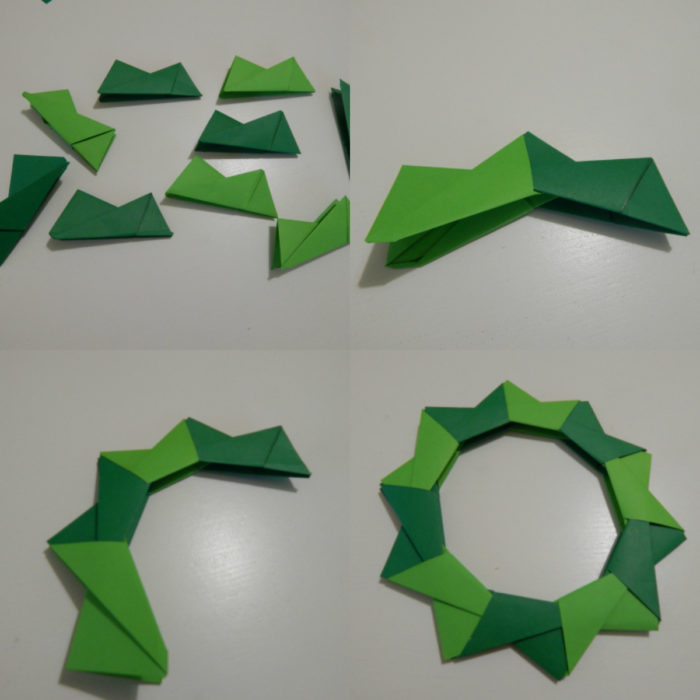
Volumetric postcard - Medal by February 23: The third stage of manufacture.
- At the first stage of manufacturing the postcard, the teacher gives children 10 squares from colored paper in size 10 by 10 cm.
- Each of the squares of children should try to fold according to the scheme that the teacher shows. This is a very good training of fine motor skills.
- Children repeat the folding procedure for all 10 squares.
- The resulting parts of the "frames" are joined with each other and glue.
- Children are applied to the cardboard sheet of a round shape, it will be the base of the coin - cards.
- The teacher offers the kids to decorate the medal on one side, for example, glue the number “23” cut out of colored paper, or some ready-made template on it.
- On the other side there should be a photograph of dad.
- The final step will be gluing the ribbon.
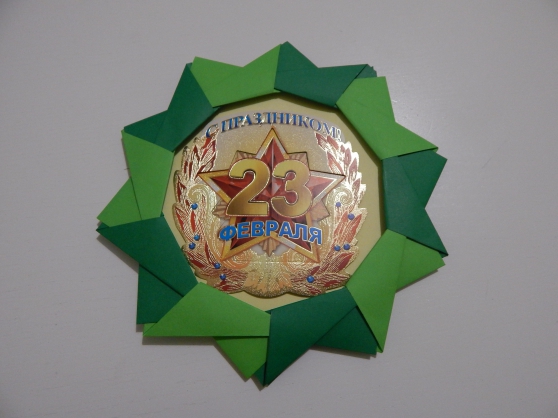
Congratulations on the postcard are medals.
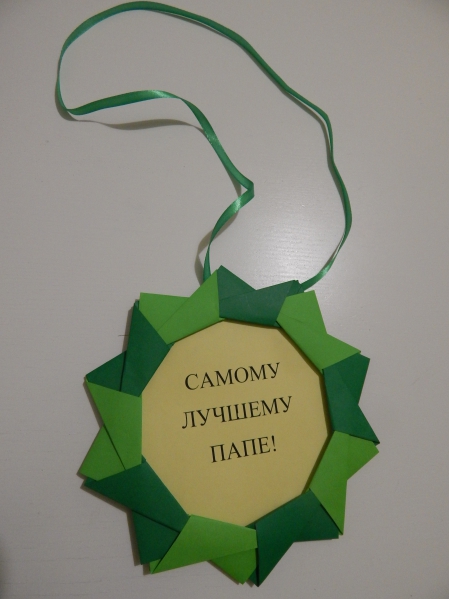
Volumetric cards - a medal by February 23.
VIDEO: Simple postcard for dad for 23 February
Ideas and postcards templates by February 23 to school
A schoolboy can please men from his family with a cord in the form of a shirt. Most likely, he will cope with this task himself, but let his mother be near and help in which case.
For postcards, shirts are needed:
- cardboard color
- colored paper
- pencil
- scissors
- ruler
- glue
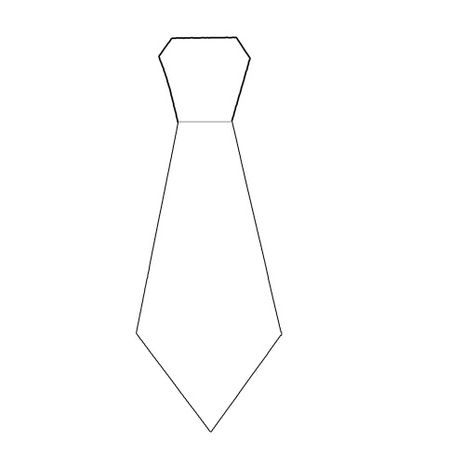
A tie for a postcard is a shirt.
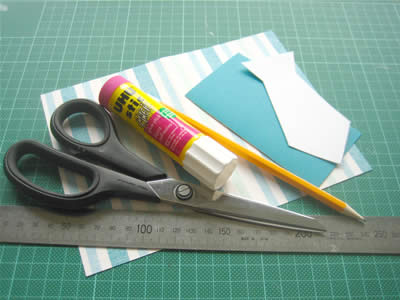
Materials and tools for postcards - shirts by February 23.
- The tie will be cut out of colored paper. A child can draw its contour by a pencil and a ruler or transferred from a template.
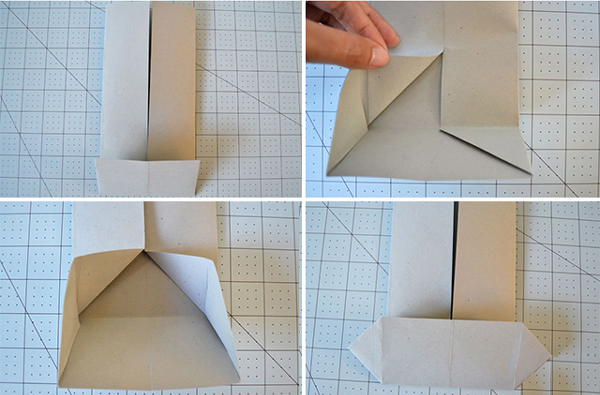
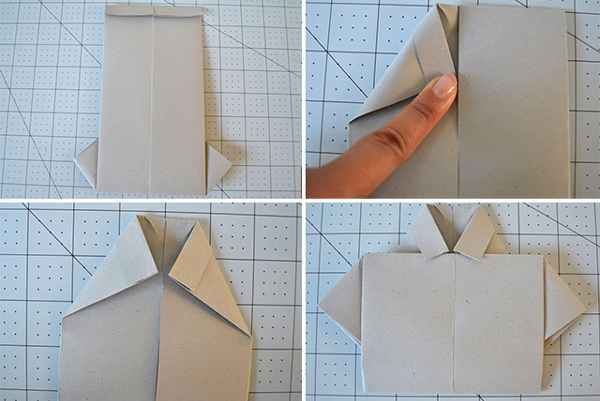
- A sheet of colored cardboard is folded in half.
- On top of the left half of the sheet, the child notes the middle, from it down it lays 3 cm.
- The corners of the cut, the child bends to the side and outward, turns out the collar of the shirt.
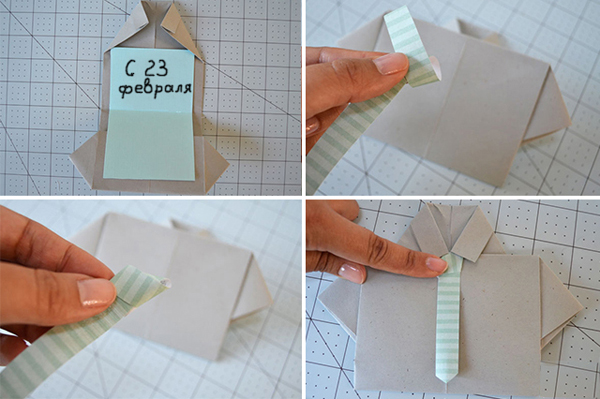
- A tie from colored paper is started slightly under the collar of the shirt and glued there.
- Inside the postcard, the student writes congratulations since February 23.
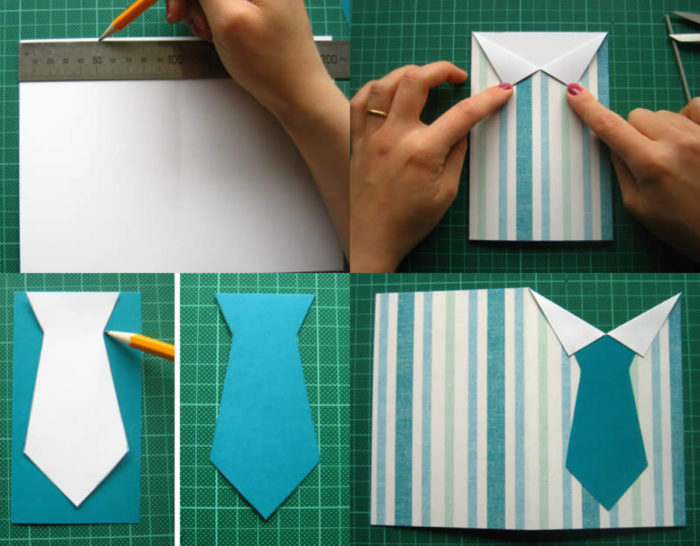
Stages of manufacturing postcards - shirts by February 23.
If desired, a postcard - a shirt can be “dressed” in a jacket or military tunic.
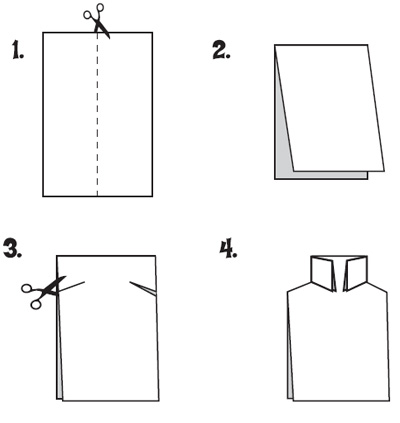
Cards manufacturing scheme - shirts.
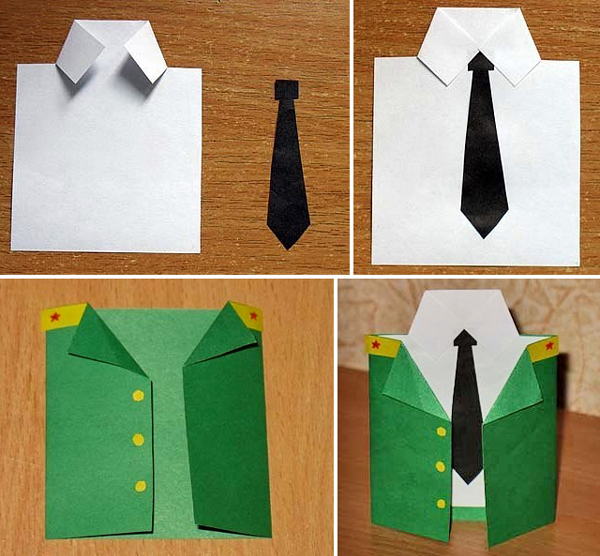
A postcard is a shirt in a military tunic.
If the student is fond of Origami, it will not be difficult for him to make a voluminous postcard - a shirt. This scheme will help.
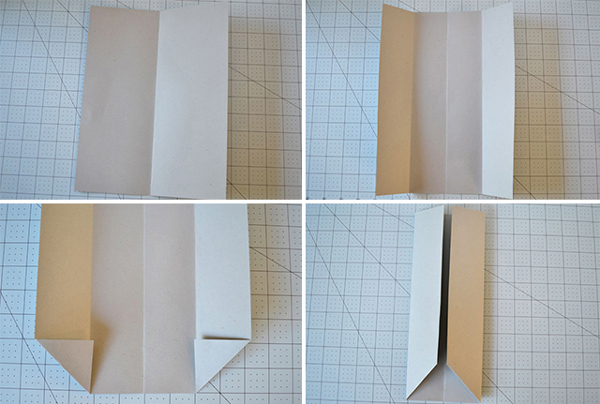
Postcard-Origami shirt: Stages 1-4.
Postcard-Origami shirt: Stages 5-8.
Postcard - Origami shirt: Stages 9 - 12.
Postcard-Origami shirt: Stages 13-16.
And here is a scheme for folding a tie.
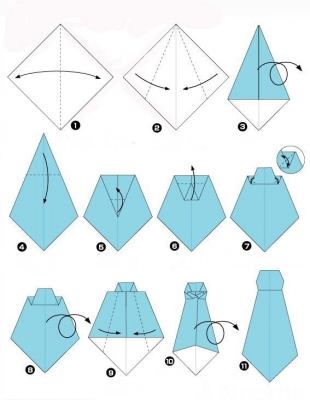
Folding diagram of a tie for postcards.
VIDEO: How to make a postcard a "shirt"?
How to draw a postcard on February 23 with a pencil and paints with the child?
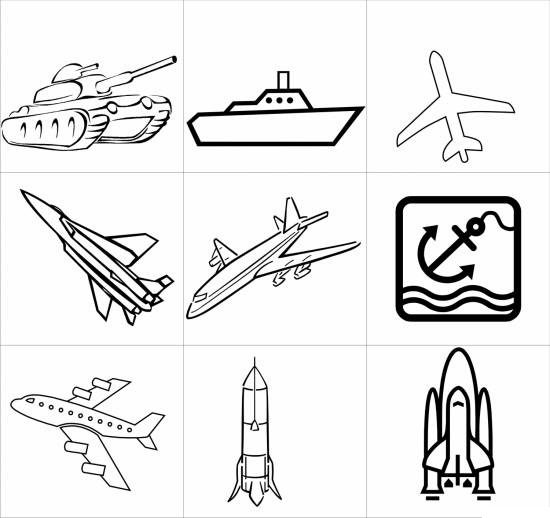
If the child is small, goes to the kindergarten, it will be very nice if he draws a portrait of dad or grandfather on a postcard on February 23. You can already think about the design "Design". On the postcard, you should place the attributes of the defender of the Fatherland Day:
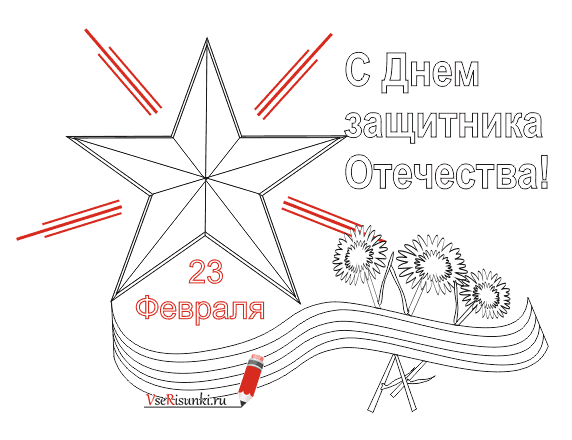
- inscription "From February 23"
- five -pointed red star
- st. George ribbon
- carnation of a soldier
- tank
- airplane
- other military equipment
For drawing, you will need:
- album sheet
- pencil
- ruler
- circular or stars template
- color pencils, felt -tip pens or paints
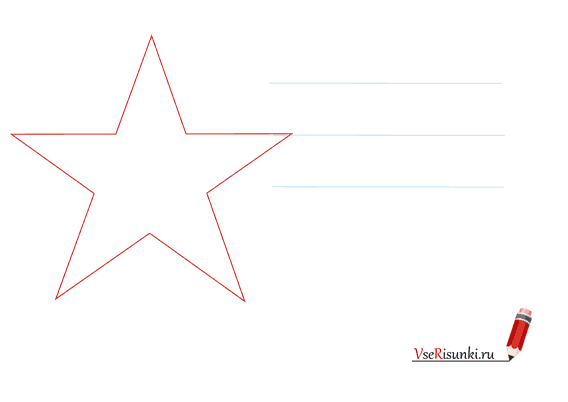
Postcard by February 23 with a pencil: Stage 1.
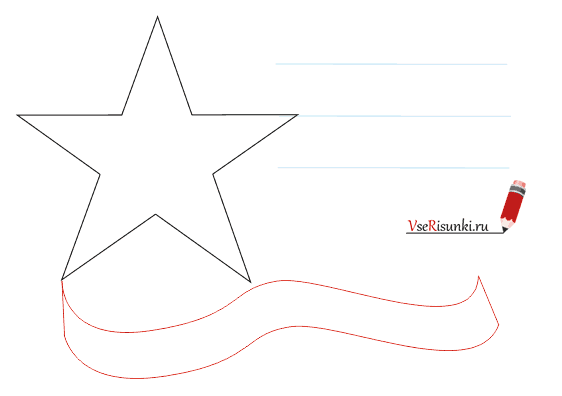
Postcard by February 23 with a pencil: Stage 2.
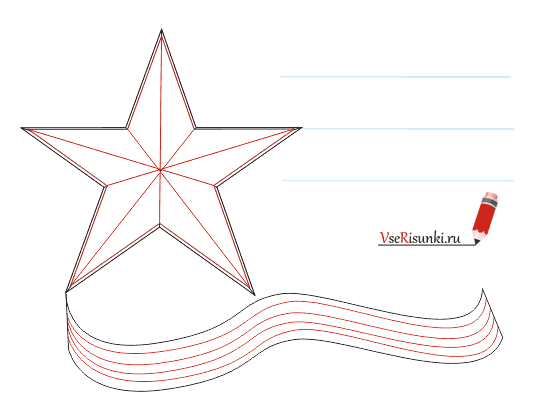
Postcard by February 23 with a pencil: Stage 3.
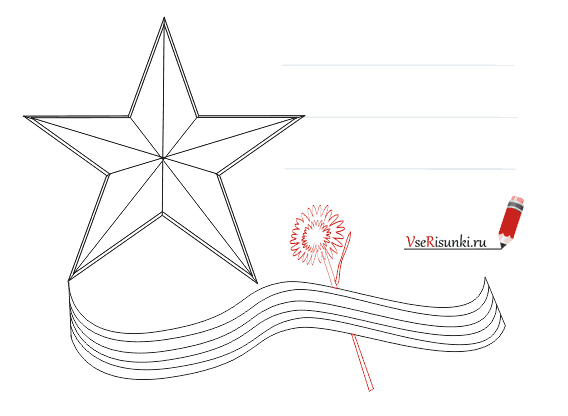
Postcard by February 23 with a pencil: Stage 4.
Postcard by February 23 with a pencil: Stage 5.
Postcard by February 23 with a pencil: Stage 6.
Postcard by February 23 with a pencil: Stage 7.
Postcard by February 23 with a pencil: Stage 8.
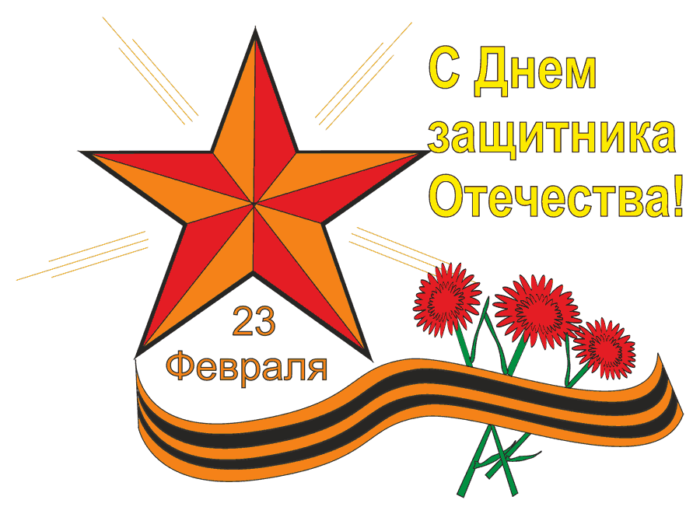
A postcard by February 23 with a pencil.
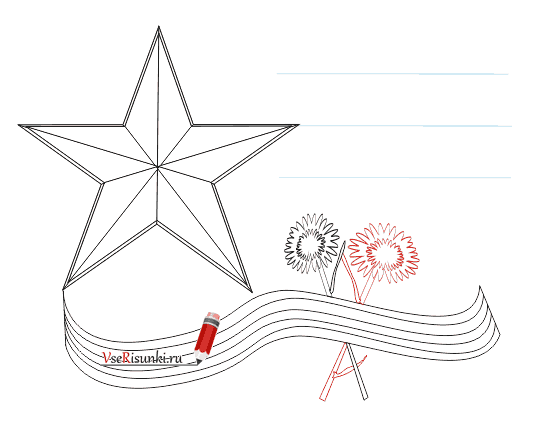
- A sheet of paper is marked. There will be: a five -pointed star, St. George’s ribbon, cloves, signature “From February 23!”.
- The most difficult thing is to draw a five -pointed star. Ideally, a child can do this with a compass and a ruler using a scheme. If it’s too difficult, the stars template are printed, cut out and circled on paper.
- At the bottom of the star, from one of its "legs" they draw a St. George wavy tape.
- Inside the star, from its center, draws the edges.
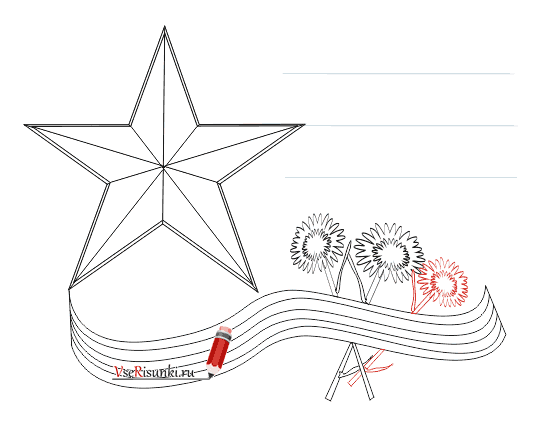
- Start drawing flowers. They will be behind the tape, in the opposite of the star, the corner of the sheet. There will be three flowers.
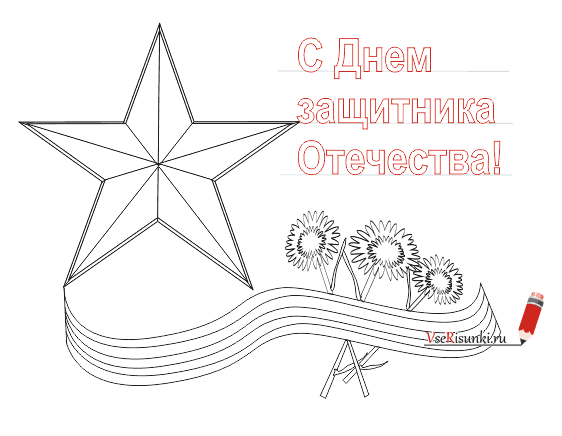
- Over the flowers, the lines on which the text of congratulations are written in a subtle, sketch.
- Decorate the drawing with additional lines.
- They paint the postcard at their discretion with pencils, felt -tip pens or paints.
On a children's postcard, a dad or grandfather for the Day of the Defender of the Fatherland can be drawn a tank.
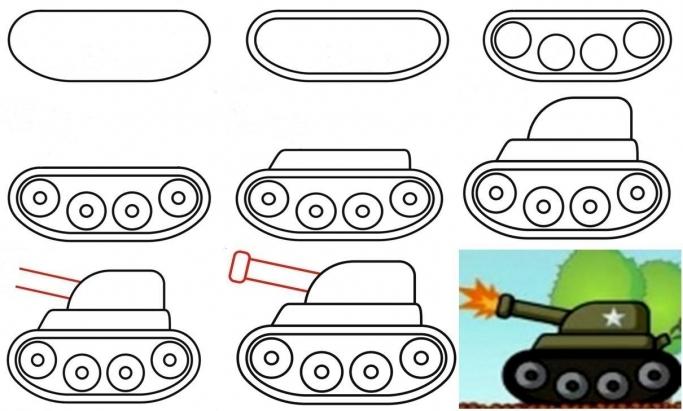
The drawing of the tank for the postcard by February 23.
- They begin, as always, with the marking of the sheet.
- First, the child draws a workpiece under the caterpillars of the tank. They will be almost along the entire length of the lower half of the sheet. Caterpillars are a straight line from above and half of the oval below.
- The fall, flattened from above, is repeated inside. Next, the child draws the wheels - large circles, inside of which there are smaller circles.
- The child proceeds to the tank tower - on top of the caterpillars depicts a rectangle, slightly rounding the corners. The length of the rectangle should be slightly less than the length of the caterpillars.
- On top of the rectangle, a trapezoid of lower length and larger height is drawn, also with rounded corners.
- The tank trunk forms two parallel lines that the child removes from the tank's trunk. At the free end, the line is connected by a flattened oval - a muzzle.
- The child decorates and paints the tank at his discretion.
How to make a volume card from February 23 with congratulations?
To make a volume card by February 23, the child will have to make efforts, show imagination, spend time. But it’s worth it: men in his family are very happy with the original craft. A postcard will be with a ship at sea.
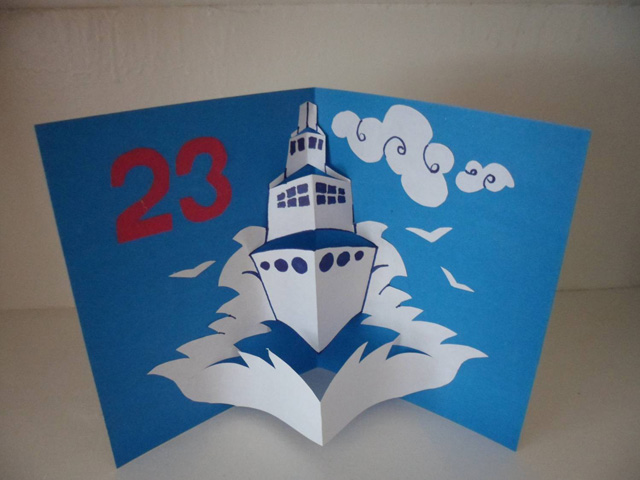
Option of a volume postcard by February 23.
First, you need to download and print the templates of the most voluminous ship and postcard decor.
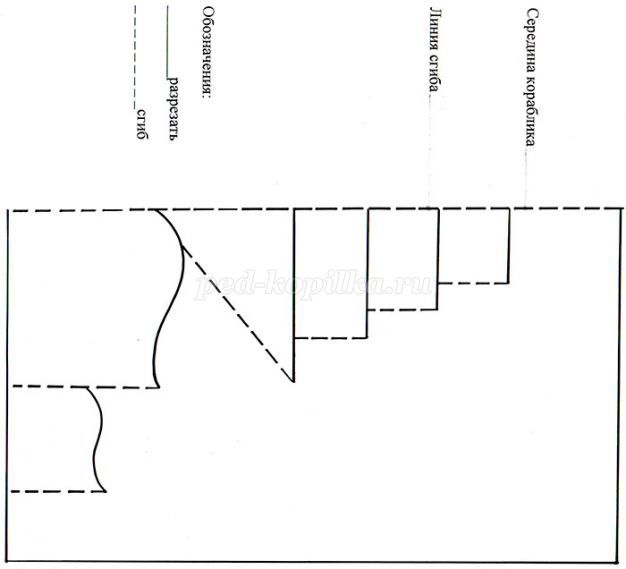
Ship template.
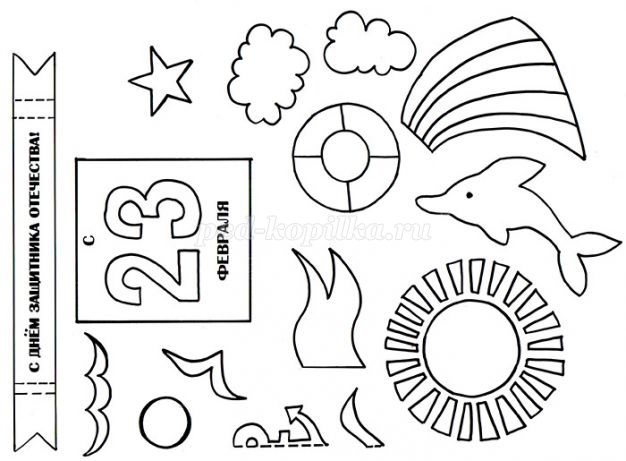
Decor template.
You will need:
- white paper
- colored paper
- scissors
- glue
- pencil
- ruler
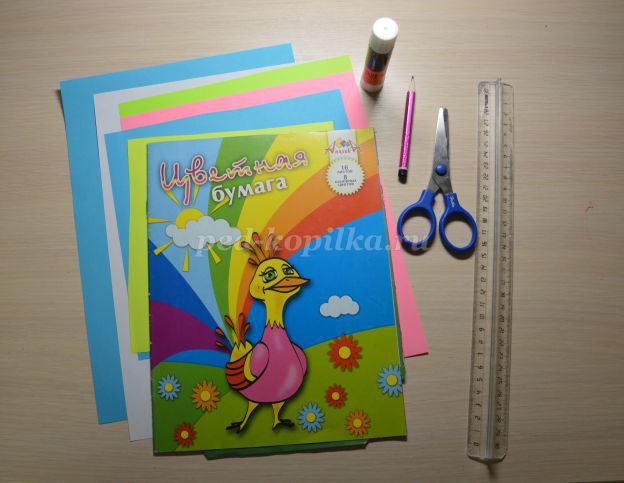
Materials and tools for the manufacture of volumetric postcards.
- First they work with a sheet of white and a sheet of colored paper. The white sheet is cut so that from all sides there is less than the color per 1 cm.
- Both sheets are folded in half.
- The ship’s template is transferred to the white sheet.
- Direct lines are cut. Fold the boat on dashed lines.
- They unfold the sheet, straighten the lines so that the boat turns out.
- The white sheet is glued to the color, in turn: one side, middle, the second side.
- A closed postcard dries under the press. At this time, the patterns of decorative elements are transferred to colored paper and cut them out.
- A dried card is designed inside and out.
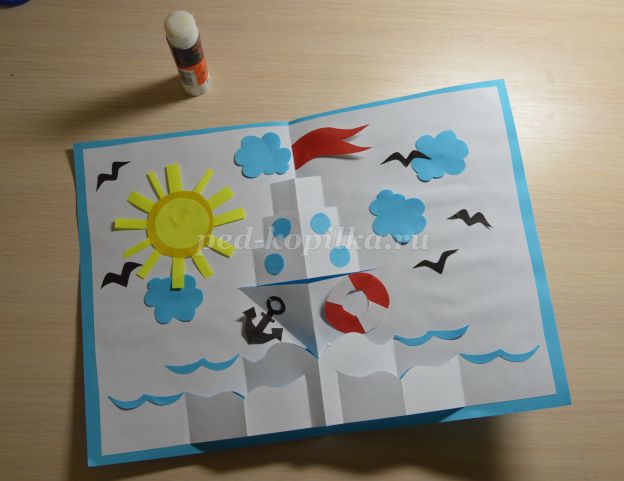
The design of the volumetric postcard by February 23 is inside.
Design of the outside of the volumetric postcard by February 23.
What postcard by February 23 to make for grandfather and dad?
By February 23, a child can make a card in the form of a box with instruments for a grandfather and dad.
You will need:
- sample
- colored paper
- simple pencil
- markers or gel pens
- scissors
- ruler
- glue
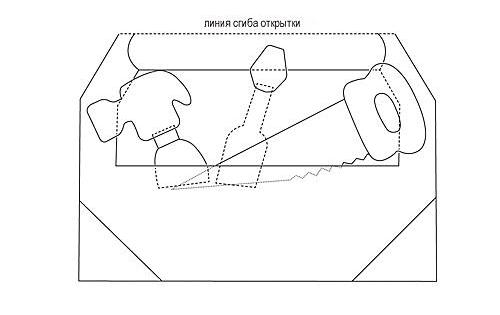
Template for postcards by February 23 in the form of a box with tools: Option 1.

Template for the postcard by February 23 in the form of a tool box: Option 2.
- The template is printed in duplicate: one will go to the box, the second - to the tools.
- Elements of the postcard are cut out of paper of different colors. The box will be of the same color, its pens and corners will be the other. You can make rivets on the corners.
- The tools will also be multi -colored: metal elements and handles. The contours of the tools are drawn by markers or gel handles.
- Tools or glue to the postcard.
- On a rectangular piece of paper, a wish is written to dad or grandfather. This leaf is glued to the suitcase.
- Here are a few more options for designing such a postcard.
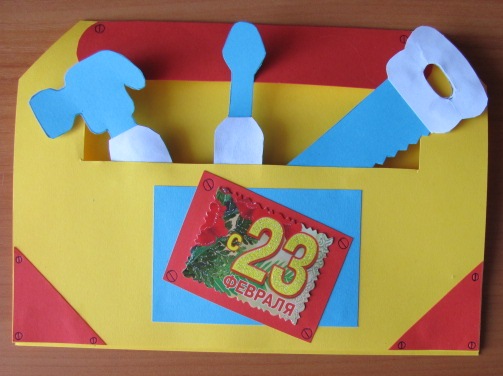
Postcard dad or grandfather by February 23: A box with tools.
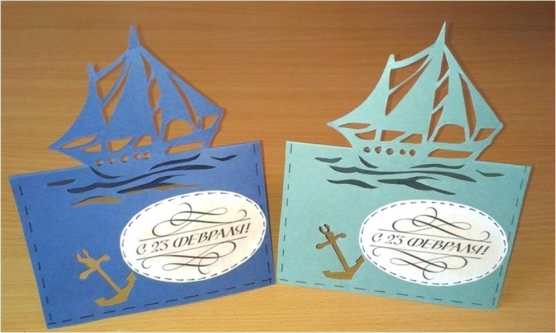
What postcard by February 23 to make for a brother?
By February 23, you can make an elegant card with a carved boat by February 23. For her you will need:
- sample
- colored paper is dense or cardboard
White paper - scissors (small, possibly manicure)
- glue
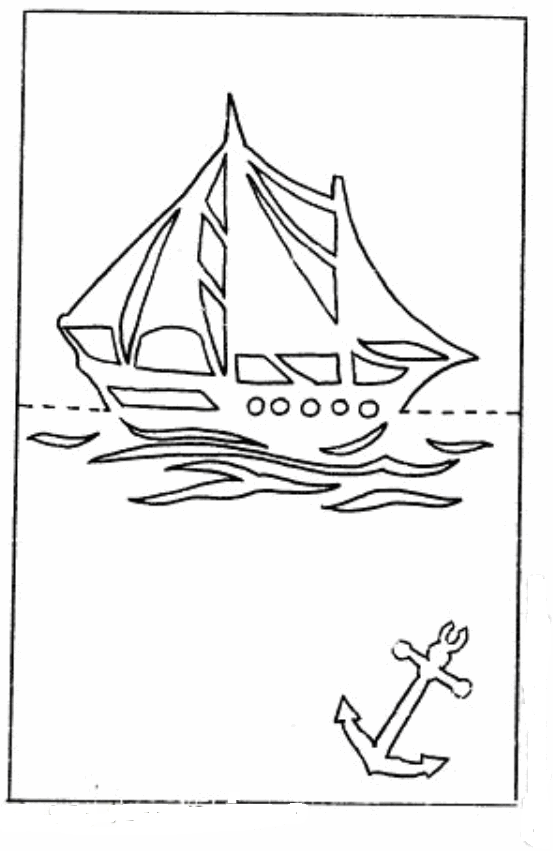
Postcards template for brother by February 23.
- Ship and wave template are transferred to colored paper
- The drawing is cut through and through, very neatly.
- The card is folded on the fold line.
- A rectangle equal to half of the postcard is cut out of cardboard of the same color. It is glued on the side where the slots remained from the ship.
- Decorate a card with a congratulatory inscription and dashed line.
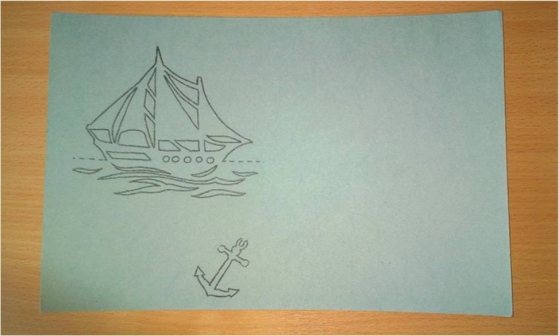
Postcard to brother by February 23: Transfer of the template.

Postcard to brother by February 23: Cutting.
Postcard to brother by February 23.